Arduino is an open-source electronics prototyping platform: a family of microcontroller boards paired with a development environment (IDE) and a vast ecosystem of libraries and shields, designed to make embedded electronics approachable. This page is the hub that gathers every tutorial related to Arduino: board overview, ecosystem, and usage tutorials sorted by difficulty. The generic overview of microcontroller families and the selection guide stay with microcontroller.
Tutorials
The tutorials of the Arduino module, in the recommended order: from the first blinking LED up to engineer level. Most of them apply a cross-cutting concept to Arduino, defined once for all the families. The entries marked (cross-cutting) are those shared pages of the skeleton, the rest is specific to Arduino.
Where to start? With getting started: install the IDE and blink a first LED on real hardware. The rest can be followed in order, or picked out as the project needs it.
Getting started
- Getting started with Arduino — install the IDE, write and upload a first program;
- Tinkercad — simulate a circuit online, before touching hardware.
Learning the basics
- The C++ language (cross-cutting) — the basics of the language;
- Logic levels (cross-cutting) — 3.3 V vs 5 V, and not frying a board;
- Configuring the GPIO —
INPUT/OUTPUT/INPUT_PULLUPmodes; - Serial monitor — read from and write to the serial port;
- off input — button or switch, plus debouncing;
- off output — LED, relay;
- Reading a digital sensor;
- Reading an analog sensor — through the ADC;
- Driving a PWM output;
- Timing delays —
delay()vsmillis(); - Using a library — install it, include it, read its docs;
- Reading a datasheet (cross-cutting) — finding Vin, logic levels and maximum current there, when the time comes to wire a component;
- Wiring a module · Using a shield;
- Powering the board — USB / Vin / barrel jack, voltage range, maximum current.
Advanced topics
- Communication, by protocol: UART · I2C · SPI (cross-cutting concept pages: communication buses);
- Debugging a program;
- GPIO state at power-up — default levels, sensitive pins;
- Actuators: servo · DC motor (H-bridge) · stepper motor;
- OLED display;
- Non-blocking programming — getting out of the blocking
delay(), a prerequisite for the state machine; - State machines on Arduino (→ concept page State machine);
- EEPROM storage;
- Filtering measurements (optional).
Engineer level
- Interrupts (→ concept page Interrupt);
- Hardware timers (→ concept page Timer);
- Bit manipulation (cross-cutting) — registers, masks, low-level access;
- Deep sleep (→ concept page Deep sleep);
- PID control — the control loop;
- Memory management (→ concept page Memory) — RAM, PROGMEM;
- Watchdog — firmware robustness.
Multitasking (FreeRTOS) is covered on the ESP32 module side and in Firmware. More tutorials will fill in these levels as projects come along.
Why Arduino?
Arduino occupies a niche of accessibility rather than a niche of performance. Its strengths do not come from the specs of the chip, but from everything around it:
- a huge community and documentation in abundance — for almost any sensor or module, a tutorial and a library already exist;
- a shield ecosystem (stackable expansion boards) that add functions without any soldering;
- 5 V tolerance on the I/O, compatible with a large pool of sensors and modules;
- a gentle learning curve, ideal for a first step into embedded work.
It is therefore the default choice for learning, prototyping fast and proving a principle. Its limits show on the 8-bit boards (Uno R3, Mega, Nano): 2 kB of RAM on the Uno R3, no floating-point unit (float values are emulated, and therefore slow) and no native USB. When the project calls for wireless (Wi-Fi, Bluetooth), battery life or raw performance, another family is often the right answer. The decision is made with the selection guide on the microcontroller hub. Worth noting: apart from the Uno R4 WiFi, none of the boards in this overview carries a radio. For a connected object, look towards the ESP32.
Board overview
Three boards cover most of what a school project needs. The rest of the range (Leonardo, Due, Giga, Nano variants) is chosen case by case.
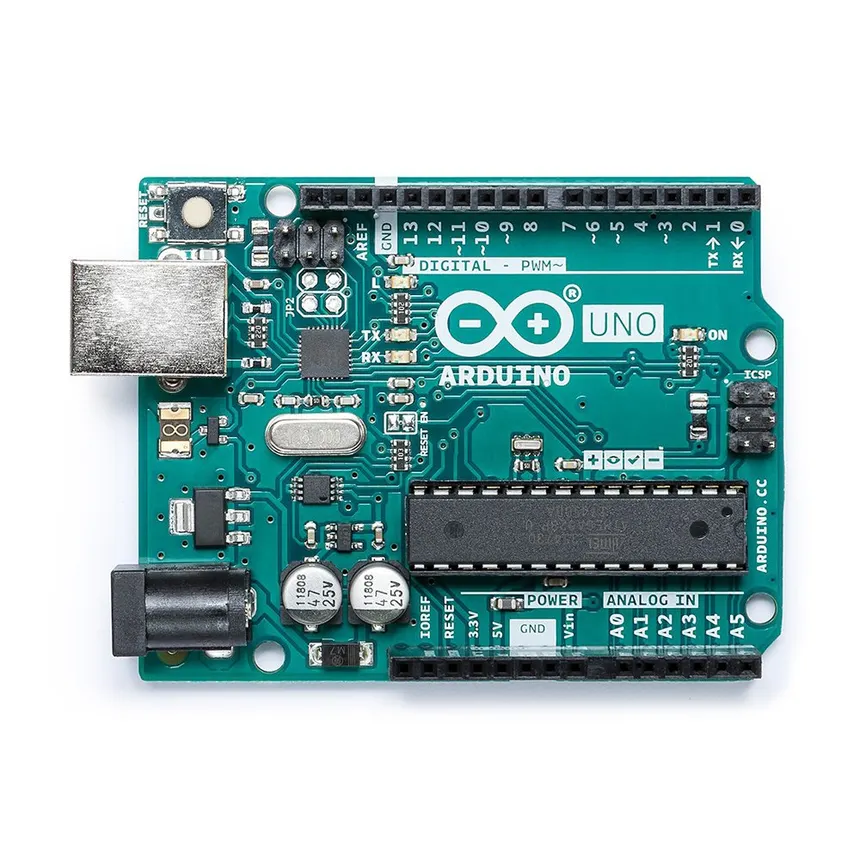
The Arduino Uno R3 board — the reference board of the overview.
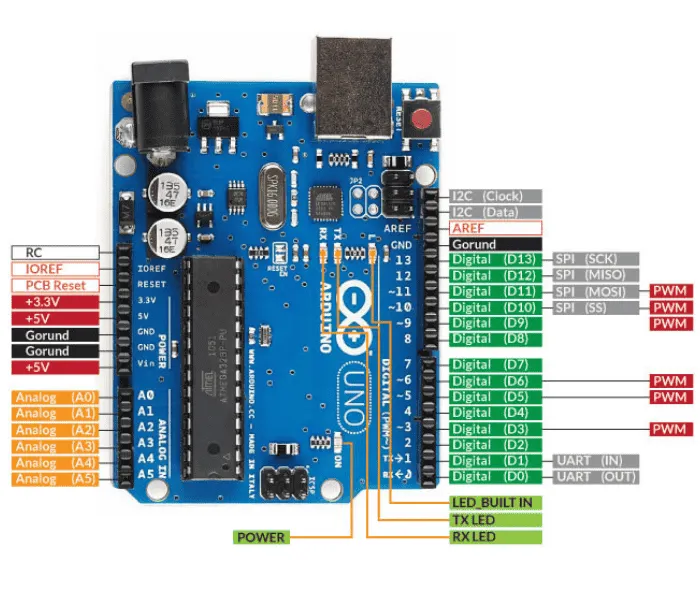
Pinout of the Arduino Uno R3: digital pins, analog pins, power and buses.
| Board | MCU | Flash / RAM | I/O (dig. / ana. / PWM) | Notable feature | Typical use case |
|---|---|---|---|---|---|
| Uno (R3 / R4) | R3: ATmega328P (8-bit AVR, 16 MHz) · R4: Renesas RA4M1 (ARM Cortex-M4, 48 MHz) | R3: 32 kB / 2 kB · R4: 256 kB / 32 kB | 14 / 6 / 6 | reference board, shield form factor; R4: USB-C, DAC, CAN bus, WiFi variant (ESP32-S3 + 12×8 LED matrix) | learning, project baseline |
| Mega 2560 | ATmega2560 (8-bit AVR, 16 MHz) | 256 kB / 8 kB | 54 / 16 / 15 | large I/O count | I/O-heavy projects (3D printers, for example) |
| Nano | ATmega328P (8-bit AVR, 16 MHz) | 32 kB / 2 kB | 14 / 8 / 6 | compact breadboard form factor | compact final integration |
Moving from the Uno R3 (8-bit) to the Uno R4 (32-bit ARM) keeps the same form factor and the 5 V shield compatibility, while multiplying memory and compute power. It is a clear example of moving up a range without breaking the ecosystem.
Ecosystem
The reference environment is the Arduino IDE, which recognises the boards without any extra driver. For more structured projects, PlatformIO or the Arduino CLI offer a more powerful build chain. The language is C++ with a layer of helpers on top (the Wiring dialect), built around two functions: setup(), which runs once at start-up, and loop(), which repeats indefinitely. The built-in library manager gives access, in a few clicks, to thousands of sensor and module drivers.
This ecosystem reaches beyond Arduino hardware alone: the same development framework also programs the ESP32 (through the Arduino core) and many other boards. One boundary is worth keeping in mind. This block describes the tooling specific to Arduino, not the way embedded code is structured, which belongs to Firmware.
See also
- Microcontroller — parent hub: overview of the families and selection guide
- ESP32 — neighbouring family, programmable through the same Arduino framework (Programming the ESP32 with the Arduino core)
- Firmware — how embedded code is structured (cross-cutting)
- Communication buses — UART / I2C / SPI