The Arduino core for STM32 (commonly called STM32duino) is the software layer that brings the Arduino API (setup(), loop(), digitalWrite…) to STM32 microcontrollers. It is the door of continuity: you reuse the reflexes learned on the Arduino, but with the power, the peripherals and the range of the STM32. Under the hood, that layer sits on the HAL and CMSIS from STMicroelectronics, the native toolchain that the engineer-level tutorials explore directly. How to structure a firmware, whichever door you take, belongs to firmware.
What is it for?
STM32duino acts as a bridge:
Reusing what you already know. The whole Arduino vocabulary (pinMode, analogRead, Serial, the Wire/SPI libraries…) works as it is. A circuit validated on an Arduino often carries over to the STM32 straight away.
Reaching the STM32 range easily. From a Blue Pill to a large Nucleo, the same sketch adapts by changing the selected board, without diving into the native toolchain.
Keeping a door open to the native side. From an STM32duino sketch, you can call HAL functions (HAL_*) directly or read CMSIS registers when you need finer control, without rewriting everything.
It is a good entry point for prototyping quickly. Moving to the full native toolchain (CubeMX + HAL) becomes worthwhile when you want to configure peripherals finely, step through a debugger, or aim for performance.
Installing STM32 support
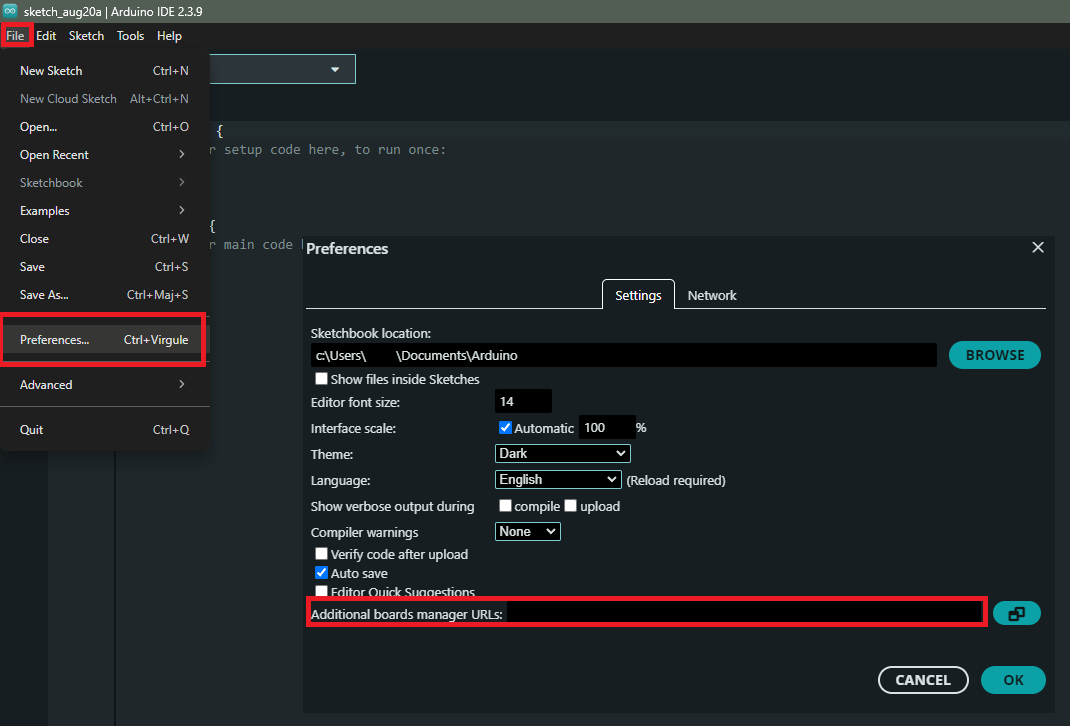
As with the ESP32, the STM32 is not known to the Arduino IDE by default: its support has to be installed. Open File → Preferences, and in Additional boards manager URLs, add:
Open the boards manager, look for stm32, and install “STM32 MCU based boards” by STMicroelectronics. In Tools → Board → STM32 MCU based boards, pick the series (for example Nucleo-64), then, in Tools → Board part number, the exact reference of your board.
Info
STM32duino flashes through STM32CubeProgrammer. Install ST’s STM32CubeProgrammer tool (free): STM32duino uses it behind the scenes for flashing. In Tools → Upload method, choose “STM32CubeProgrammer (SWD)” for a Nucleo (the on-board ST-LINK is enough). A Blue Pill, which has no ST-LINK, needs another mode (DFU over USB, serial port, or an external ST-LINK).
Take a screenshot of the Tools menu of the Arduino IDE unfolded, showing Board set to “Nucleo-64”, the Board part number line filled in with the exact reference of the board, and Upload method set to “STM32CubeProgrammer (SWD)“.
Almost the same code as Arduino
An STM32 sketch has the shape of an Arduino sketch:
const int LED = LED_BUILTIN; // LD2 on most Nucleo boardsbool allumee = false; // the state is remembered, never read back from the pinvoid setup() { Serial.begin(115200); pinMode(LED, OUTPUT);}void loop() { allumee = !allumee; // flip the remembered state digitalWrite(LED, allumee ? HIGH : LOW); // then apply the new state delay(500);}
setup() once, loop() forever: the model is identical. The differences are platform details, not structural ones:
pins are named by their port (PA5, PB6…), and on a Nucleo the Arduino aliases D0–D15 and A0–A5 of the connectors are also accepted;
the logic runs at 3.3 V (with FT pins tolerant to 5 V, see voltage levels);
the ADC is a 12-bit converter, but analogRead() returns 10 bits by default, because the core truncates the value to imitate an Uno and avoid breaking libraries that expect 0-1023. Call analogReadResolution(12) in setup() to unlock the full 0-4095 range;
Serial goes here to the virtual serial port of the ST-LINK (USART2 on the Nucleo boards): you read the monitor without an extra USB-to-serial adapter.
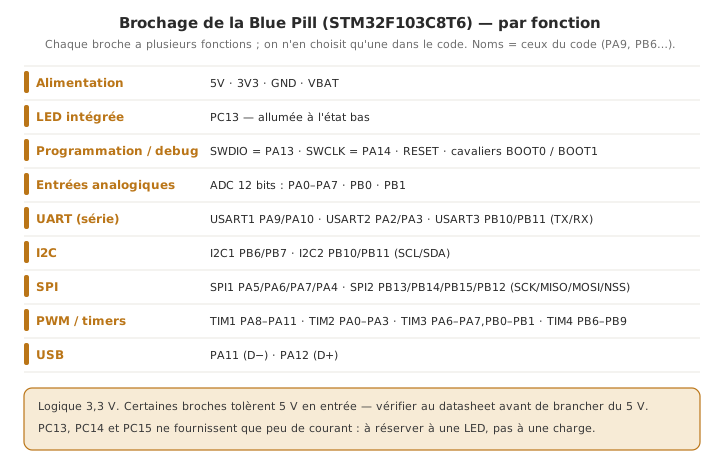
On a Blue Pill (STM32F103), every pin carries its port name (PA9, PB6…) and several possible functions. The pinout by function helps you choose which one to declare:
What changes under the hood
STM32duino is not hand-written bare metal: it relies on ST’s HAL and CMSIS. In practice:
The code sits on the HAL.digitalWrite calls, behind the scenes, the equivalent of a HAL_GPIO_WritePin. The same clock and the same peripherals as in a CubeIDE project are used. STM32duino configures them for you.
The native functions are reachable.HAL_* and the CMSIS register definitions (GPIOA->BSRR…) can be used directly inside a sketch, with nothing to rewrite.
Far more resources than an Uno. Depending on the chip, tens to hundreds of kilobytes of flash and RAM: heavy libraries, buffers and String objects fit far more easily.
Richer peripherals. Several UARTs, advanced timers, several ADCs: exposed through the Arduino API where possible, reachable through the HAL otherwise.
Tip
An Arduino library is not always STM32-compatible. Some of them poke AVR registers directly (<avr/io.h>), which do not exist on ARM. Before depending on a library, check that it announces STM32 support (or that it is written in portable Arduino API).
Example — A sketch that mixes Arduino and the native HAL
To make it tangible that STM32duino sits on the native toolchain, this sketch uses the Arduino API and native information: the core frequency (the CMSIS variable SystemCoreClock) and the unique identifier of the chip (through the HAL).
void setup() { Serial.begin(115200); delay(200); // Native CMSIS value, read from an Arduino sketch Serial.print("Core frequency: "); Serial.print(SystemCoreClock / 1000000); Serial.println(" MHz"); // 96-bit unique identifier of the chip, through the HAL Serial.print("UID: "); Serial.print(HAL_GetUIDw0(), HEX); Serial.print(HAL_GetUIDw1(), HEX); Serial.println(HAL_GetUIDw2(), HEX);}void loop() {}
On the serial monitor, you read the real core frequency and the unique identifier, two pieces of information that do not exist as such on an AVR Arduino, obtained without leaving the comfort of the sketch. This is the concrete illustration of the bridge: you program “in Arduino” while keeping the HAL and CMSIS at hand.
On the monitor, two lines printed once in setup():
Core frequency: XX MHz
UID: XXXXXXXXXXXXXXXXXXXXXXXX
The frequency depends on the board and on the clock configuration applied by the core, to be noted down on yours. The UID, for its part, is specific to your chip: it is masked here, because a serial number copied into a tutorial always ends up being taken for one’s own.
Pitfalls
Assuming AVR reflexes. Poking AVR registers, relying on cycle-accurate AVR timing, or including <avr/...> does not work: the architecture is ARM Cortex-M. Go through the Arduino API, the HAL or the STM32 registers.
Wrong flashing method. Choosing an Upload method that does not match the board: a Nucleo is flashed over SWD (built-in ST-LINK), a Blue Pill over DFU, serial or an external ST-LINK. A wrong choice blocks the upload.
STM32CubeProgrammer missing. Without ST’s tool installed, STM32duino cannot flash (error message at the upload step).
Believing in 5 V everywhere. Coming from an Arduino that tolerates 5 V on every pin, you burn an analog input or a non-FT pin by applying 5 V to it. Check the datasheet (see reading a datasheet).
Reading back an output pin to know its state. Writing digitalWrite(pin, !digitalRead(pin)) looks elegant, but it asks the microcontroller to read back what it has just written: not all of them allow it, the result depends on the configured output mode, and on a loaded output the pin may not be at the level you think. Remember the state in a variable (or drive it explicitly with HIGH/LOW): the program knows what it asked for, it does not have to guess.
Confusing pin names.PA5, D13 and LED_BUILTIN may designate the same pin on a Nucleo, or not, depending on the board. When in doubt, refer to the pinout of the board.
Exercises
Exercise 1 — What frequency?
Print the core frequency at start-up, then compare the value you read with the frequency announced for your board. What is SystemCoreClock on a Nucleo-F411? On a Nucleo-G431?
SystemCoreClock is a CMSIS variable kept up to date by the system clock. STM32duino configures the core close to its maximum frequency by default (of the order of 84–100 MHz on an F411, 170 MHz on a G431, to be checked on the board). It is that clock tree that gets tuned finely in CubeMX.
Exercise 2 — Button and LED
Wire one up (or use the built-in button B1, pin PC13 on a Nucleo-64): turn the LED on as long as the button is pressed. Which line changes compared to an Arduino?
Solution
const int BTN = PC13; // built-in button B1, inverted logic on a Nucleoconst int LED = LED_BUILTIN;void setup() { pinMode(BTN, INPUT); pinMode(LED, OUTPUT);}void loop() { digitalWrite(LED, digitalRead(BTN) == LOW); // pressed = low level}
The code is almost identical to an Arduino one: only the pin designation changes (PC13), and you have to know that button B1 on the Nucleo is in inverted logic (pressed = LOW). The rest — pinMode, digitalRead, digitalWrite — is strictly the same Arduino vocabulary. That is the whole point of the door of continuity.
Special case — PlatformIO and the switch to native
Two setups go beyond the Arduino IDE:
PlatformIO (a VS Code extension) handles the Arduino framework and the native framework (HAL/CMSIS) inside the same project, with fine-grained library and Git version management, handy as soon as the project grows.
A gradual switch to native. STM32duino being built on the HAL, you can start in the Arduino API, then replace the critical parts little by little with HAL or register calls, without rewriting everything. It is a natural migration path towards CubeMX and the HAL.
Where it fits in the project
Step 4 of the proof-of-concept phase. Choosing STM32duino as the environment of the software PoC is a reasonable default when you come from the Arduino: you move fast, and you keep the native door open. Keeping it in reserve means switching to the native toolchain only when a precise need calls for it (debugging, performance, a fine-grained peripheral).
Reuse of an Arduino prototype. A circuit validated on an Arduino often carries over as it is to the STM32 through the core, gaining memory, peripherals and performance.
Understanding that STM32duino relies on the HAL and CMSIS (the same foundation as the native toolchain) sheds light on the later move to CubeMX: it is not another world, it is the layer underneath.