The STM32 are a vast family of 32-bit microcontrollers from STMicroelectronics, built on ARM Cortex-M cores (from the frugal M0+ to the high-performance M7) and known for the richness of their peripherals and for development tooling of professional quality. They are programmed in two ways: with the Arduino framework (through STM32duino), to reuse everything already known from the Arduino, or with ST’s native tooling (STM32CubeIDE + CubeMX + HAL/LL), which opens up the real work of an embedded engineer (configuring a microcontroller, and not only writing its code). This page is the hub that gathers the tutorials related to the STM32: why this family, its overview, its ecosystem, and the tutorials sorted by difficulty. The general overview of microcontroller families and the selection guide stay with microcontroller.
Why STM32?
Where the Arduino aims at accessibility and the ESP32 at connectivity, the STM32 aims at industrial maturity and range coverage:
- the standard of professional embedded work — this is the family met on placement and in industry, and mastering its tooling is something that carries well beyond a school project;
- an enormous range — from a minimal Cortex-M0+ up to a Cortex-M7 at 480 MHz, you stay in the same ecosystem and the same tooling simply by changing chip;
- rich, fine-grained peripherals — very complete timers, several fast ADC, advanced PWM, many buses, carefully designed low-power modes;
- built-in hardware debugging — on a Nucleo board, the on-board ST-LINK lets you run the code step by step, set breakpoints and inspect variables, with no extra hardware (see debugging an embedded system).
In exchange, the STM32 is less forgiving than the Arduino: the range is sprawling (picking a chip takes a minimum of method), the native tooling is heavier, and the documentation assumes you can read a datasheet. It is the choice that makes sense when you want to understand the hardware in depth or aim for performance. For a first contact with embedded work, the Arduino stays gentler. The decision is settled with the selection guide on the microcontroller hub.
Family overview
The STM32 range runs to about twenty lines, of which a handful cover most of what a school project needs. The Cortex-M core is the right landmark for finding your way: it sets the performance class, the rest is a matter of peripherals.
Info
The table below is a teaching landmark, to be confirmed against ST’s official selector (ST product selector) before a choice is frozen: exact part numbers, frequencies and options keep changing.
| Line | Core | Positioning | Example part |
|---|---|---|---|
| STM32C0 / F0 / G0 | Cortex-M0 / M0+ | entry level, replaces 8-bit parts | STM32G031, STM32C011 |
| STM32F1 | Cortex-M3 | the “classic”, very widespread in the community (Blue Pill) | STM32F103 |
| STM32F4 / F3 | Cortex-M4 (with FPU) | capable mainstream; F3 rich in analog | STM32F411 (Black Pill), STM32F303 |
| STM32G4 | Cortex-M4 | mixed digital and analog, motor control and power electronics | STM32G431 |
| STM32F7 / H7 | Cortex-M7 (up to 480 MHz, sometimes dual-core M7+M4) | high performance, HMI, signal processing | STM32H743 |
| STM32L0 / L4 / U5 | Cortex-M0+ / M4 / M33 | ultra-low power, battery-powered objects | STM32L476, STM32U575 |
| STM32WB / WL | Cortex-M4 (+ M0+) | built-in wireless: WB = BLE/Zigbee/Thread, WL = LoRa/sub-GHz | STM32WB55, STM32WL55 |
Underlying trend: the recent lines add hardware security (TrustZone on Cortex-M33: L5, U5, H5) and built-in connectivity (WBA), and the very latest carry AI acceleration (N6 series on Cortex-M55). For a school project, a Nucleo based on an F4 or a G4 covers the vast majority of needs.
These chips are met on three kinds of board. The Nucleo boards are the official evaluation boards: Arduino-compatible connectors plus ST Morpho connectors, and above all an on-board ST-LINK debugger. This is the recommended entry point to start with. The Discovery boards are showcase boards for one chip, often enriched (screen, sensors, audio). On the community side, the Blue Pill (STM32F103) is very widespread but has no on-board debugger (an external ST-LINK is needed) and sometimes carries cloned chips. The Black Pill (STM32F411, USB-C) is a more recent and healthier alternative.
Ecosystem
Two programming paths coexist, and they are the two doors into the STM32.
- STM32duino (Arduino core) — the same API as the Arduino (
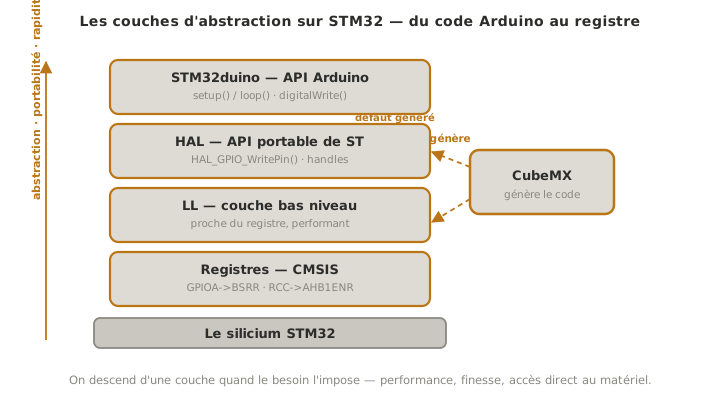
setup(),loop(),digitalWrite…), installed in the Arduino IDE. This is the door of continuity: the whole Arduino skeleton is reused simply by changing board. Detailed in programming with the Arduino core. - STM32CubeIDE + CubeMX + HAL/LL — ST’s native tooling, free and all in one. The microcontroller is configured graphically (CubeMX: pinout, clock tree, peripherals), the initialisation code is generated (HAL or LL), and you can go down to the register (CMSIS) where performance demands it. This is the door of the trade, and the real thing the STM32 brings to the path.
These two doors are not exclusive: from an STM32duino sketch you can call HAL functions, and the other way round. PlatformIO (a VS Code extension) handles both worlds and makes Git versioning easier. Keil MDK and IAR EWARM also exist (commercial environments), but CubeIDE is more than enough in a school setting.
How the code is structured (loop, tasks, states, RTOS) belongs to firmware, whichever door is chosen.
Watch the voltage
Warning
The STM32 runs 3.3 V logic. Many of its pins tolerate 5 V (marked FT, for five-volt tolerant, in the datasheet), but not all of them: the analog pins and some supply pins do not accept it, and applying 5 V there can destroy the input. Coming from an Arduino (5 V tolerant everywhere), do not generalise: check the FT marking pin by pin in the datasheet. See logic levels and reading a datasheet.
Tutorials
The tutorials of the STM32 module, sorted by increasing difficulty. As with the Arduino and the ESP32, the entries marked (cross-cutting) are shared pages of the skeleton (valid for every family), the rest is specific to the STM32.
Getting started
- Getting started with the STM32 — install CubeIDE, create a project for your Nucleo, flash a first blink through the ST-LINK;
- Reading a datasheet (cross-cutting) — pinout, FT pins, maximum current.
Learning the basics
- The C++ language (cross-cutting) — the basics of the language;
- Logic levels (cross-cutting) — 3.3 V, and 5 V tolerant pins (FT);
- GPIO (cross-cutting) — the idea of an input and an output (put to work on the STM32 through either door);
- Programming with the Arduino core — the door of continuity: reusing the Arduino skeleton on an STM32.
Advanced topics
- Communication: SPI (cross-cutting);
- Debugging (cross-cutting) — step by step, through the built-in ST-LINK, a genuine strength of the STM32;
- Interrupts (cross-cutting) · Timers (cross-cutting) — events and hardware time, on peripherals that are particularly rich at STM32.
Engineer level
The door of the trade — what the STM32 distinctively brings, the move from “writing code” to “configuring a microcontroller”.
- Configuring with CubeMX — pinout, clock tree, peripheral initialisation, code generation;
- Programming with the HAL — the generated API, its three modes (polling, interrupt, DMA), and the HAL / LL distinction;
- Going down to the register (→ concept page Bit manipulation) — low-level access through CMSIS, when performance or fine control demands it;
- Firmware (cross-cutting) — structuring the code, from super-loop to RTOS.
More tutorials will fill in these levels as projects come along.
See also
- Microcontroller — parent hub: overview of the families and selection guide
- Arduino — neighbouring family, programmable through the same framework (Programming the STM32 with the Arduino core)
- ESP32 — neighbouring family, also programmable through the Arduino core
- Firmware — how embedded code is structured, from super-loop to RTOS (cross-cutting)
- Logic levels — 3.3 V logic and the 5 V tolerant pins
- Debugging — making use of the built-in ST-LINK of the Nucleo boards