Debugging an embedded system means tracking down the cause of a program behaving abnormally on a microcontroller, where there is no screen, no keyboard, and none of a PC’s console. Two broad approaches live side by side: debugging by messages (printing values over the serial link) and hardware debugging (a probe that pauses the program, sets breakpoints and inspects variables in real time). This cross-cutting page lays out the method and compares the two approaches, whatever the family. For the logs specific to one board, see reading error logs and firmware.

What is it for?
A bug on a microcontroller is harder to pin down than on a PC: no immediate display, real-time execution, interaction with hardware (sensors, motors, links). Debugging answers precise questions:
- “is this code even running?” — is the branch of an
if, the inside of a function, an interrupt actually reached? - “what value does this variable hold right now?” — the state of a state machine, a sensor reading, a counter;
- “where does the program go wrong?” — freezing execution just before the symptom to look at the context;
- “is this a code problem or a hardware problem?” — telling a software bug from an electrical fault (and switching then to the measuring instruments).
Two approaches
Debugging by messages (printf / log). You slip printouts (Serial.print, log macros) into key points of the code, and watch them scroll past in the serial monitor. It is universal (any board with a serial link), needs no extra hardware, and it is the natural way in for a beginner. Limits: it is intrusive (the printouts change both the flow and the timing), it bloats the code, and there is no pausing and no inspection on demand: you only see what you thought to print. Covered for each family in reading error logs and through the DEBUG macros of debugging an Arduino program. On the MicroPython side, the interactive REPL changes things (see debugging a MicroPython program).
Hardware debugging (JTAG / SWD). A debug probe (ST-Link, J-Link, or the controller built into some boards such as the ESP32-S3/C3) connects to the microcontroller’s debug pins and hands you control over execution:
- breakpoints — freezing the program on a precise line;
- stepping — moving forward one instruction at a time (into a function, over it, out of it);
- inspection — reading (and sometimes changing) variables, registers and memory in real time, without printing anything;
- call stack — knowing which path got you there.
Upside: non-intrusive (the code does not change) and far more powerful. Cost: you need the hardware (the probe) and the toolchain setup (toolchain plus IDE), specific to the microcontroller family.
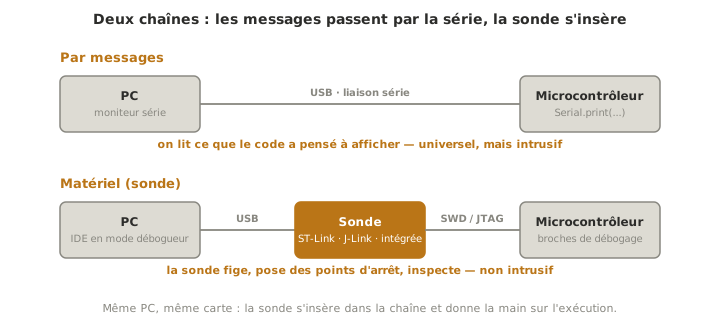
The method, whichever the approach
Debugging is not changing code at random until it goes through. The process is an investigation:
- Reproduce the bug reliably — a bug you cannot reproduce cannot be fixed with any confidence.
- Isolate — cut down to the smallest case that still triggers the problem (comment out, simplify).
- State a precise hypothesis about the cause (“the state variable never changes”, “the interrupt is never called”).
- Instrument to test the hypothesis — a well-placed printout, or a breakpoint.
- Check, then fix — and only then, confirm that the symptom is gone.
Warning
A breakpoint freezes the processor, not the outside world. When execution stops on a breakpoint, the microcontroller stands still, but a motor keeps turning on its own inertia, a link times out, a capacitor discharges. Hardware debugging of a system that drives movement or real-time exchanges can therefore falsify what you observe, and can even be dangerous. To be handled with care on the parts that command power.
Example — An LED that refuses to blink
An LED meant to blink stays dark. The wiring and the supply have been checked (with the multimeter): the problem is in software.
- Hypothesis 1 — “the line that toggles the LED is never reached”. You set a breakpoint on it: if it never fires, the path of execution does not go through there (a condition above it is false).
- The message variant — with no probe, you place a
Serial.printjust before it: the absence of a message confirms the same thing. - Move back up — you shift the observation point to the condition guarding that block, and inspect the variable being tested: you find it does not change as expected (an
=instead of an==, a delay that never elapses because of a badly written date comparison, see delays on Arduino or in MicroPython). - Fix the confirmed hypothesis, remove the instrumentation, check that the LED blinks.
The investigation located the cause without touching the rest of the code, instead of changing lines at random.
Pitfalls
Changing code with no hypothesis. Changing things at random until it works hides the real bug instead of explaining it. It will come back. A fix is made on a cause that has been identified.
The Heisenberg effect of printf. Adding a printout changes the timing: a time-related bug (a race between an interrupt and the main program, the timing of a bus) can vanish when you instrument it and come back when you take the printout away. A sign that the problem is a timing one.
Forgetting to take the debugging out. Debug printouts left in place eat compute time, memory and serial bandwidth in production. Make them conditional at compile time (#if DEBUG) or take them out.
Confusing “it compiles” with “it works”. A program that compiles without error can do anything at all at run time. The compiler validates the syntax, not the intent.
Debugging software when the fault is hardware. If a sensor reading is nonsense, the cause can be wiring, a logic level, a solder joint. Not the code. Before diving into the program, check the real signal with the measuring instruments.
See also
- Firmware — the architecture of the program being debugged (prerequisite)
- Reading error logs — debugging by messages, on the toolchain side
- Debugging an Arduino program — the Arduino version (
DEBUGmacros, serial monitor) - Debugging in MicroPython — the MicroPython version (interactive REPL)
- Measuring instruments — when the bug is electrical and not in software
- State machine — inspecting a state variable is a frequent debugging case
- Microcontroller — the debug pins (JTAG/SWD) by family
- Watchdog — an armed watchdog can restart the board in the middle of a debug session