A microcontroller (MCU, for microcontroller unit) is a programmable integrated circuit that brings together on a single chip a processor, some memory and O peripherals: it is the component that runs the control program at the heart of a mechatronic system. This page is the entry hub to the microcontroller families: it lays out the overview and gives the method for choosing one, without going into what is specific to each family (covered in the child pages) or into how the code is written (see firmware).
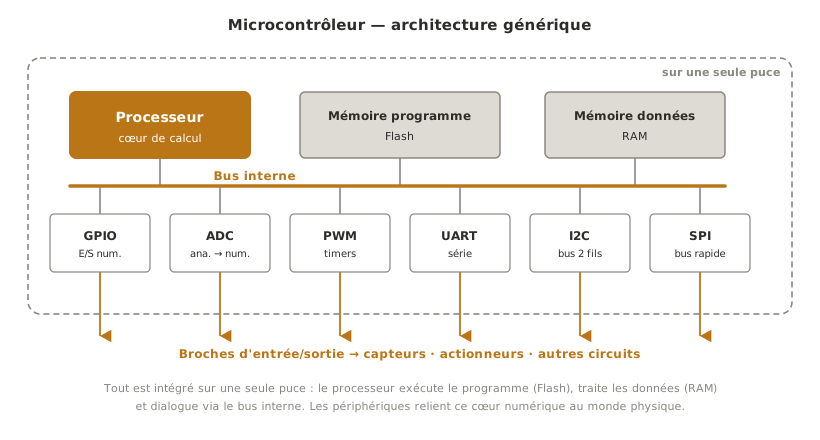
What is it for?
The microcontroller is the brain of the control chain of a mechatronic system: it reads the sensors, runs the decision logic and drives the actuators. The microcontroller is chosen during the concept phase, typically through a decision matrix per subsystem, and then frozen in the technical design file at integration time.
This page keeps a clean border with the neighbouring concepts:
- choosing a family and a board that suit the project → here (overview plus choosing guidance);
- structuring the embedded code → firmware;
- reading a component’s datasheet → reading a datasheet;
- making the MCU talk to its peripherals → communication buses;
- reacting to an event straight away instead of watching for it in a loop → interrupt;
- setting up your bench and reusing existing code → IDE, library.
Family overview
The landscape runs from the historic 8-bit microcontroller (the AVR of the first Arduino boards) to the 32-bit ARM Cortex-M chips that are everywhere today, and on to embedded platforms of the single-board computer (SBC) kind such as the Raspberry Pi, which are not microcontrollers strictly speaking (they run a full operating system) but which are grouped here because they are taught alongside them.
| Family | Architecture | Language / IDE | Power draw | I/O and connectivity | Typical use case |
|---|---|---|---|---|---|
| Arduino | AVR 8-bit (Uno R3) to ARM Cortex-M4 (Uno R4) | C++/Wiring, Arduino IDE | moderate, hardware sleep possible but barely supported by the framework | digital and analog GPIO, no native wireless (except R4 WiFi) | learning, quick prototyping |
| ESP32 | Xtensa LX6/LX7 or RISC-V, 32-bit | Arduino core or ESP-IDF | deep sleep ~µA, ~80–240 mA with Wi-Fi active | Wi-Fi and Bluetooth built in, rich GPIO | connected objects, wireless projects |
| XIAO (Seeed Studio) (mini format — ESP32 based) | ESP32-C3 (RISC-V) or ESP32-S3 (Xtensa), 32-bit | Arduino core, MicroPython | deep sleep ~µA (ESP32 based) | Wi-Fi and BLE, ~11 pins in a postage-stamp footprint | compact projects, wearables, miniature IoT |
| Raspberry Pi Pico | RP2040, 2× Cortex-M0+ (Pico 2: RP2350) | MicroPython (Thonny), C/C++ Pico SDK, Arduino core | sleep ~1 mA (board) | 26 GPIO, PIO (programmable I/O), no wireless (Pico W: Wi-Fi and BT) | learning MicroPython, real-time I/O (PIO) |
| Raspberry Pi (SBC — embedded platform) | multicore ARM Cortex-A (SoC), running Linux | Python or any language | several W | USB/HDMI/Ethernet/Wi-Fi, GPIO | heavy processing, vision, networking, when an OS is needed |
| ESP8266 | Xtensa 32-bit single core | Arduino core | deep sleep ~20 µA | Wi-Fi built in (no BT) | simple Wi-Fi IoT |
| STM32 | ARM Cortex-M0 to M7 | STM32CubeIDE, STM32duino, PlatformIO | carefully designed low-power modes | very rich peripherals | demanding professional and industrial projects |
| Teensy | ARM Cortex-M4/M7 (NXP, up to 600 MHz) | Arduino plus Teensyduino | high performance | fast I/O, audio | audio, DSP, performance within the Arduino frame |
| PIC | 8 / 16 / 32-bit (Microchip) | MPLAB X, XC compilers | low power draw | varied peripherals | industrial, legacy, very high volume production, where a stable part number and long-term availability come first |
Three pointers for reading this table. The Seeed Studio XIAO is not a chip family but a format: a postage-stamp board built (most often) around an ESP32. Everything that holds for the ESP32 holds for it, in the smallest possible footprint. The Raspberry Pi is not a microcontroller but a miniature computer: it earns its place when the project calls for an operating system, networking or heavy computation (vision), at the price of a higher power draw and more complexity. Not to be confused with the Raspberry Pi Pico, which is a real microcontroller (it has its own row in the table) and is in particular the canonical board of the MicroPython path. The ESP8266 opened the way to Wi-Fi on a microcontroller. The ESP32 has overtaken it today on almost every count. It keeps its use in two cases: when ESP8266 boards are already in stock, and for reprogramming off-the-shelf objects built around one.
How to choose
The right reflex is not to start from whichever microcontroller is fashionable, but from the needs of the project. Six criteria steer the choice:
- Inputs and outputs — how many GPIO, how many analog inputs (ADC), how many PWM outputs, and which interfaces (I2C, SPI, UART) does the project demand? And at which logic level (3.3 V or 5 V) do the sensors and modules chosen talk? (→ concept page logic levels)
- Connectivity — does the system have to talk wirelessly (Wi-Fi, Bluetooth)? If so, the ESP32 starts as the favourite. If not, a board with no radio will do.
- Compute power and real time — fast control, signal processing or audio call for a capable 32-bit part (STM32, Teensy). A slow sensor reading makes do with an 8-bit one.
- Power draw — a battery-powered system demands low-power modes (ESP32 in deep sleep, STM32) and a current budget with numbers on it (→ concept page electronic power supply). On mains, the criterion weighs less.
- Ecosystem and availability — documentation, community, libraries and above all whether the part will still be available in a year count more often than a few megahertz: an MCU that is well documented and stocked by two distributors saves a great deal of time. What the team already knows counts just as much: a family nobody has ever programmed is paid for in learning time taken out of the project.
- Size and integration — how much room does the board take in the product, and how is it fixed in place? A postage-stamp board (XIAO) opens up integrations a Uno rules out. The other way round, a wide board with well-spaced pins is far easier to wire and to fix during prototyping.
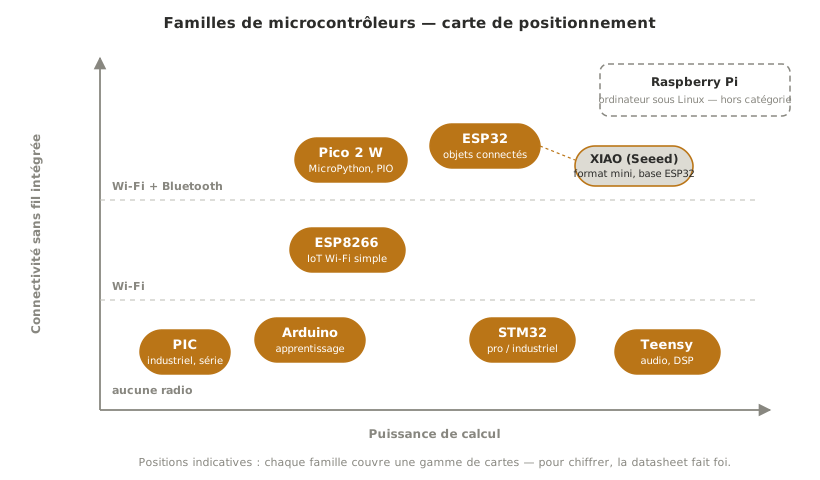
In practice, these criteria are weighed against each other in a decision matrix run during concept, on the same footing as the other architecture choices. The full method inside the project — putting numbers on the needs, comparing the candidates, recording the choice — is set out in choosing the hardware, step 2 of the build column. One strategy comes up often on school projects: prototype on an easy board (Arduino) to prove the principle, then move to a better-suited target (ESP32 for wireless, STM32 for performance) if the need justifies it.
See also
- Firmware — structuring the embedded code (cross-cutting, pseudocode)
- Reading a datasheet — a cross-cutting reading skill
- Communication buses — the UART / I2C / SPI protocols
- Decision matrix — the tool for choosing the microcontroller during concept
- Choosing the hardware — the method for selecting MCU, sensors and actuators inside the project (step 2 of the build)
- Concept — the phase where the microcontroller is chosen (step 2)