Getting started with Arduino means installing the development environment, having the computer recognise the board, and uploading a first program. It is the on-ramp step, and without it none of the other Arduino tutorials runs on real hardware: everything that follows assumes you can compile code and send it to the board. The target program here is the Blink (making the on-board LED flash), the embedded equivalent of “Hello World”.
What is it for?
Getting started validates the whole chain between your code and the board in one go: editor, compiler, USB driver, board selection, port selection, upload. If one link is broken, the Blink does not blink, and you know it straight away, on trivial code, rather than buried in a complex sketch.
Beyond the first program, this step plays two parts:
- Diagnosing later on. When a more advanced sketch refuses to work, you will be able to tell a code problem from a toolchain problem, because the Blink, for its part, runs on that same chain.
- Giving yourself a reference point. The IDE, the Outils → Type de carte / Port (Tools → Board / Port) menu, the Upload button, the serial monitor: these are the moves the tutorials repeat a thousand times. Anchoring them once on trivial code frees your attention for the rest.
Step by step
Four steps: install, plug in, write (or load), upload.
1. Install the Arduino IDE
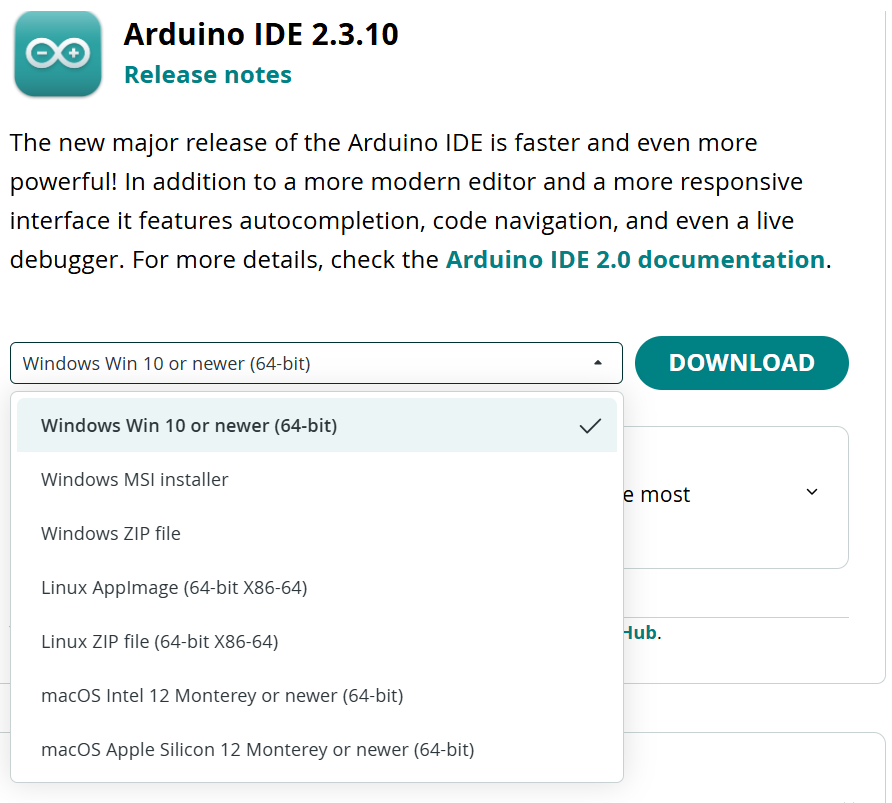
Download the IDE from the official site: arduino.cc → Products → Software → Arduino IDE (direct link: arduino.cc/en/software). Two versions live side by side: the IDE 2.x (recent, recommended — autocompletion, debugger, built-in board manager) and the IDE 1.8.x (legacy, lighter, still present on many teaching machines). The screenshots on this page use the IDE 2.x.
At download time, Arduino may offer to let you contribute (donate) or create an account: this is optional. Click Just Download to go straight to the download.
On Windows, the installer also installs the USB drivers for the official Arduino boards. On Linux, add your user to the dialout group so you can reach the serial port without sudo. On macOS, nothing else to do.
2. Plug the board in and check it is recognised
Plug the board in with a USB data cable. The “charge only” cables that come with smartphones carry power but no signal. Typical symptom: the ON LED on the board lights up, but the IDE sees no port. It is the number one beginner’s mistake.
In the IDE, open Outils → Type de carte (Tools → Board) and pick your model (Arduino Uno, Arduino Mega or Mega 2560, Arduino Nano…). Then Outils → Port (Tools → Port) and select the port matching your board. On Windows it shows up as COM3, COM4…; on macOS as /dev/cu.usbmodem...; on Linux as /dev/ttyACM0 or /dev/ttyUSB0.
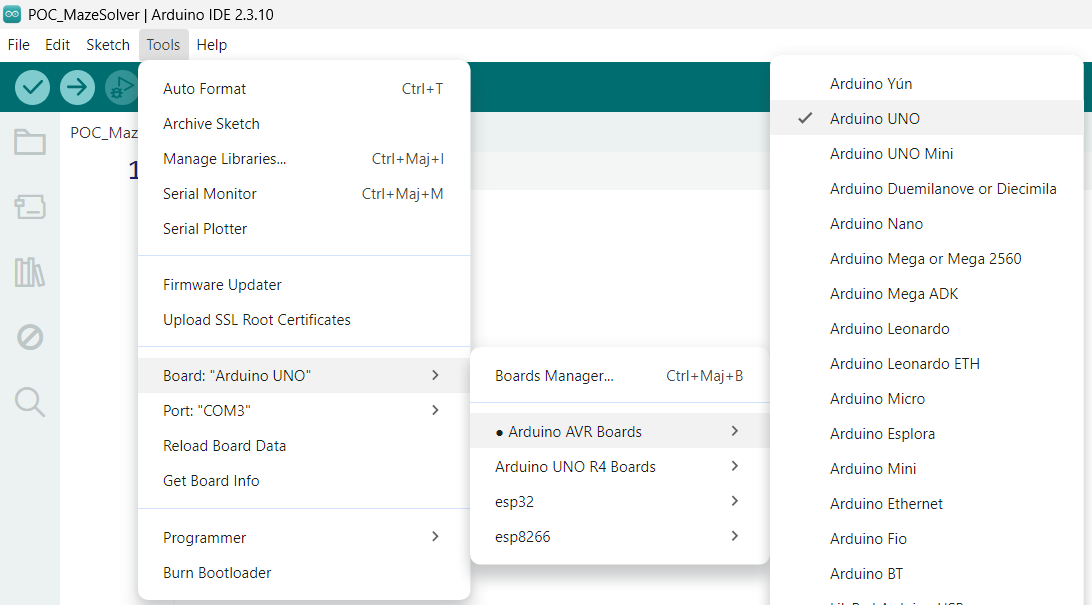
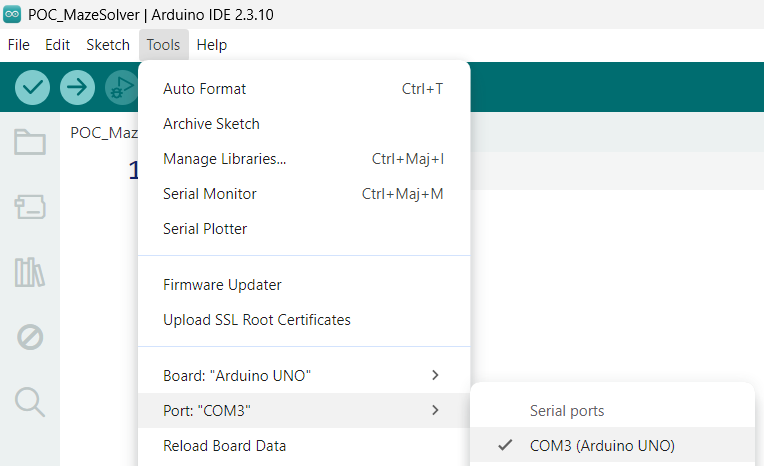
Checkpoint. At this stage, your board must appear under Outils → Port (COMx on Windows, /dev/cu.usbmodem... on macOS, /dev/ttyACM0 or /dev/ttyUSB0 on Linux). If it does, move on to step 3. If no port matches the board, work through the troubleshooting below first.
If the board does not appear (troubleshooting)
Common symptom: no port matches the board under Outils → Port. The causes, in order of frequency:
1. A charge only USB cable. The ON LED on the board is lit (the board has power), but no port shows up. The cable, often a smartphone lead, carries power but no data. This is by far the most frequent cause: swap it for a USB data cable.
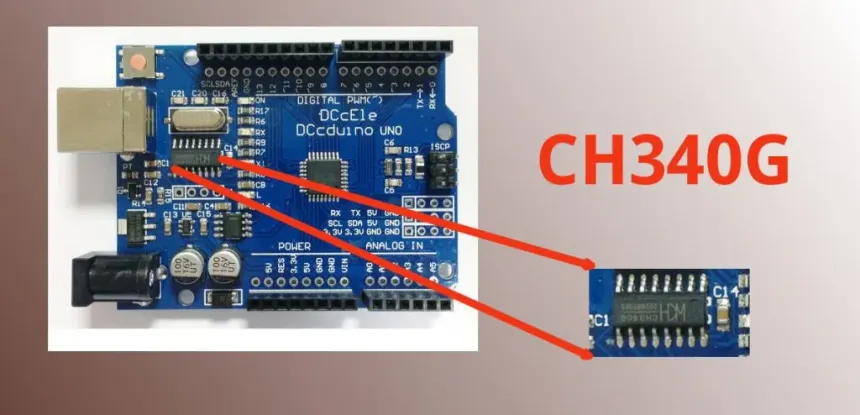
2. Missing CH340 driver (clone boards). The cable is good, the board has power, but still no port under Windows. Clone Uno and Nano boards (unofficial ones) carry a CH340 USB-to-serial chip instead of the official USB circuit. Windows cannot talk to it until its driver is installed.
Tip
Installing the CH340 driver, step by step.
- Open the Gestionnaire de périphériques (Device Manager, right-click on the Start menu → Gestionnaire de périphériques). A device marked with a yellow exclamation point (under Autres périphériques, or named USB-SERIAL CH340) confirms the diagnosis.
- Download the CH340 driver straight from sparks.gogo.co.nz/ch340.html, which gathers the Windows, macOS and Linux drivers together. (Original driver: the manufacturer wch-ic.com, package CH341SER.)
- Unpack the archive, run
SETUP.EXE, then click Install.- Unplug the board and plug it back in (restart if the port still does not appear). The
COMxport must now be listed under Outils → Port.
3. Linux / macOS. On Linux, check that you belong to the dialout group (see step 1). An ls /dev/ttyACM* /dev/ttyUSB* after plugging in confirms the port is there. On macOS, official boards work with no driver. Only old CH340 clones may ask for a signed driver.
3. Load the Blink example
Open Fichier → Exemples → 01.Basics → Blink (File → Examples → 01.Basics → Blink). The IDE opens a new tab holding this code:
void setup() {
  pinMode(LED_BUILTIN, OUTPUT);
}

void loop() {
  digitalWrite(LED_BUILTIN, HIGH);
  delay(1000);
  digitalWrite(LED_BUILTIN, LOW);
  delay(1000);
}
Two functions structure every Arduino program: setup() runs once when the board starts, loop() then repeats indefinitely. The program declares the LED_BUILTIN pin (the LED soldered onto the board, pin 13 on the Uno) as an output, then inside the loop lights it, waits one second, switches it off, waits one second, and starts over.
Click Vérifier (Verify, the tick icon, top left). This is the compilation stage. If all is well, the console at the bottom prints Sketch uses XXX bytes (X%) of program storage space. No red lines.

4. Upload and watch
Click Téléverser (Upload, the arrow icon, to the right of Verify). The IDE recompiles and sends the binary to the board over the serial port. During the upload, the RX and TX LEDs on the board flash rapidly.
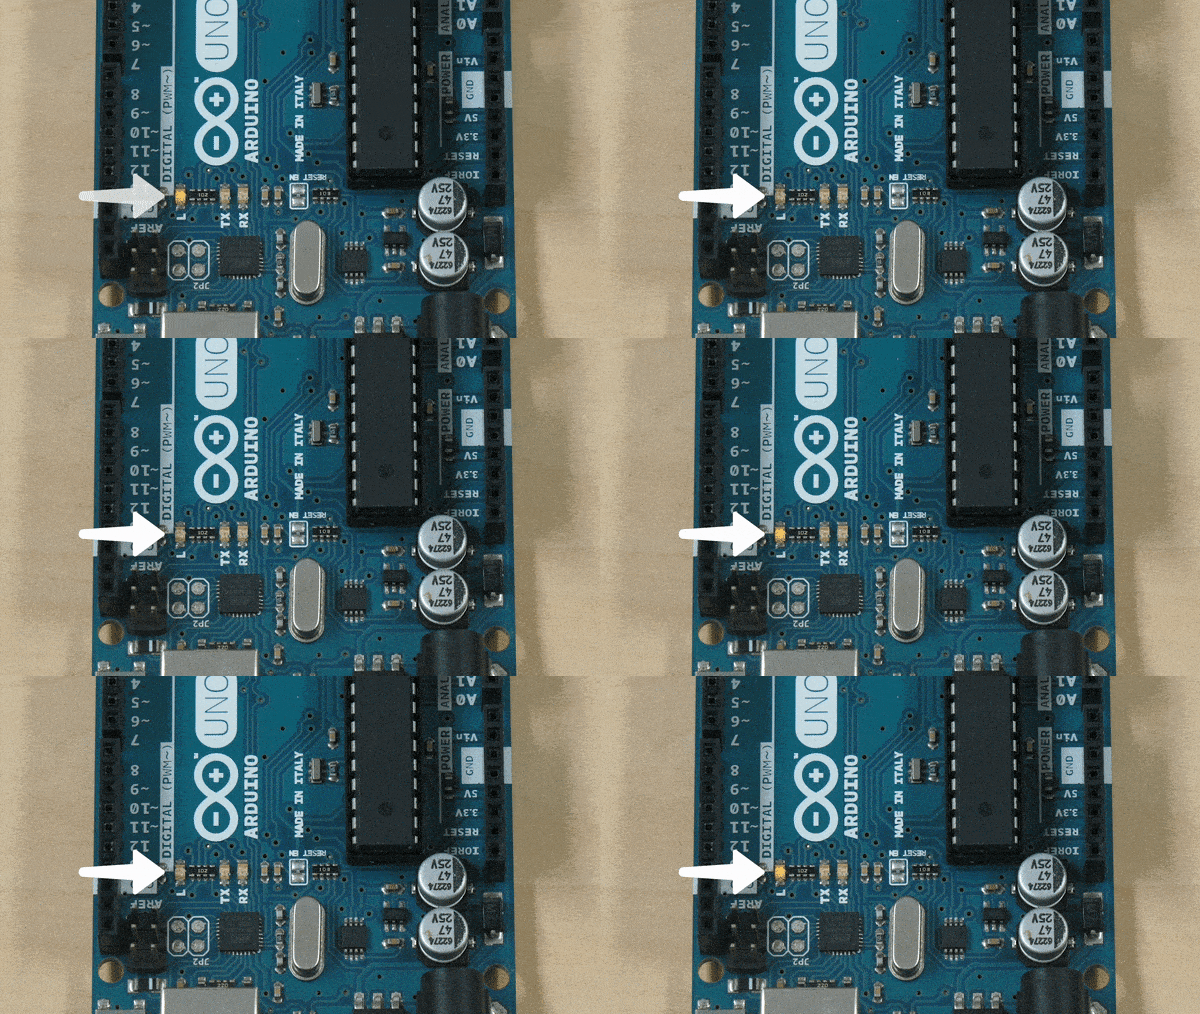
Once the upload is finished, the L LED (pin 13) starts flashing at a rate of one second lit, one second dark. The program is running. Getting started is validated.
Tip
Verify is not upload. Vérifier (Verify) compiles without sending anything to the board (handy for hunting down a syntax error without risking a running program). Téléverser (Upload) compiles and then sends. At the slightest doubt, Vérifier first. It saves waiting for the USB round trip only to discover a typo.
Example — Blink modified
To check that you really control what happens (and not just that you managed to upload some code), change the delays:
void loop() {
  digitalWrite(LED_BUILTIN, HIGH);
  delay(100);
  digitalWrite(LED_BUILTIN, LOW);
  delay(900);
}
Upload again. The LED now gives a short flash (100 ms) once a second. This small step — change, upload, watch the expected change — is the basic move of every tutorial that follows. Until that reflex is yours, you will mistake your bugs for your successes.
Pitfalls
Wrong port selected. If several boards (or a phone) are plugged into USB, the IDE may offer several ports. Uploading to the wrong one fails with a cryptic error message: always check Outils → Port before every upload.
Compiling is not uploading. A successful compilation validates the syntax of the code, not the connection to the board. If the upload fails with programmer is not responding or avrdude: stk500_recv(), the board did not answer — port, cable or board to check.
Nano clone, wrong bootloader. On some Nano clones, the port is recognised but the upload fails (an avrdude timeout). Choosing Outils → Processeur → ATmega328P (Old Bootloader) (Tools → Processor → …) sorts it out.
Uploading with the serial monitor open elsewhere. If another application (PlatformIO, an external terminal, another IDE) holds the port open, the upload fails because the port is locked. Close the other window and try again.
Confusing the L LED with the ON LED. The ON LED is the power indicator (always lit when the board is powered). It is the L LED (near pin 13) that flashes under the program’s control. If only ON lights up after an upload, the code may not have taken.
IDE 1.8.x against 2.x. The menu paths differ slightly between the two versions (board manager, library manager, serial plotter). If a tutorial mentions an option you cannot find, check the version installed. Ours is the 2.x.
Special case — Alternatives to the Arduino IDE
For a more structured project (fine-grained Git versioning, multiple files, multiple platforms), two alternatives are worth the detour:
- Arduino CLI — a command-line build chain, scriptable, perfect in continuous integration.
- PlatformIO — a VS Code extension that handles Arduino, ESP32, STM32 and many others in one place. Clean library manager, native debugging.
The Arduino IDE remains the best way in for learning. The alternatives earn their keep when the project grows. See firmware for what is at stake in structuring embedded code.
Where it fits in the project
- Step 4 of the proof of concept phase — the first compilation and upload of a sketch onto the target board is the founding act of the software PoC. As long as the Blink does not blink, no measurement or downstream control loop is credible.
- Every Arduino tutorial downstream — with no working setup, reading the other tutorials without being able to test comes down to reading code without running it. Do the Blink at least once, on the project’s target hardware, as early as you can.
Investing half an hour to validate the whole chain at the start of the PoC saves hours of hybrid bugs later, when you can no longer tell a toolchain problem from an algorithm one.
Going further
- Official arduino.cc guide — the extended version, in English.
- Arduino language reference — every built-in function (
pinMode,digitalWrite,analogRead, …).
See also
- Arduino — hub of the Arduino tutorials
- Microcontroller — parent hub, overview of the families
- Tinkercad — simulating an Arduino circuit online, with no hardware
- C++ — the basics of the language Arduino puts a layer on top of
- Firmware — structuring embedded code (cross-cutting)