The serial monitor is the universal observation tool for an embedded program: it lets the board send text to the computer (and the other way round) while the program runs, over the USB cable. It is the first debugging tool, ahead of the oscilloscope and the dedicated probes. When you want to know “what is my program doing, right now?”, you print to the serial monitor.
What is it for?
The serial monitor fills three complementary roles in a project:
- Seeing the invisible. The value of a variable, the reading from a sensor, whether a conditional branch was taken (all things you cannot observe from outside) become available through a single
Serial.println()line. - Calibrating. Before running a motor to a setpoint, you print the position sensor’s value: you read off the measuring range, adjust the thresholds, put numbers on the delays.
- Talking back the other way. The computer can also send commands to the board (entering a setpoint, triggering a measurement) through
Serial.read(). It is the simplest channel of interaction, with no graphical interface.
The serial plotter completes the monitor by displaying the printed values as a graph over time, ideal for watching a measurement change.
Step by step
Four steps: open the link, print, open the monitor, read what comes back.
1. Open the link in setup()
A single line, almost always the same:
void setup() {
  Serial.begin(9600);
}
The parameter is the transmission rate (baud rate, in bits per second). 9600 is the historic value, compatible everywhere. 115200 is more common today and gives roughly 12× the throughput (useful as soon as you print often). On the board side and on the monitor side, the value must be strictly identical. Otherwise the text shows up as unreadable characters.
2. Print in loop()
Two main functions: Serial.print() prints without a line break, Serial.println() prints and then starts a new line. Both take anything: string, number, boolean.
int valeur = analogRead(A0);
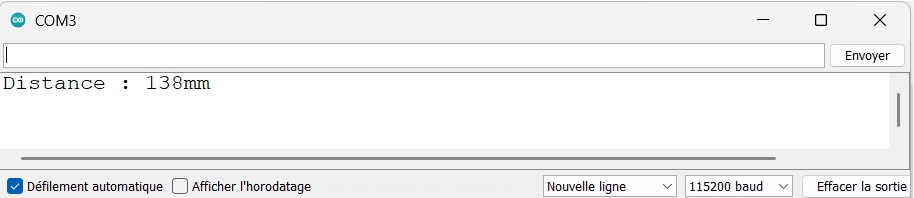
Serial.print("Valeur du capteur : ");   // "Sensor value: ", as shown in the screenshot below
Serial.println(valeur);
To print several quantities separated by a tab (useful for the serial plotter and for pasting into a spreadsheet):
Serial.print(temps);
Serial.print("\t");
Serial.print(consigne);
Serial.print("\t");
Serial.println(mesure);
3. Open the serial monitor
Upload the code first, then click the magnifying-glass icon at the top right of the IDE (IDE 1.8.x) or the serial monitor icon in the side bar (IDE 2.x). A pane opens at the bottom.
Check the baud rate in the drop-down at the bottom right. It must match the one passed to Serial.begin(). Otherwise the text looks like ⸮Ââ ⸮À⸮ instead of readable sentences.
The text printed by the board appears as it comes.
Tip
Uploading restarts the board. On every upload the program starts again from scratch, and the serial monitor stays open. Handy for watching the start-up. If nothing shows up after an upload, check the baud rate first, then that
Serial.begin()is there.
4. Read an input from the computer
The computer can also send text to the board. Type in the input box at the top of the monitor and press Enter.
On the code side, two functions:
Serial.available()returns the number of bytes received and waiting to be read (0if there are none).Serial.read()reads a single byte from the queue.
void loop() {
  if (Serial.available() > 0) {
    char c = Serial.read();
    Serial.print("Received: ");
    Serial.println(c);
  }
}
Warning
Serial.read()returns a character, not a number. If you type42into the monitor, you will get'4'(ASCII code 52) then'2'(ASCII code 50), not the integer 42. To read a number, useSerial.parseInt(), which gathers the digits up to the next separator.
Example — Watching a setpoint against a measurement
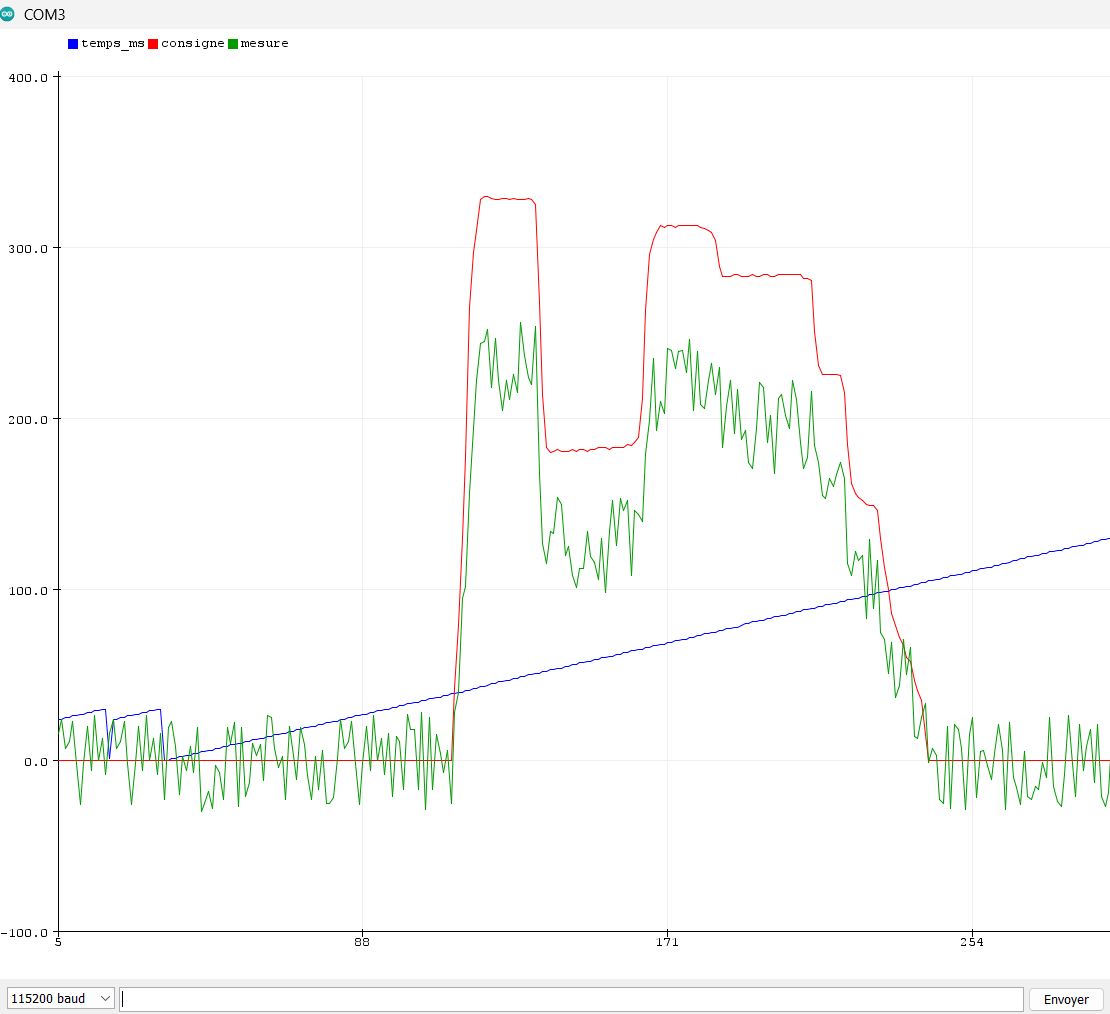
A concrete case: a program that reads a value on analog input A0 (a setpoint sent by a potentiometer) and compares it with an internal counter in millis(). You want to watch both change on the monitor and on the serial plotter.
unsigned long t0;

void setup() {
  Serial.begin(115200);
  t0 = millis();
  Serial.println("temps_ms\tconsigne\tmesure");  // headers: time_ms, setpoint, measurement
}

void loop() {
  unsigned long t = millis() - t0;
  int consigne = analogRead(A0);
  int mesure = (consigne * 0.7) + random(-30, 30);  // made-up noisy measurement

  Serial.print(t);
  Serial.print("\t");
  Serial.print(consigne);
  Serial.print("\t");
  Serial.println(mesure);

  delay(50);  // refreshed at 20 Hz
}
On the serial monitor, three columns separated by tabs scroll past, ready to paste straight into a spreadsheet for analysis. On the serial plotter (Outils → Traceur série, Tools → Serial Plotter), the three values are drawn as three curves on the same axes, with a legend taken from the header line. Turn the potentiometer: the consigne (setpoint) curve moves, the mesure (measurement) curve follows with noise on it.
Pitfalls
Mismatched baud rate. The number one trap, which produces text in Chinese characters or broken symbols. The cause is always the same: Serial.begin(X) in the code against the value picked at the bottom of the monitor. Line the two up.
Forgetting Serial.begin(). Without that line, the Serial.print() calls send nothing. Symptom: monitor open, baud rate correct, but no output at all.
print everywhere, println nowhere. All the output on one unreadable line sliding off to the right. The reflex: println at the end of every logical line, print in the middle.
Flooding the port. Printing every millisecond (delay(1), or no delay at all) saturates the serial port, slows the board down and makes the output unreadable. Keep it to ~10-50 Hz (delay(50) or more) for human observation, faster if a script on the computer is processing the output.
A monitor open elsewhere locks the port. If PlatformIO, an external terminal or another IDE is holding the port open, the IDE can neither open its own monitor nor upload. Close the other application before trying again.
Serial.read() consumes a single byte. A loop calling Serial.read() once reads only one character, even if the computer sent a whole word. To read up to the line break, loop on Serial.available(). Simpler still: Serial.parseInt() or Serial.readStringUntil('\n').
Buffer not flushed at start-up. Some boards (Leonardo, Micro) do not reset the serial link on upload the way the Uno does. The buffer may hold stale data. Adding while (!Serial) {} after Serial.begin() waits for the link to be ready (pointless on the Uno, recommended on the Leonardo), but avoid it if the board has to run with no computer attached: it would stay stuck at start-up as long as no monitor is open.
Special case — The serial plotter for watching quantities
The serial plotter (Outils → Traceur série, Tools → Serial Plotter) is a small software oscilloscope built into the IDE. It draws any numeric value that gets printed, one value per line (or several separated by tabs, drawn as curves on the same axes). It is the ideal tool for:
- setting the thresholds of a measurement (reading the range off the screen),
- watching the noise on a sensor,
- comparing setpoint against measurement in a simple control loop.
Limit: no adjustable time axis, and a short scrolling window. For deeper analysis, copy the text output into a spreadsheet or a Python script.
Where it fits in the project
- All through the proof of concept phase — the serial monitor is the default debugging tool. Before the oscilloscope, before the profiling tools, you print.
- Step 1 of the integration and testing phase — to qualify how a function behaves across a set of known measurements, the monitor lets you print expected against obtained side by side.
- Every step where you calibrate a sensor or an actuator — quick readings, range checks, watching transient behaviour.
Learning from the very first steps to print cleanly (headers, consistent separators, a sensible rate) saves you rebuilding your instrumentation for every new sensor. The serial monitor is the most immediate instrument in the project (nothing to install, nothing to wire) and one of the most rewarding.
Going further
- Official reference for the Serial class — every function (
peek,parseFloat,readBytes, …). - Debugging an Arduino program — more advanced tools (assertions, breakpoints on the IDE 2.x), beyond the monitor.
- To process the output downstream: a Python script using the
pyseriallibrary reads the stream and handles it (plotting, logging to a file, triggering actions).
See also
- Arduino — hub of the Arduino tutorials
- Getting started with Arduino — prerequisite (IDE plus a first upload)
- Tinkercad — the serial monitor is available in simulation too
- C++ — the language used in the sketches
- ASCII code — why a character received through
Serial.read()is a number, not the integer you typed - Communication buses — UART is the bus the serial monitor runs on underneath