Before writing a single line, you need to understand what happens between the moment you click Upload and the moment the board runs the program. This page follows that path (editing → compiling → uploading → running) then presents the minimum code that compiles on Arduino: the two functions setup() and loop(). As long as you do not know what runs, when, and how many times, you are programming blind.
What is it for?
Understanding execution pays off twice. First for troubleshooting: when a program refuses to work, the first question is “did it even compile and upload?”, and you can only answer that if you know the stages. Then for writing correct code: most beginners’ errors come from a wrong idea of what the board does. Two misunderstandings come up again and again:
believing the program runs once then stops, like a script on a computer — whereas a microcontroller runs in an endless loop for as long as it is powered;
believing all the code in the file runs from top to bottom — whereas only two functions are called, and not in the order you read them.
Clearing up those two misunderstandings is what this page is for.
From editing to running
Between your text and the blinking LED there are four stages. Understanding them lets you place a fault where it belongs.
Editing. You write C++ in the editor. At this stage it is nothing but text: the board does not understand that language.
Compiling. The Verify button launches the compiler, which translates your text into machine code — the sequence of binary instructions the microcontroller understands. If a syntax error remains (a missing ;, an unclosed brace), the translation fails: nothing is produced, and the compiler reports an error. As long as it does not compile, nothing goes to the board.
Uploading. The Upload button recompiles and then sends the machine code to the board over the USB cable. A small program already on the board, the bootloader, receives those bytes and writes them into flash memory (the memory that keeps the program even with the power off).
Running. As soon as the upload is finished (or on every power-up and every press of Reset), the microcontroller reads the program from flash and runs it. It carries on for as long as it is powered.
Info
Compiling ≠ uploading ≠ working. Three separate stages, three separate faults. Code can compile (correct syntax) and still fail to upload (wrong port, cable). It can upload and still misbehave (a mistake in the algorithm). Knowing which stage is stuck is half of the troubleshooting.
The minimum code
Here is the smallest Arduino program that compiles and uploads without error:
void setup() {}void loop() {}
It does nothing visible, but it is valid, and it already contains the whole compulsory skeleton. Two functions, and they are not interchangeable:
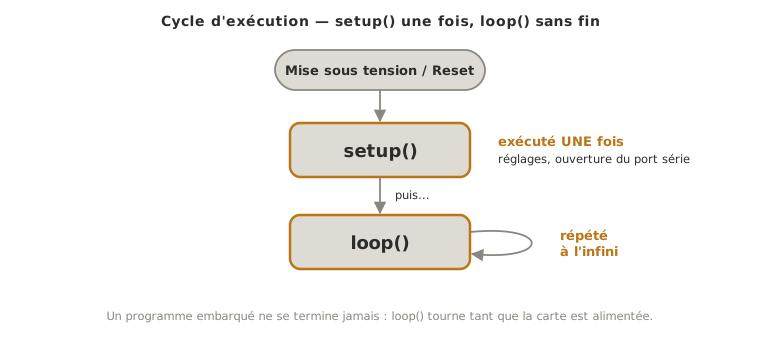
setup() runs only once, at start-up. This is where you put whatever is settled once and for all: the direction of the pins, the opening of the serial port.
loop() runs in an endless loop, right after setup(). It is the living heart of the program: as soon as the board reaches the end of loop(), it starts it again immediately, and so on until the power is cut.
Both are compulsory, even when empty: if either is missing, the program does not compile.
Note
Where did main() go? In “normal” C++, every program starts with a main() function. On Arduino it still exists, but the framework hides it: it writes for you a main() that calls setup() once, then loop() over and over. That is the whole “scaffolding” of the Wiring dialect: it spares you that repetitive code.
What the board does at power-up
The sequence is always the same, whatever the program:
An embedded program therefore never “finishes” of its own accord. This is a deep difference from a program on a computer: there is no end, no return to the system, just loop() running round and round until you unplug it.
Code to read
This sketch makes execution visible on the serial monitor. Upload it, open the monitor (magnifying glass at the top right, speed set to 115200), and watch.
unsigned long passages = 0; // counts the passes of loop() - declared outside the functionsvoid setup() { Serial.begin(115200); // opens the serial port (only once) Serial.println("=== Startup: setup() has run ===");}void loop() { passages = passages + 1; // one more on every pass Serial.print("loop pass no "); Serial.println(passages); delay(500); // slows the printing down so it stays readable}
The output looks like this:
=== Startup: setup() has run ===
loop pass no 1
loop pass no 2
loop pass no 3
loop pass no 4
Three things to notice as you read the output:
the === Startup === line appears only once — that is setup(), run a single time;
the counter climbs endlessly (1, 2, 3, …) — that is loop(), repeated for ever;
if you press the Reset button on the board, the start-up message reappears and the counter starts again from 1: a Reset is exactly a “power-up again”, so setup() plays out afresh.
Without the delay(500), the loop would run tens of thousands of times per second and the monitor would be unreadable: a good opportunity to gauge just how fast loop() is.
Pitfalls
One of the two functions is missing. Deleting setup() or loop() causes a compilation error of the kind undefined reference to 'loop'. Both are compulsory, even when empty.
Code written outside any function. An “executable” instruction (a digitalWrite, a function call) placed directly between setup() and loop(), outside any braces, does not compile. Only declarations (of variables, of functions) live at that level. Actions go inside setup() or loop().
Believing loop() runs only once. This is the most frequent misreading. Everything inside loop() repeats endlessly. Whatever must happen only once (a setting, a welcome message) goes in setup().
Forgetting Serial.begin(). Without that line in setup(), the Serial.print() calls display nothing: the port was never opened. Symptom: a hopelessly empty serial monitor.
A monitor speed that does not match. If Serial.begin(115200) and the monitor is set to another speed (9600…), the display is a jumble of characters. The two values have to be identical.
Exercises
Exercise 1 — The program that "does nothing"
Upload the minimum code (an empty setup() and loop()). What happens? Does the compilation succeed? The upload? And on the board, do you observe anything?
Answer to exercise 1
The compilation succeeds and so does the upload: the program is valid. But on the board, nothing visible: no pin is driven, no message sent. That is the key point: a program that compiles and uploads is not thereby “doing” anything. Compiling only proves the syntax is correct, not that the program does anything useful.
Exercise 2 — Making the loop visible
Print on the serial monitor a counter that increases on every pass of loop(), one line per second. How many lines do you see in 10 seconds?
Answer to exercise 2
unsigned long n = 0;void setup() { Serial.begin(115200);}void loop() { n = n + 1; Serial.println(n); delay(1000); // one second between two printouts}
With delay(1000) you get one line per second, so about ten in 10 seconds. The delay does not “clock” the board: it merely forces it to wait between two printouts. Without it, loop() would run thousands of times per second.
Exercise 3 — Proving that setup() runs only once
Write a program that prints "setup" in setup() and "loop" in loop() (once per second). Upload it, watch, then press the Reset button. What do you observe at each stage?
At start-up: a single"setup", then "loop" repeating. On pressing Reset: a new "setup" appears, then the "loop" lines resume. Conclusion: a Reset amounts to a power-up. setup() plays out in full, which also resets every variable (covered in local and global variables).
Where it fits in the project
Step 4 of the proof of concept phase — the very first upload (the Blink of getting started) is the act that validates the whole chain. Understanding the four stages of execution means knowing where to look when that first attempt fails.
Criterion “Programming or configuring a digital controller” — all the project’s code rests on this model of setup() once and loop() without end. It is the mental frame shared by every board in the Arduino framework.