Timing delays is the art of measuring or producing a delay in an embedded program. Arduino offers two tools with opposite philosophies: delay(), which suspends the whole program for a given time, and millis(), which gives the time elapsed since the board started. Moving from one to the other (going from delay() to patterns built on millis()) is the most structuring jump between a beginner’s sketch and an embedded program worthy of the name.
What is it for?
Any halfway serious program needs time: flashing an LED at 1 Hz, sampling a sensor at 10 Hz, raising an alarm after 3 seconds, running a closed-loop motor controller every 20 ms. With no time management you get either a program running as fast as the processor (with no rhythm), or a program blocked by delay() that misses everything happening during its pauses. This page shows both tools, and argues why millis() ends up winning.
Step by step
Four steps: use delay() to get going, understand its limits, switch to millis(), handle several times at once.
1. delay() — the teaching time bomb
void loop() {
  digitalWrite(LED, HIGH);
  delay(500);
  digitalWrite(LED, LOW);
  delay(500);
}
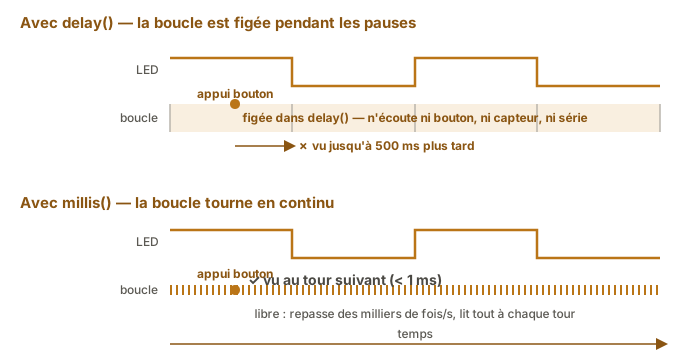
delay(N) pauses the program for N milliseconds. Simple, readable, used in the Blink and in every first example. Its limits: nothing else can run during the pause — no button reading, no serial reception, no sensor measurement.
For microseconds: delayMicroseconds(N) (useful for generating a short pulse on the HC-SR04, for instance).
2. Understand the limit of delay()
Code that looks harmless but misses everything:
void loop() {
  digitalWrite(LED, HIGH);
  delay(1000);
  digitalWrite(LED, LOW);
  delay(1000);
  // During these 2 seconds: impossible to read a button, a sensor, or Serial
}
If a button is meant to interrupt the flashing, this code will only see it up to 2 seconds late. That is unacceptable as soon as you have two things to do at once.
Danger
A program frozen in
delay()is blind to everything that happens during the pause. On a critical system — emergency stop, limit switch, obstacle detection, current or temperature threshold — an event falling during adelay()is only seen at the end of the pause, or missed altogether if it is fleeting. That delayed reaction can damage the hardware or injure someone. As soon as an input has to be watched continuously,delay()is banned in favour ofmillis().
3. millis() — the non-blocking clock
millis() returns the number of milliseconds elapsed since the board started. The program does not stop: it consults the clock.
unsigned long dernierToggle = 0;
const unsigned long INTERVALLE = 500;  // ms
bool etatLED = false;

void setup() {
  pinMode(LED_BUILTIN, OUTPUT);
}

void loop() {
  if (millis() - dernierToggle >= INTERVALLE) {
    dernierToggle = millis();
    etatLED = !etatLED;
    digitalWrite(LED_BUILTIN, etatLED);
  }

  // Here we can do SOMETHING ELSE without blocking
  // (read a button, measure a sensor, listen to Serial)
}
The loop() runs at full speed (of the order of 100 000 times per second on a Uno R3, depending on the load of the loop). On every pass you check whether the interval has elapsed: if it has you act, otherwise you carry on. The if (millis() - last >= interval) pattern is the incantation to memorise once and for all.
The contrast between the two philosophies reads at a glance on a timing diagram:
4. Several times at once
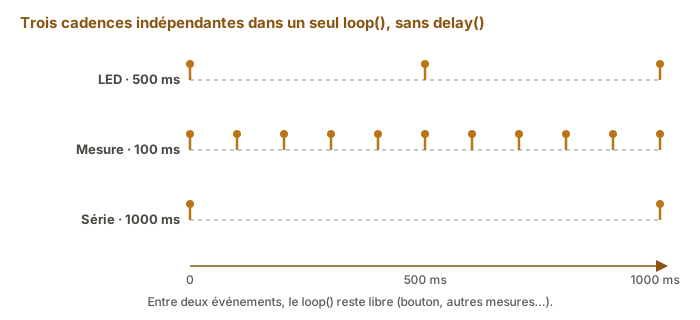
The decisive advantage of millis(): you can run several independent rates in the same loop().
unsigned long t_LED = 0,    INT_LED    = 500;
unsigned long t_MESURE = 0, INT_MESURE = 100;   // 10 Hz
unsigned long t_PRINT = 0,  INT_PRINT  = 1000;  // 1 Hz

void loop() {
  unsigned long maintenant = millis();

  if (maintenant - t_LED >= INT_LED) {
    t_LED = maintenant;
    digitalWrite(LED_BUILTIN, !digitalRead(LED_BUILTIN));
  }

  if (maintenant - t_MESURE >= INT_MESURE) {
    t_MESURE = maintenant;
    int val = analogRead(A0);
    // ... process the reading
  }

  if (maintenant - t_PRINT >= INT_PRINT) {
    t_PRINT = maintenant;
    Serial.println("Alive");
  }
}
Three rates (LED toggling at 2 Hz, measuring at 10 Hz, printing at 1 Hz) live together with no delay() at all. The loop() is free to listen to a button as well, or to Serial, and so on.
Example — Non-blocking blink plus a responsive button
The full case, which shows what the pattern is worth: an LED flashes at 1 Hz, and a button switches the rate between 1 Hz and 5 Hz with no loss of responsiveness at all.
// --- Pins: constants (const, set once and for all) ---
const int LED = 13;                     // pin of the indicator LED
const int BOUTON = 2;                   // pin of the push button (other leg to GND)
const unsigned long DELAI_REBOND = 30;  // ms of stability required before confirming a change of state

// --- Flashing: these are VARIABLES, they change while the program runs ---
unsigned long t_LED = 0;          // time (millis) of the last toggle of the LED
unsigned long intervalle = 500;   // current half-period: 500 ms = 1 Hz, 100 ms = 5 Hz
bool etatLED = false;             // LED currently lit (true) or out (false)

// --- Button: debouncing plus edge detection ---
bool dernierBouton = HIGH;            // last RAW reading (HIGH = released, pull-up)
bool etatStable    = HIGH;            // CONFIRMED state once the bounce is over
unsigned long dernierChangement = 0;  // time of the last transition of the raw reading

void setup() {
  pinMode(LED, OUTPUT);
  pinMode(BOUTON, INPUT_PULLUP);  // internal pull-up: button released = HIGH, pressed = LOW
}

void loop() {
  unsigned long maintenant = millis();   // read the clock ONCE per pass

  // 1. Flashing at the current rate, with no delay(): check whether the interval has elapsed
  if (maintenant - t_LED >= intervalle) {
    t_LED = maintenant;                  // remember when this toggle happened
    etatLED = !etatLED;                  // flip the state
    digitalWrite(LED, etatLED);
  }

  // 2. Button: filter the bounce, then act only on the EDGE (once per press)
  bool lecture = digitalRead(BOUTON);

  if (lecture != dernierBouton) {        // the raw reading has just changed (maybe a bounce)
    dernierChangement = maintenant;      // (re)start the debounce clock
    dernierBouton = lecture;
  }

  // Reading stable for more than DELAI_REBOND, AND different from the confirmed state?
  if (maintenant - dernierChangement > DELAI_REBOND && lecture != etatStable) {
    etatStable = lecture;                // confirm this new stable state
    if (etatStable == LOW) {             // LOW = falling edge = the button has just been pressed
      intervalle = (intervalle == 500) ? 100 : 500;   // switch 1 Hz <-> 5 Hz, once only
    }
  }
  // (No artificial "latch": testing lecture != etatStable is enough to act once per press.)
}
How to read this code. The sketch runs two independent mechanisms in the same loop(), without either one blocking the other.
- The flashing rests on
millis():t_LEDholds the time of the last toggle, andmaintenant - t_LED >= intervalleasks on every pass “has enough time gone by?“. If it has, the LED is toggled again andt_LEDis set tomaintenant. Changingintervalle(500 ↔ 100 ms) is all it takes to change the rate. - The button combines debouncing with edge detection, exactly as in off input:
dernierBoutonfollows the raw reading,etatStablethe state confirmed once the bounce is over (DELAI_REBOND). TheetatStable == LOWcondition is only true once per press (on the falling edge). That is what stops the rate switching over and over while the finger stays down.
Both blocks run on every pass: the LED flashes while the button is being watched, precisely what a delay() would forbid.
The wiring holds nothing new: a button on INPUT_PULLUP (one leg to the pin, the other to GND) and an LED on its pin. It is set out and illustrated in off input.
With a single delay() in the code, this behaviour would not be possible: it is the direct illustration of why millis() is the right tool as soon as there is more than one thing to do at a time.
Pitfalls
delay() blocking everything. The number one beginner’s trap: a delay(5000) tucked away in a loop, and all the rest of the program waits 5 seconds. Spot every delay() in the code and ask yourself each time: “could I replace this with a millis()?“.
Badly handled millis() overflow. millis() is an unsigned long (32 bits) that overflows after ~49.7 days. The test if (millis() - last >= interval) stays correct across the overflow, thanks to the modular arithmetic of unsigned types. The other way round, if (millis() >= last + interval) is wrong at the overflow (it can produce a temporary freeze). Always prefer the first form.
Time variable as an int or a signed long. Storing a millis() result in an int (16 bits on a Uno R3) causes an overflow every 32 seconds. Always unsigned long for variables holding a timestamp.
On the Uno R4 (an Arm Cortex-M4 32-bit core), an int is 32 bits: the same bug then only overflows after ~24.8 days, rarer and therefore all the more insidious. The rule does not change: unsigned long for every timestamp.
delayMicroseconds(N) beyond 16383. The function is only accurate for durations under ~16 ms (16383 µs on a Uno R3). For longer, use delay() (in milliseconds) or a counter based on micros().
micros() overflows too. micros() (microseconds since start-up) is also an unsigned long, and overflows after ~71 minutes. For short timings that has no effect. For long ones, prefer millis().
Mixing up the units. delay(1000) = 1 second, delayMicroseconds(1000) = 1 millisecond. A classic mistake: swapping one for the other without adjusting. The LED then flashes 1000× too fast or too slow.
Stacking several if (millis()…) that reset the same counter. Every independent rate must have its own unsigned long. Otherwise the rates pollute each other and cut each other short.
Special case — Sub-millisecond rates and real time
For fast control loops (a PID at 1 kHz, reading an encoder at 10 kHz, generating a precise signal), the millis() plus loop() polling pair reaches its limit: the latency becomes uncertain depending on what the rest of the loop() happens to be doing. Three routes:
micros()for the same pattern at microsecond resolution — the gain is limited by the duration of theloop().- Hardware timers plus a periodic interrupt — see hardware timers and interrupts.
- FreeRTOS or cooperative systems — for structured multitasking (typically on the ESP32).
Where it fits in the project
- Step 3 of the proof of concept phase — every measure-and-act loop (a control loop, sensor sampling) rests on a precise rate, to be built with
millis()from the very first code. - All through the integration and testing phase — a test measuring the response time of a function relies on
millis()ormicros()for its timestamps.
Making the delay() → millis() step once and for all at the start of the PoC saves you rewriting the whole structure of the code when the project calls for two things at once, which it always does in practice.
See also
- Arduino — hub of the Arduino tutorials
- off input — uses
millis()for non-blocking debouncing - Non-blocking programming — the pattern generalised to the whole of the code
- Interrupts — for the ultra-fast events where
millis()is not enough - Hardware timers — for periodicity down to the µs
- Timer — the hardware counter
millis()anddelay()rest on