An on/off input reads a binary signal that only ever takes two states: high or low, pressed or released, present or absent. Push button, switch, limit switch, digital presence sensor: all of them are read with digitalRead(). The difficulty is not in the reading itself but in dealing with bounce: a mechanical contact produces several spurious switchings over a few milliseconds, and you have to filter them out to get a clean signal.
What is it for?
Reading an on/off input is the founding move of every embedded user interface: starting a cycle, confirming a setpoint, triggering a measurement, detecting a mechanical end of travel. A typical project has several (a Start/Stop button, a limit switch on each axis, a part-presence sensor). Good practice is to learn the reading with debouncing once, then duplicate it cleanly on every input of the project.
Step by step
Four steps: wire it with a pull-up, read it, add debouncing, detect the edge.
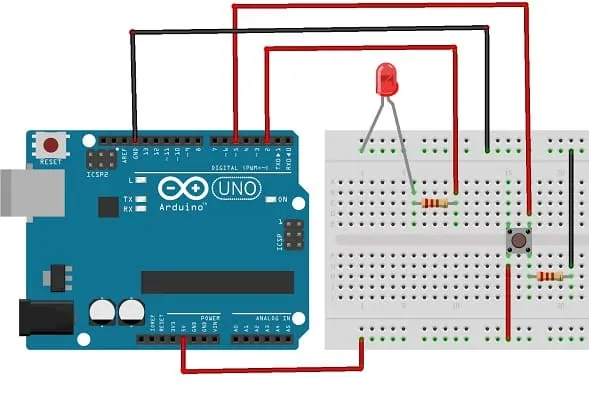
1. Wire the button with INPUT_PULLUP
One side of the button to the chosen pin (D2 here), the other side to GND. No external resistor: the internal pull-up resistor (set by pinMode(BOUTON, INPUT_PULLUP)) pulls the potential up towards +5 V when the button is released, and lets it fall to GND when it is pressed.
Inverted logic: digitalRead() returns HIGH at rest, LOW when pressed.
2. Raw reading
const int BOUTON = 2;                  // button wired to pin D2

void setup() {
  pinMode(BOUTON, INPUT_PULLUP);       // input plus internal resistor: rest = HIGH
  Serial.begin(115200);                // opens the serial link so we can watch
}

void loop() {
  int etat = digitalRead(BOUTON);      // reads the pin: HIGH (1) or LOW (0)
  Serial.println(etat);                // prints 1 or 0 to the monitor
  delay(10);                           // short pause: ~100 readings per second
}
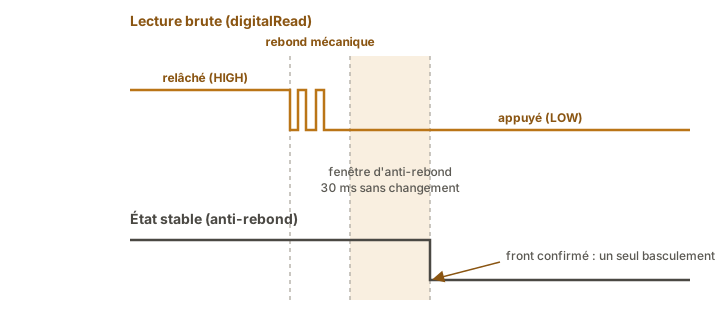
Upload, open the serial monitor, press: you see 1, 1, 1, 0, 0, 0, 1, 1, 1.... But look very closely and you will sometimes catch a few spurious transitions at the moment of the press (0, 1, 0, 1, 0). That is the mechanical bounce of the contact, and it lasts a few milliseconds.
3. Software debouncing
The simplest fix: ignore any switching that is not confirmed for 20-50 ms.
const int BOUTON = 2;                    // button wired to pin D2

int dernierEtat = HIGH;                  // last value READ (shakes during the bounce)
int etatStable = HIGH;                   // CONFIRMED state of the button (the one we act on)
unsigned long dernierChangement = 0;     // time, in ms, of the last change of reading
const unsigned long DELAI_REBOND = 30;   // quiet time required before confirming (ms)

void setup() {
  pinMode(BOUTON, INPUT_PULLUP);         // input plus internal resistor: rest = HIGH
  Serial.begin(115200);                  // serial link, to print the presses
}

void loop() {
  int lecture = digitalRead(BOUTON);     // raw reading on every pass of the loop

  // Has the reading just changed? (on the press it changes many times: bounce)
  if (lecture != dernierEtat) {
    dernierChangement = millis();        // note WHEN that change happened
    dernierEtat = lecture;               // and keep the new value read
  }

  // Has the reading stayed the same for long enough (> 30 ms)?
  if (millis() - dernierChangement > DELAI_REBOND) {   // yes: the bounce is over
    if (lecture != etatStable) {         // and the confirmed state really did change
      etatStable = lecture;              // confirm the new state
      Serial.print("Button: ");
      Serial.println(etatStable == LOW ? "pressed" : "released");  // LOW = pressed (pull-up)
    }
  }
}
How to read this code. The trick lies in two variables. dernierEtat follows the raw value read at this instant (it shakes during the bounce). etatStable only holds the confirmed state, the one you act on. On every pass of loop():
- if the reading changes, you do not believe the button straight away: you only note the time of the change (
dernierChangement = millis()); - as long as it changes again (bounce), that time is pushed back over and over;
- as soon as it stays the same for 30 ms, the bounce is over: you confirm
etatStable.
millis() returns the number of milliseconds elapsed since the board started. millis() - dernierChangement is therefore the time elapsed since the last shake. Comparing it with DELAI_REBOND amounts to asking: “has the signal been quiet long enough to be believed?”
Test it: now every press produces exactly one Button: pressed line and then Button: released, whatever the mechanical quality of the button.
4. Detect the edge (press against hold)
Often you want to react to the press itself (toggle, trigger) rather than for as long as the key is held down. That is falling-edge detection:
// Inside the debouncing branch, replace the println with:
if (etatStable == LOW) {
  // FALLING EDGE — the button has just been pressed
  Serial.println("Press detected!");
}
A toggle variant (one press flips the state of an LED):
int etatLED = LOW;
// ...
if (etatStable == LOW) {
  etatLED = !etatLED;
  digitalWrite(LED_BUILTIN, etatLED);
}
Example — Counting presses and toggling an LED
A full case combining debouncing plus edge detection plus a visible action.
const int BOUTON = 2;
const int LED = 13;

int dernierEtat = HIGH, etatStable = HIGH;   // the same 2 variables as in step 3
unsigned long dernierChangement = 0;
const unsigned long DELAI_REBOND = 30;

int compteur = 0;                            // number of presses counted
bool ledAllumee = false;                     // current state of the LED

void setup() {
  pinMode(BOUTON, INPUT_PULLUP);
  pinMode(LED, OUTPUT);
  Serial.begin(115200);
}

void loop() {
  int lecture = digitalRead(BOUTON);
  if (lecture != dernierEtat) {              // --- debouncing block, same as step 3 ---
    dernierChangement = millis();
    dernierEtat = lecture;
  }
  if (millis() - dernierChangement > DELAI_REBOND && lecture != etatStable) {
    etatStable = lecture;                    // confirmed state
    if (etatStable == LOW) {                 // falling edge = one new press
      compteur++;                            // +1 press
      ledAllumee = !ledAllumee;              // flip the LED (toggle)
      digitalWrite(LED, ledAllumee);         // apply the new state to the LED
      Serial.print("Press #");
      Serial.println(compteur);
    }
  }
}
Every press increments a counter visible on the serial monitor and flips the state of the LED (clean behaviour, immune to bounce).
Pitfalls
No debouncing. Typical symptom: one press of the button counts for 3 or 4 increments. Mechanical bounce is invisible to the eye but plain to see at the processor’s microsecond.
INPUT wiring with no external resistor. With no pull-up or pull-down, the pin floats. The LED flips at the slightest wave of a hand over the board (aerial effect). Nearly always, INPUT_PULLUP plus a button to GND is the answer.
Inverting the pull-up logic. digitalRead() == HIGH means released, not pressed. Getting it the wrong way round gives an LED lit by default that goes out on the press, functional but counter-intuitive.
Debounce delay too short. Below ~10 ms, some cheap mechanical buttons get through the filter. 20-50 ms is the usual range. Do not go lower without having measured the bounce of the part you are using.
Confusing hold and press. A loop reacting to digitalRead() == LOW acts for as long as the button is held (a counter incrementing 1000 times per second of holding, say). For a per press behaviour, you have to detect the edge: compare the current state with the previous one.
delay() in the reading loop. A delay(500) in the middle of loop() misses short presses. The debouncing pattern above deliberately uses no delay at all: it watches time through [[arduino-temporisation-en|millis()]].
Wiring the button between 5 V and the pin. INPUT_PULLUP mode plus a button to 5 V = always reads HIGH. The button shorts the pull-up to its own level. Always the button to GND.
Special case — Several buttons
For 4-8 buttons you simply duplicate the pattern (one stable state, one last-change time per button). Beyond that, two routes:
- Button matrix (rows × columns scanned) for 16+ buttons on few pins.
- Analog conversion (a resistor network plus
analogRead) to read N buttons on a single analog pin — cheap but touchy.
See Arduino libraries for Bounce2 (debouncing off the shelf) or OneButton (short click, long click and double click detection).
Where it fits in the project
- Step 2 of the proof of concept phase — every user command button (Start/Stop, confirm) must be tested on its own with debouncing before being integrated.
- Step 2 of the integration and testing phase — every mechanical limit switch (axis at its stop, part present) is validated as an on/off input with debouncing.
The debouncing pattern is there to be copied and adapted from one page to the next once you have understood it once. Investing 10 minutes here saves hours of debugging spent wondering why the system counts presses wrong.
See also
- Arduino — hub of the Arduino tutorials
- Configuring Arduino GPIO — prerequisite on
pinModeandINPUT_PULLUP - off output — the matching output
- Timing delays —
delay()againstmillis(), essential for non-blocking debouncing - Interrupts — the alternative to polling when you need to react fast