A library is a ready-made block of code that wraps up the communication with a component or a service: Servo.h for servos, Wire.h for the I2C bus, LiquidCrystal.h for LCD displays, Adafruit_BMP280.h for the BMP280 pressure sensor. Instead of rewriting a sensor’s protocol or an actuator’s timing on every project, you include the library and use its functions. The Arduino ecosystem counts thousands of third-party libraries. Knowing how to install one, include it and read its documentation is a basic move.
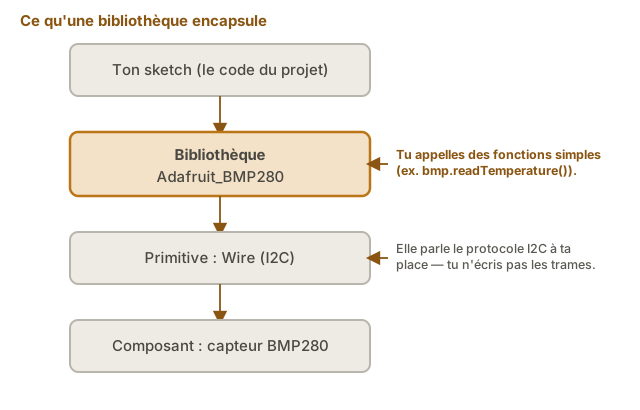
What is it for?
Three complementary roles:
- Saving time — showing text on an SSD1306 OLED with no library means several hundred lines of I2C code plus bitmap fonts. With
Adafruit_SSD1306, it is ten lines. - Benefiting from accumulated experience — maintained libraries have already been through the subtle bugs (timing, edge cases, compatibility across boards) that you would rather not rediscover one by one.
- Making porting easier — a single library (
Adafruit_GFXfor graphic displays, say) covers several models of hardware. Changing part number takes only a minimal change of code.
Step by step
Four steps: find the library, install it, include it, read its documentation.
1. Find a library
Three legitimate sources:
- The library manager built into the IDE (Sketch → Inclure une bibliothèque → Gérer les bibliothèques, Sketch → Include Library → Manage Libraries) — the official channel, which gathers hundreds of libraries vetted by Arduino.
- The module manufacturer’s GitHub — for a slightly specialised component (Pololu, Adafruit, SparkFun, Sensirion), go to their GitHub repository.
- The PlatformIO Registry — the equivalent of the Arduino manager but for PlatformIO, with a large overlap.
For a component you do not know, type its name plus “arduino library” into a search engine. Check the GitHub page: number of stars, date of the last commit, open against closed issues. A library untouched for several years on a common component should raise your suspicions.
2. Install the library
Method A — the built-in manager (recommended):
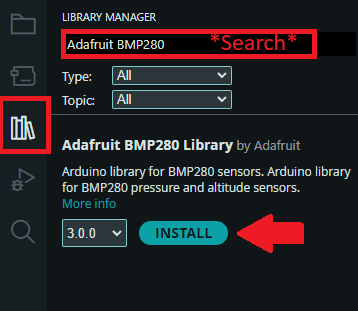
- Open Sketch → Inclure une bibliothèque → Gérer les bibliothèques (Sketch → Include Library → Manage Libraries).
- Type the name into the search box (
Servo,LiquidCrystal_I2C,Adafruit BMP280). - Pick the library and click Installer (Install).
A library often calls for others. The IDE may then open the Install library dependencies box, which names what is missing. Click Install all: the library you asked for would not be enough on its own to compile.
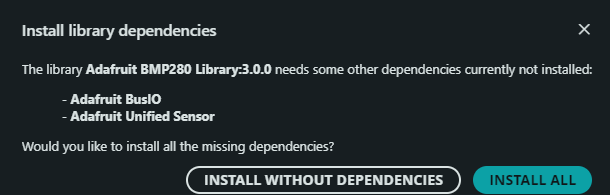
Install without dependencies installs the library you asked for and nothing else. The Output tab still announces a successful installation (see Pitfalls).
Method B — installing from a ZIP file (for libraries missing from the manager):
- Download the ZIP from GitHub (Code → Download ZIP button).
- In the IDE: Sketch → Inclure une bibliothèque → Ajouter la bibliothèque .ZIP… (Sketch → Include Library → Add .ZIP Library…).
- Select the ZIP.
Method C — a Git clone (for developers used to it): clone the repository straight into ~/Arduino/libraries/. The IDE picks it up automatically at the next start-up.
3. Include it and use it in the code
Once installed, the library is included as a header file at the top of the sketch:
#include <Servo.h>

Servo monServo;

void setup() {
  monServo.attach(9);  // pin D9
  monServo.write(90);  // position 90°
}

void loop() {
  // ...
}
#include <X.h> (with angle brackets) searches the IDE’s standard directories. That is the form to use for installed libraries. #include "X.h" (with quotes) searches the sketch folder first, and is reserved for the project’s own local files.
4. Read the documentation
Three complementary sources of documentation:
- The examples shipped with the library: Fichier → Exemples → library name (File → Examples → library name). Almost always there, and the number one way in.
- The README and the docs on the GitHub repository: what the functions do, their parameters, their limitations.
- The source code: for short libraries (
Servo.hruns to a few dozen lines), reading the.htells you exactly what each function does.
The beginner’s mistake: trying a library without looking at its examples. 80% of the questions on forums are answered by opening the example that ships with it.
Example — Driving a servo with Servo.h
The full case: install Servo.h, wire an SG90 servo, sweep through an angle.
Installation: Servo.h ships with the Arduino IDE by default. Nothing to install, only to include.
Wiring: SG90 servo, red wire to +5 V, brown (or black) wire to GND, orange (or yellow, the signal) wire to D9.
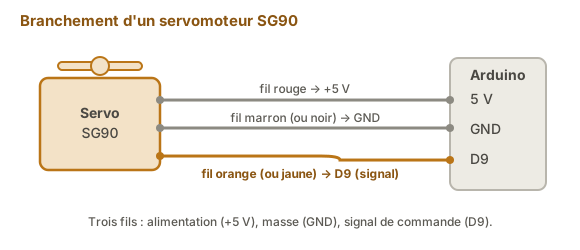
Code:
#include <Servo.h>          // makes the functions of the Servo library available

Servo monServo;             // creates a servo object (one per servo driven)

void setup() {
  monServo.attach(9);       // ties the servo to pin D9 (generates the signal for it)
  Serial.begin(115200);     // (optional here) opens the serial link
}

void loop() {
  // Sweep 0° → 180°
  for (int angle = 0; angle <= 180; angle++) {  // the angle grows degree by degree
    monServo.write(angle);  // sends the angle setpoint to the servo
    delay(15);              // 15 ms per step: gives the servo time to move
  }
  // Back 180° → 0°
  for (int angle = 180; angle >= 0; angle--) {  // the same thing the other way
    monServo.write(angle);
    delay(15);              // same block as the outward sweep
  }
}
Upload. The servo sweeps back and forth continuously.
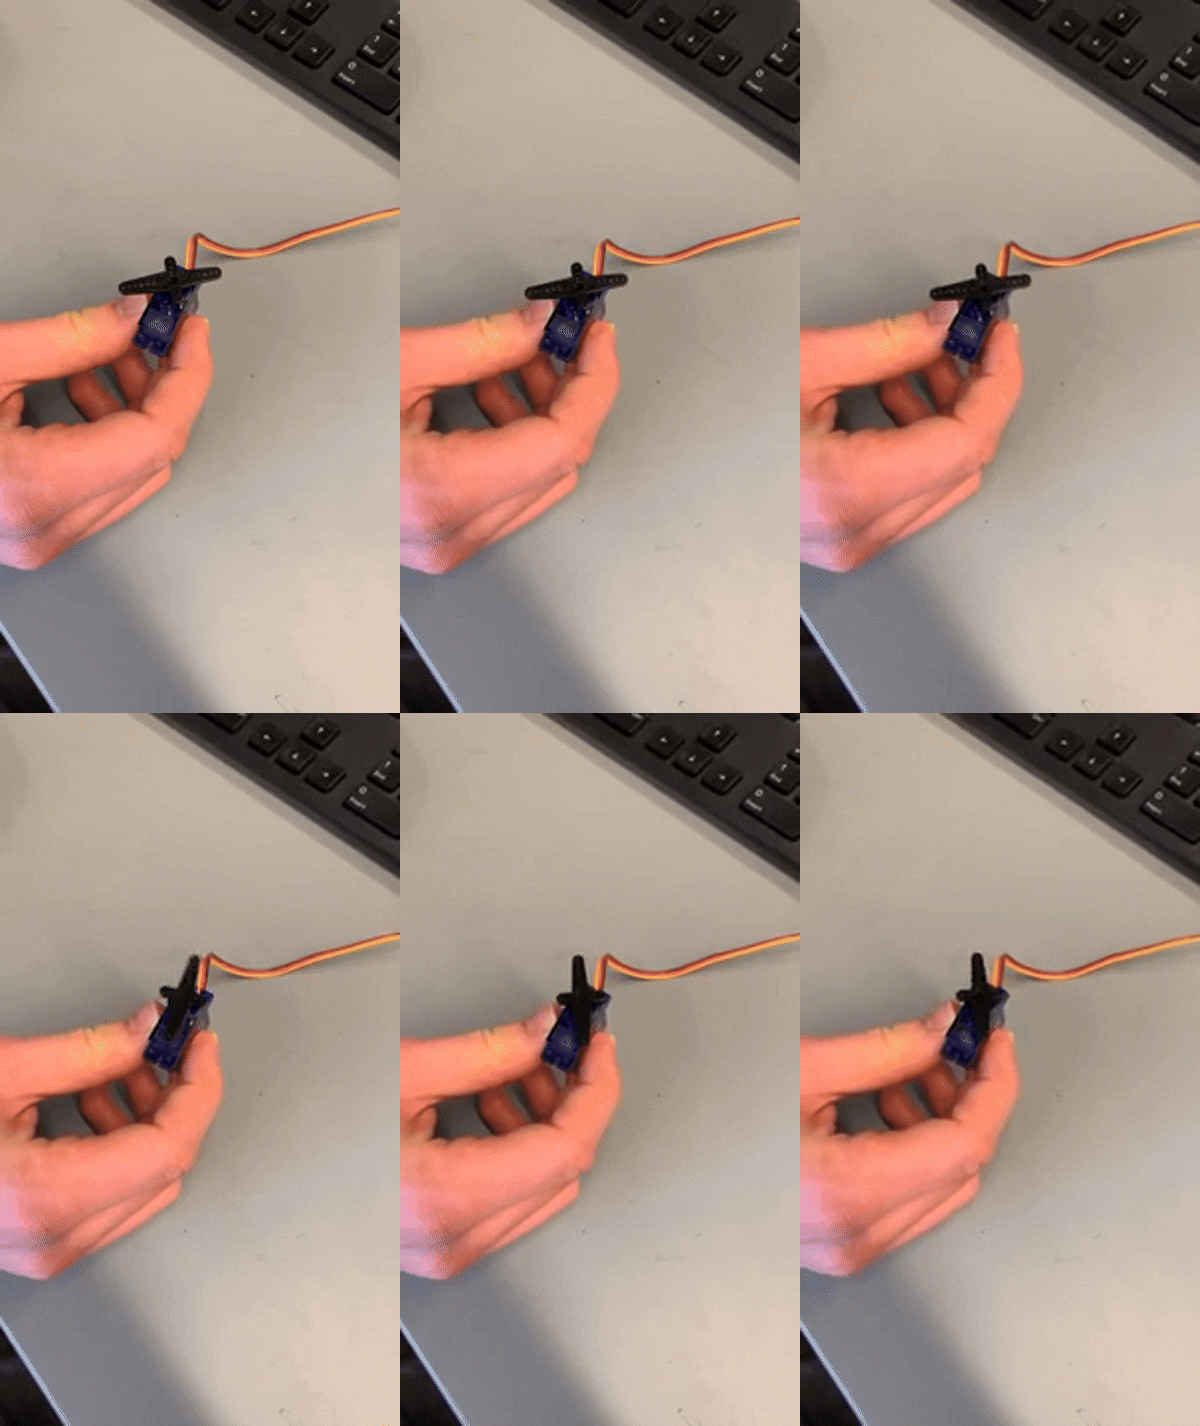
The actual range of travel is not guaranteed by the code. attach(9) spreads the angles 0 to 180 across a default pulse range that depends on the library — 544 to 2400 µs on Arduino AVR, but only 1000 to 2000 µs on the ESP32. The same write(180) therefore does not send the same pulse from one board to the next, and an SG90 driven with the ESP32 defaults covers only about half its travel. That is what the sweep above shows, filmed on an ESP32. The three-argument form takes that range back into your own hands:
monServo.attach(9, 500, 2500); // pin, pulse at 0°, pulse at 180°On the ESP32 it doubles the range and gives the full travel. On AVR, where the default range is already wide, it gains only a few per cent: a sweep that stayed short there would have a mechanical cause, which no software setting will open up.
A note on the teaching side: before Servo.h, driving a servo meant generating the 50 Hz PWM signal with its 1-2 ms pulse by hand. The library wraps all of that up, which is exactly the point of it.
Pitfalls
Library not installed. The compiler reports fatal error: Servo.h: No such file or directory. Check the installation, check the spelling (case-sensitive on Linux and macOS).
Dependencies not installed. The same failure, with a reassuring front. Choosing Install without dependencies succeeds. The Output tab ends on successfully installed, and nothing says the count is short. The failure only shows at compile time:
In file included from Blink.ino:1:
...\libraries\Adafruit_BMP280_Library/Adafruit_BMP280.h:26:10: fatal error: Adafruit_Sensor.h: No such file or directory
   26 | #include <Adafruit_Sensor.h>
      |          ^~~~~~~~~~~~~~~~~~~
compilation terminated.
The file at fault is not the sketch: it is the header of the library you have just installed, line 26, which calls for Adafruit_Sensor.h, the dependency that was refused. And the compiler stops at the first one missing: installing them one by one means recompiling that many times. Reopen the manager, reinstall, and accept Install all.
Several libraries with the same name. Symptom: it compiles but behaves inconsistently. Arduino uses the last one installed. Uninstall the duplicates in the manager.
Library incompatible with the board. A library written for the Uno R3 (AVR) may fail to compile on the Uno R4 (ARM Renesas) or on the ESP32. Check the supported platforms on GitHub. Often a 2.x version or a fork exists for the newer platform.
Resource conflict. Servo.h uses Timer1 on the Uno R3 and disables PWM on D9 and D10. Including two libraries that both want the same timer produces unpredictable behaviour. Read the notes of each library.
Duplicate definitions. Including the same library twice across several files of the project without an #ifndef guard produces multiple definition of… errors. Serious libraries are protected. Amateur ones are not always.
Unstable API between versions. A library update can rename functions or change parameters. If code that used to work breaks after an update, look at the repository’s CHANGELOG. Fix: pin the version (PlatformIO allows it through platformio.ini).
Outdated library on a common component. For very common sensors (DHT11/22, MPU6050), several libraries live side by side — some up to date, others abandoned. Prefer the ones maintained by a known name (Adafruit, Sensirion, the component’s manufacturer) over an orphaned fork.
Special case — The Wire and SPI libraries
Wire.h (I2C) and SPI.h ship with the IDE, nothing to install. They provide the low-level primitives that the sensor libraries on those buses build on. See I2C on Arduino and SPI on Arduino.
The same goes for EEPROM.h (non-volatile memory), SoftwareSerial.h (software UART) and Stepper.h (stepper motor): they ship with the IDE.
Where it fits in the project
- Step 2 of the proof of concept phase — at the first slightly advanced sensor or actuator (servo, LCD, BMP280), install the right library and run its example BEFORE writing any project code. That is the test that validates hardware plus tooling.
- Step 4 of the concept phase — the technical state of the art often takes the availability of a library in as a criterion for choosing a component: a component with no maintained library adds weeks of development.
A well-chosen library is one of the biggest levers of efficiency in an embedded project. The other way round, insisting on reinventing what a proven library already does is a false step you pay for in bugs over the long run.
See also
- Arduino — hub of the Arduino tutorials
- Getting started with Arduino — prerequisite (knowing where the manager is)
- Servo — an example of using
Servo.h - OLED display — an example of using
LiquidCrystal_I2CorAdafruit_SSD1306 - Library — the cross-cutting concept page
- Firmware — for the wider structuring of embedded code