A display lets an embedded project show its readings, its state or its menu without going through a PC. Two families live side by side in the Arduino ecosystem: character LCDs (16×2 or 20×4 characters, the historical technology) and graphic OLEDs (128×64 pixels on an SSD1306, more modern). This page covers both in their most teachable form: wired over I2C, which takes only two pins.
What is it for?
The display comes in at the point where a project leaves the PC-tethered bench and becomes standalone:
- Demonstration — showing sensor readings live on the enclosure, with no computer.
- User interface — menu, mode selection, settings.
- Status indicator — time, battery level, error present.
- On-board datalogger — seeing the latest values without opening a file.
A quick comparison:
| Type | Readability | Graphics | Consumption |
|---|---|---|---|
| 16×2 I2C LCD (HD44780 + PCF8574) | excellent, even in full sun | none | ~20-50 mA (backlight on) |
| 0.96″ I2C OLED, SSD1306 (128×64) | very high contrast, narrow viewing angle | ✅ | ~20 mA |
| 2.4″ SPI TFT (ILI9341) | colour, wide viewing angle | ✅ | ~80-150 mA |
| 2.9″ SPI e-paper | excellent in ambient light | ✅ | none outside refresh (slow refresh, ~2 s) |
Step by step
Four steps: choose the display, wire it over I2C, install the library, write the code.
1. Choose the display
For a first school project: an SSD1306 128×64 I2C OLED. Small, legible, simple graphics.
For robust text you can read from a distance: a 16×2 I2C LCD (PCF8574 label on the back). No graphics, but perfect text, and bigger.
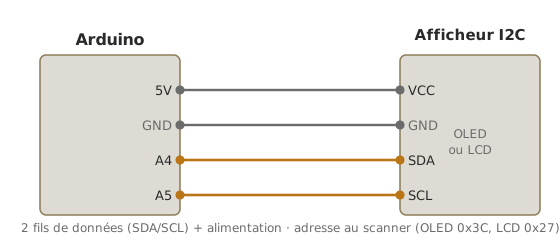
2. Wire it over I2C
Identical for both types: 4 wires.
| Module | Arduino Uno |
|---|---|
| VCC | 5 V (or 3.3 V for some OLEDs) |
| GND | GND |
| SDA | A4 |
| SCL | A5 |
Consumer SSD1306 OLEDs accept both 3.3 V and 5 V (on-board regulator). Check the label on the module. The I2C LCD is designed for 5 V only.
3. Install the library
For an SSD1306 OLED: Adafruit SSD1306 through the library manager. Also install Adafruit GFX Library (a dependency, providing the drawing primitives) and Adafruit BusIO (a bus dependency).
For an I2C LCD: LiquidCrystal I2C (by Frank de Brabander) through the manager. Several forks exist. This one is reliable. Alternative: hd44780 (by Bill Perry), more modern but with slightly different syntax.
4. Write the code
SSD1306 OLED:
#include <Wire.h>
#include <Adafruit_GFX.h>
#include <Adafruit_SSD1306.h>

const int LARGEUR = 128;
const int HAUTEUR = 64;
Adafruit_SSD1306 ecran(LARGEUR, HAUTEUR, &Wire, -1);  // -1 = no reset pin

void setup() {
  Serial.begin(115200);
  if (!ecran.begin(SSD1306_SWITCHCAPVCC, 0x3C)) {  // 0x3C found with the I2C scanner
    Serial.println("OLED not found");
    while (1);
  }
  ecran.clearDisplay();
  ecran.setTextColor(SSD1306_WHITE);
  ecran.setTextSize(1);
  ecran.setCursor(0, 0);
  ecran.println("Hello!");
  ecran.println("Line 2");
  ecran.display();
}

void loop() {
  ecran.clearDisplay();
  ecran.setCursor(0, 0);
  ecran.print("Time: ");
  ecran.print(millis() / 1000);
  ecran.println(" s");
  ecran.display();
  delay(500);
}
How to read this code
ecran.display()is mandatory: the Adafruit library draws into an internal buffer (in RAM), and only that call actually sends it to the screen. ThesetCursor/clearDisplaycommands touch nothing but the buffer. Untildisplay()is called, the screen stays as it was. Forgettingdisplay()= a screen that looks blank while the code “runs”.
16×2 I2C LCD:
#include <Wire.h>                // I2C bus
#include <LiquidCrystal_I2C.h>    // LCD driver through the PCF8574 expander

// module I2C address (0x27 or 0x3F), then column and row count
LiquidCrystal_I2C lcd(0x27, 16, 2);

void setup() {
  lcd.init();              // initialises the LCD and the I2C bus
  lcd.backlight();         // turns the backlight on (otherwise the text is unreadable)
  lcd.setCursor(0, 0);     // cursor to column 0, row 0 (top-left corner)
  lcd.print("Hello LCD!");
  lcd.setCursor(0, 1);     // column 0, row 1 (second line)
  lcd.print("Line 2");
}

void loop() {
  lcd.setCursor(0, 1);          // back to the start of line 2 before rewriting
  lcd.print("Time: ");
  lcd.print(millis() / 1000);   // seconds elapsed since start-up
  lcd.print(" s   ");           // trailing spaces: they wipe the digits of the previous value
  delay(500);
}
How to read this code
Unlike the OLED, the LCD has no buffer: every
lcd.print()shows up immediately. But it does not erase what was written before. Showing42then7at the same spot leaves you looking at72. To clean up, write spaces after the value (like the" s "above) or calllcd.clear()(slow, to be used sparingly).
Example — an OLED thermometer with a thermometer icon
A full case: read the temperature from a BMP280 (see I2C on Arduino) and show it on the OLED in large digits with an icon.
Wiring: BMP280 and OLED both on I2C, on A4/A5 (same bus as in step 2; several devices at different addresses — BMP280 = 0x76, OLED = 0x3C).
#include <Wire.h>
#include <Adafruit_GFX.h>
#include <Adafruit_SSD1306.h>
#include <Adafruit_BMP280.h>

const int LARGEUR = 128;
const int HAUTEUR = 64;
Adafruit_SSD1306 ecran(LARGEUR, HAUTEUR, &Wire, -1);
Adafruit_BMP280 bmp;

void setup() {
  Serial.begin(115200);
  ecran.begin(SSD1306_SWITCHCAPVCC, 0x3C);
  bmp.begin(0x76);
  ecran.setTextColor(SSD1306_WHITE);
}

void loop() {
  float t = bmp.readTemperature();

  ecran.clearDisplay();
  ecran.setTextSize(1);
  ecran.setCursor(0, 0);
  ecran.println("Temperature");

  ecran.setTextSize(3);  // large characters
  ecran.setCursor(10, 20);
  ecran.print(t, 1);  // 1 decimal place
  ecran.print(" C");

  ecran.display();
  delay(500);
}
Breathe on the BMP280: the displayed temperature climbs by 1-2 °C per second. A simple demo, visually satisfying, combining two I2C modules on one bus.
Pitfalls
Wrong I2C address. The SSD1306 is nearly always at 0x3C, occasionally at 0x3D. The LCD is at 0x27 or 0x3F depending on the module. Always run an I2C scanner (see I2C on Arduino) before hard-coding an address.
An obsolete or incompatible library. There are many SSD1306 libraries (Adafruit, U8g2, SH1106 for the variants). If nothing shows up, check that you are using the library matching your screen’s controller (SSD1306 vs SH1106: the label is on the module).
An OLED with no call to display(). The Adafruit library draws into an internal buffer. Only display() sends it to the hardware. Forgetting the call = a blank screen despite code that looks correct.
An LCD that does not clear the old content. The LCD writes character by character without erasing the rest. Show "42" then "7" and you see "72": you have to write "7 " (with a space) or call lcd.clear().
Text too big for the screen. On a 128×64 OLED at setTextSize(3), one character is about 18 pixels wide by 24 tall, so 7 characters per line at most. Beyond that the text runs off the right or overwrites the display. Size it for the length you expect.
Several I2C devices with their own pull-ups. I2C LCDs and some OLEDs carry their own SDA/SCL pull-ups. On a bus with several such modules, the equivalent resistance gets too low: the bus stops working. Disable the pull-ups on every module but one.
An LCD backlight that draws too much. The backlight of a 16×2 I2C LCD pulls about 50 mA. On a project running from a battery, or from the USB port of an already loaded PC, that counts. lcd.noBacklight() turns the backlight off and saves it.
Slow refresh that flickers. Clearing the whole screen every frame (clearDisplay() plus a full redraw) is fine at 50 Hz. Above that it may flicker: prefer redrawing only the area that changed.
Special case — custom fonts and accented characters
Accented characters (é, è, à, ç) are not in the default font of the Adafruit GFX library. Three options:
- Strip them as you write: put
"Temperature"where the French text would say"Température". - Import an extended font (
fonts/in Adafruit GFX, fonts carrying accents). - Use U8g2 — an alternative library with native UTF-8 support and hundreds of fonts.
For a French-language project that has to render accents properly, U8g2 is the recommended option.
Where it fits in the project
- Step 3 of the proof-of-concept phase — the first on-board display, letting you watch the readings without a PC.
- Step 3 of the integration and testing phase — the display built into the demonstrator acts as the HMI for the test pyramid (current mode, real values).
A display, however simple, turns a project from “watching the serial monitor” into “seeing the state directly”, a real step up in a demonstration.
See also
- Arduino — hub for the Arduino tutorials
- I2C on Arduino — prerequisite (bus wiring)
- Using a library — prerequisite (Adafruit GFX, LiquidCrystal_I2C)
- SPI on Arduino — for TFT and e-paper screens