The EEPROM (Electrically Erasable Programmable Read-Only Memory) is a non-volatile memory built into the microcontroller, which keeps its contents after the power is cut. On an Arduino Uno R3 it holds 1 KB; on a Mega 2560, 4 KB. It is where you store user settings (sensor calibration, operating mode, event counter) to find them again at the next start-up. The EEPROM.h library shipped with the IDE wraps reading and writing, one byte at a time.
What is it for?
Typical uses in a school project:
- A persistent event counter — number of start-ups, number of cycles run, total time in use.
- Calibration settings — sensor offset, user thresholds, operating mode.
- Remembering the last configuration — last active mode, last setpoint, so you pick up where you left off.
- Small logs — the last few values from a sensor, kept for analysis after a restart.
Important limits: small capacity (1 KB = 1024 bytes on an Uno R3), a limited number of write cycles (~100000 per cell), no file system at all. It is a raw memory addressed by byte number. For larger volumes, look to an SD card (see SPI on Arduino).
Step by step
Four steps: know the board’s capacity, read the initial value, write sparingly, handle data structures.
1. Know the capacity
| Board | EEPROM capacity | Type |
|---|---|---|
| Uno R3, Nano (ATmega328P) | 1024 bytes | dedicated EEPROM |
| Mega 2560 | 4096 bytes | dedicated EEPROM |
| Uno R4 | 8 KB emulated on Data Flash (Renesas RA4M1) | emulation — erased page by page |
| ESP32 | no hardware EEPROM — emulated on Flash (size declared at init) | emulated through EEPROM.h or Preferences.h |
On an Uno R4, the EEPROM does not physically exist. The Renesas RA4M1 uses its Data Flash (8 KB) to emulate the behaviour. The EEPROM.h library stays compatible, but erasing happens one 1024-byte page at a time: writing a single byte can force a rewrite of the whole page. As a result wear climbs far faster than on a dedicated EEPROM, and update() does not bring the same gain there as on an AVR. Never do data logging through EEPROM.h on an R4. For frequent writes, go through an SD card.
On ESP32, prefer Preferences.h (the more modern one) to EEPROM.h (kept for compatibility).
2. Basic reading and writing
#include <EEPROM.h>

void setup() {
  Serial.begin(115200);
  delay(2000);

  // Write one byte at address 0
  EEPROM.write(0, 42);

  // Read the same byte back
  byte valeur = EEPROM.read(0);
  Serial.print("Read: "); Serial.println(valeur);
}

void loop() {}
EEPROM.write(address, byte) writes. EEPROM.read(address) reads. The address is an integer between 0 and the capacity minus 1 (0-1023 on an Uno R3).
For multi-byte types (int, float, structures), use EEPROM.put() and EEPROM.get(), which handle the serialisation for you:
float seuil = 3.14;
EEPROM.put(0, seuil);  // writes 4 bytes

float seuilLu;
EEPROM.get(0, seuilLu);  // reads 4 bytes and rebuilds the float
3. Save write cycles
Each EEPROM cell takes about 100000 write cycles (it varies with conditions). At one write per second, that lasts around 28 hours before it wears out. The discipline is not optional: never write in a loop, only write when the value changes.
void enregistrer(int adresse, byte nouvelleValeur) {
  byte valeurActuelle = EEPROM.read(adresse);
  if (valeurActuelle != nouvelleValeur) {
    EEPROM.write(adresse, nouvelleValeur);
  }
}
EEPROM.update(address, byte) does exactly that on its own (it reads first, and writes only if the value differs). Prefer it to EEPROM.write() whenever you are not sure the value really changes.
4. Handle data structures
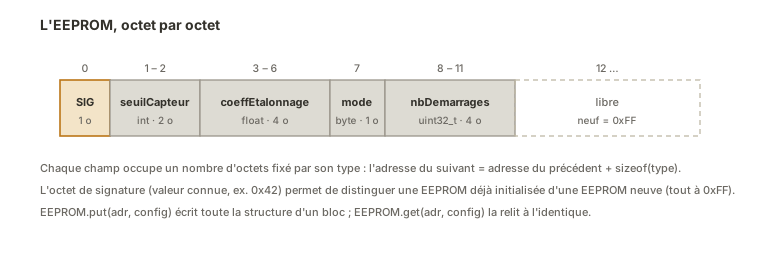
To store several settings together, define a structure and write it as one block:
struct Config {
  int seuilCapteur;
  float coeffEtalonnage;
  byte modeActif;
  uint32_t nbDemarrages;
};

void sauverConfig(Config &c) {
  EEPROM.put(0, c);  // writes the whole structure at address 0
}

void chargerConfig(Config &c) {
  EEPROM.get(0, c);
}
The upside: the structure documents the data format and makes it easier to evolve.
Example — A persistent start-up counter
The full case: counting how many times the Arduino has started and showing the figure on the serial monitor.
#include <EEPROM.h>

const int ADRESSE_COMPTEUR = 0;  // the first 4 bytes

void setup() {
  Serial.begin(115200);
  delay(2000);

  // Read the current counter
  uint32_t compteur;
  EEPROM.get(ADRESSE_COMPTEUR, compteur);

  // Fresh EEPROM: every byte is 0xFF, so the result is 0xFFFFFFFF = 4294967295
  // Detect that case and start from 0
  if (compteur == 0xFFFFFFFF) {
    compteur = 0;
    Serial.println("Fresh EEPROM, initialising");
  }

  // Increment
  compteur++;

  // Save
  EEPROM.put(ADRESSE_COMPTEUR, compteur);

  Serial.print("Startup #");
  Serial.println(compteur);
}

void loop() {}
How to read this code
EEPROM.get(ADRESSE_COMPTEUR, compteur)reads back the 4 bytes of auint32_tat address 0. On a fresh board those bytes are all0xFF, socompteurcomes out as0xFFFFFFFF(that is, 4294967295): you test for that case to start again from 0 rather than from a nonsense number. You increment, thenEEPROM.put(...)writes the 4 bytes back.getandputhandle the type’s serialisation on their own, with no need to split it into bytes by hand.
Upload, watch the value (Startup #1, for instance). Unplug the Arduino, plug it back in: the value goes up (#2, #3 and so on). It survives even a complete disconnection.
Pitfalls
Detecting a fresh EEPROM. A blank EEPROM has every byte at 0xFF (255). Read an int at address 0 without ever having written there and you get 0xFFFF (that is, -1 signed, 65535 unsigned). Always detect that case and initialise to something sensible. Otherwise the program starts on nonsense settings. A variant: write a signature (a byte of known value at a fixed address) and check it at start-up.
Forgetting EEPROM.commit() on ESP32. On ESP32 the emulated EEPROM.h needs an explicit call to EEPROM.commit() after every change for the data to actually reach the Flash. On an Uno R3 it is not needed. Code written for an Uno that moves to an ESP32 and loses its data is a missing commit().
Writing in a loop. Code such as EEPROM.write(0, capteur); inside loop(): every pass writes, and you burn through 100000 cycles in a few hours. A dead cell, erratic values. Use EEPROM.update() or only write on an event (a mode change, a button).
Overlapping addresses. Store an int (2 bytes) at address 0, then a float (4 bytes) at address 1: the float overwrites bytes 1, 2, 3, 4, so the second byte of the int is corrupted. Always work the addresses out: ADR_FLOAT = ADR_INT + sizeof(int);.
A structure that breaks between versions. Change struct Config (add a field, change a type) and you break compatibility with the EEPROM already written. At start-up you read bytes into the wrong structure. Good practice: number the version inside the structure and migrate when the version differs.
EEPROM corrupted by a reset during a write. A power cut during EEPROM.write() can corrupt the byte being written (~3 ms on an Uno R3). For critical data, use a double buffer (two copies at different addresses, switching between them) or a checksum.
Misreading the types. Reading back as a float (through EEPROM.get(adr, monFloat)) what was written as an int (through EEPROM.put(adr, monInt)) gives nonsense values — no compilation error, just the wrong bits reinterpreted. get and put work the type out from the variable passed in: keeping type and type consistent between write and read is the programmer’s responsibility.
Confusing Flash and EEPROM. An Arduino’s Flash memory holds the sketch: you cannot write to it while the program runs, from user code. The EEPROM is a separate area, dedicated to user data. On the Uno R4 and the ESP32 the boundary blurs (emulation), but the concept still holds (see a microcontroller’s memories).
Special case — Storage on ESP32
On ESP32, EEPROM.h is only emulated (Arduino backward compatibility, with a mandatory commit()). The recommended native API is Preferences.h: key-value pairs stored in Flash (NVS), with space and wear handled for you, and far more robust for persistent settings. The detail of that API belongs to the ESP32 path. What to take away here is that EEPROM code written for an Arduino does not carry over as is to an ESP32 (at the very least, add commit()).
Where it fits in the project
- Step 3 of the proof-of-concept phase — at the first adjustable user setting (a threshold, a mode), consider saving it to EEPROM as early as the PoC, so you do not have to re-enter the configuration on every cycle.
- Step 4 of the technical design file phase — persistence of settings and counters is part of the firmware’s architecture choices.
- Step 3 of the integration and testing phase — calibration done in real conditions is saved to EEPROM so that it is not lost at power-off.
The EEPROM is a small, simple tool that beginner projects often overlook: bringing it in at the moment the first persistent setting appears turns a demo sketch into a system that remembers, a key step towards a credible demonstrator.
See also
- Arduino — hub for the Arduino tutorials
- Using a library — prerequisite,
EEPROM.hships with the IDE - A microcontroller’s memory — Flash, SRAM, EEPROM: the three memories and their roles
- SPI on Arduino — for larger volumes (SD card)
- ESP32 — on ESP32, persistent storage goes through
Preferences.h(emulated EEPROM) - Debugging an Arduino program — to inspect the EEPROM contents
- Firmware — how embedded code is organised, persistence included