The ESP32 is a family of system-on-chip microcontrollers from Espressif, which integrate Wi-Fi and Bluetooth on the chip and offer far more power and memory than a classic Arduino. They are programmed with the same framework as the Arduino (the Arduino core) or with ESP-IDF, Espressif’s native environment. This page is the hub that gathers the tutorials related to the ESP32: why this family, its variants, its ecosystem, and the tutorials sorted by difficulty. The general overview of microcontroller families and the selection guide stay with microcontroller.
Why ESP32?
Where the Arduino aims at accessibility, the ESP32 aims at connectivity and performance:
- built-in Wi-Fi and Bluetooth — the deciding argument: a connected object with no external radio module;
- power — one or two cores up to 240 MHz, far more RAM and Flash, and a native RTOS (FreeRTOS) for multitasking;
- battery life — a very frugal deep sleep mode, suited to battery-powered operation.
In exchange, the ESP32 is less forgiving: it runs at 3.3 V (see the warning below), needs a carefully designed power supply (current surges when the radio transmits), and its richness makes it harder to start with. The choice is settled with the selection guide on the microcontroller hub: for learning, or for simple prototyping without connectivity, the Arduino stays gentler. As soon as wireless, battery life or compute power is needed, the ESP32 is the answer.
Variant overview
The family has branched out, but a handful of variants cover most needs.
| Variant | Core(s) | Radio | Notable feature |
|---|---|---|---|
| ESP32 (original) | 2× Xtensa LX6, 240 MHz | Wi-Fi + Bluetooth Classic + BLE | the all-rounder, the most widespread |
| ESP32-S2 | 1× Xtensa LX7 | Wi-Fi only | native USB, no Bluetooth |
| ESP32-S3 | 2× Xtensa LX7 | Wi-Fi + BLE 5 | native USB, AI instructions |
| ESP32-C3 | 1× RISC-V | Wi-Fi + BLE 5 | compact package |
| ESP32-C6 | 1× RISC-V | Wi-Fi 6 + BLE 5 + 802.15.4 | Thread / Zigbee for home automation |
| ESP32-C5 | 1× RISC-V | dual-band Wi-Fi 6 (2.4 + 5 GHz) + BLE 5 + 802.15.4 | the only 5 GHz variant |
| ESP32-H2 | 1× RISC-V | BLE 5 + 802.15.4, no Wi-Fi | Thread / Zigbee, without Wi-Fi |
| ESP32-P4 | 2× high-performance RISC-V | none (pairs with a wireless chip) | compute / multimedia / HMI |
These chips are met on modules (WROOM, WROVER), themselves mounted on development boards (DevKitC, plus Feather and LOLIN variants…). For a project, an original ESP32 DevKit board is the safe entry point.
Underlying trend: the original ESP32 and the S series rest on Xtensa cores, while the recent variants (C, H and P series) move to RISC-V. The S3 is the last big Xtensa. For a new project, RISC-V is the direction the ecosystem is taking.
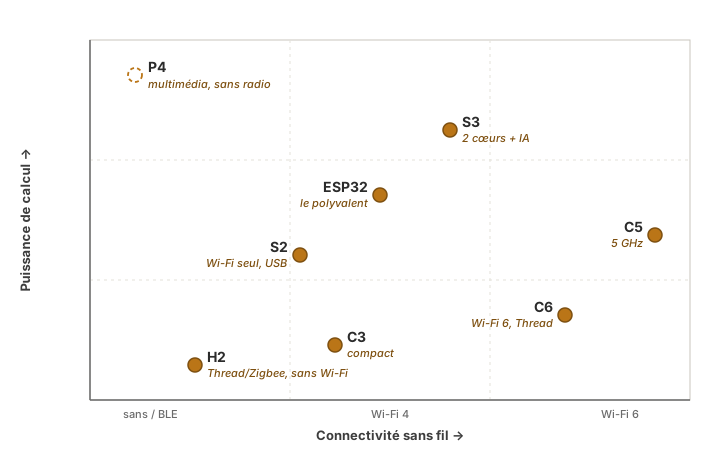
Placing the variants by connectivity and power. The table above gives the detail.
Ecosystem
Two programming paths coexist:
- Arduino core for ESP32 — the same API as the Arduino (
setup(),loop(),digitalWrite…), through the ESP32 core installed in the Arduino IDE. This is the gentlest migration from the Arduino, and the recommended path to start with. - ESP-IDF — Espressif’s native framework, built on FreeRTOS, which gives full control (multitasking, fine-grained power management, network stack). More demanding, it earns its place on mature projects.
PlatformIO handles both. How the code is structured (loop, tasks, states, RTOS) belongs to firmware, whichever path is chosen.
Watch the voltage
Warning
The ESP32 pins run at 3.3 V and do not tolerate 5 V. Wiring a 5 V sensor or module straight onto an ESP32 input can destroy the pin. This is the trickiest difference with the Arduino, which is 5 V tolerant. Any interface with a 5 V signal goes through level shifting (see logic levels).
Tutorials
The tutorials of the ESP32 module, sorted by increasing difficulty. As with the Arduino, the entries marked (cross-cutting) are shared pages of the skeleton (valid for every family), the rest is specific to the ESP32.
Getting started
- Getting started with the ESP32 — install the Arduino core, select the board, upload a first program;
- Reading a datasheet (cross-cutting) — pinout, levels, maximum current.
Learning the basics
- The C++ language (cross-cutting) — the basics of the language;
- Logic levels (cross-cutting) — 3.3 V, and not frying a pin;
- Configuring the GPIO — usable pins, pins to avoid at boot;
- Serial monitor — read from and write to the serial port;
- Programming with the Arduino core — the coding environment, and what changes under the hood.
Advanced topics
- Connectivity: Wi-Fi · Bluetooth LE — the heart of the family;
- Communication: UART · I2C · SPI (cross-cutting concept page: communication buses);
- Deep sleep (→ concept page Deep sleep) — battery-powered operation.
Engineer level
- Multitasking with FreeRTOS — the ESP32 speciality: several pre-emptive tasks;
- Discovering ESP-IDF — the native environment, when the need outgrows the Arduino core;
- Interrupts (cross-cutting) · Timers (cross-cutting);
- Firmware (cross-cutting) — structuring an ESP32 firmware, from super-loop to RTOS.
More tutorials will fill in these levels as projects come along.
See also
- Microcontroller — parent hub: overview of the families and selection guide
- Arduino — neighbouring family, programmable through the same framework (Programming the ESP32 with the Arduino core)
- Firmware — how embedded code is structured, from super-loop to FreeRTOS (cross-cutting)
- Logic levels — the 3.3 V / 5 V adaptation, essential with the ESP32
- Communication buses — UART / I2C / SPI