The serial monitor is the universal observation tool for an embedded program: it lets the board send text to the computer (and the other way round) while the program is running, over the USB cable. It is the first debugging tool, ahead of the oscilloscope or the probes. When you want to know “what is my program doing, right now?”, you print to the serial monitor. On the ESP32, two particularities set it apart from the Arduino: the usual speed of 115200 baud (the speed of the start-up messages) and, on chips with native USB, one setting you need to know about for the output to appear.
What is it for?
The serial monitor plays three complementary roles in a project:
Seeing the invisible. The state of a variable, the result of a sensor, the fact that a conditional branch was taken (all things that cannot be observed from the outside) are within reach of a single Serial.println() line.
Calibrating. Before driving an actuator from a setpoint, you print the sensor value: you read the measurement range, adjust the thresholds, put figures on the delays.
Communicating the other way. The computer can send commands to the board (setpoint, trigger), through Serial.read() and its variants. It is the simplest interaction channel there is, with no graphical interface.
At start-up the ESP32 prints boot messages on this port of its own accord (at 115200 baud): a useful log, but one that explains why a monitor set to another speed shows gibberish from the reset onwards.
Step by step
Four steps: open the link, print, open the monitor, read what comes back.
1. Open the link in setup()
A single line:
void setup() { Serial.begin(115200);}
The parameter is the transmission speed (baud rate). On the ESP32 you take 115200 by default: it is the speed of the chip’s start-up messages, and a comfortable throughput. On the board side and on the monitor side, the value must be strictly identical, otherwise the text shows up as unreadable characters.
Warning
Native USB chips: enable “USB CDC On Boot”. On ESP32 variants whose USB port is native (C3, S3, C6 and so on), Serial goes through USB Serial/JTAG. For the output to appear in the monitor after a reset, enable Outils → USB CDC On Boot → Enabled (Tools → USB CDC On Boot → Enabled) before uploading. On an original ESP32 (with a CP2102/CH340 bridge chip) this setting does not exist and Serial works straight away.
2. Print in loop()
Two main functions: Serial.print() prints without a line break, Serial.println() prints then starts a new line. Both accept anything: string, number, boolean.
int valeur = analogRead(34);Serial.print("Sensor value: ");Serial.println(valeur);
To print several quantities separated by a tab (useful for the serial plotter and for pasting into a spreadsheet):
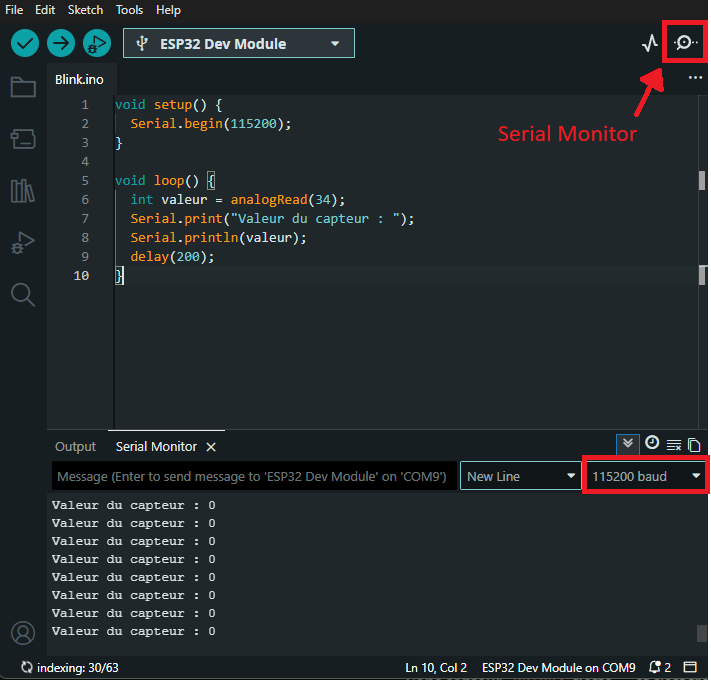
Upload the code first, then open the serial monitor (the icon at the top right of the toolbar, or Outils → Moniteur série, Tools → Serial Monitor). A window opens at the bottom.
Check the baud rate in the drop-down menu on the right of the monitor bar: it must read 115200. Otherwise the text looks like broken symbols, including the chip’s start-up messages.
In this screenshot GPIO34 is connected to nothing: the value stays at 0 line after line. Everything is working nonetheless: there is simply nothing to measure. This is the screen you will see if you upload before wiring anything at all, and it is not a sign of any fault (see Pitfalls).
Tip
Uploading (or the EN button) restarts the board. On every reset the program starts over and the ESP32 sends its boot messages again. If nothing appears, check in this order: the baud rate (115200), the presence of Serial.begin(), and, on a native USB chip, the USB CDC On Boot setting.
4. Read an input from the computer
The computer can send text to the board. Type in the monitor’s input box, then press Enter.
On the code side, two basic functions:
Serial.available() returns the number of received bytes waiting (0 if none).
Serial.read() reads a single byte from the queue.
void loop() { if (Serial.available() > 0) { char c = Serial.read(); Serial.print("Received: "); Serial.println(c); }}
Type a, press Enter: the output is not the one you would expect.
Received: a

Received:
Two passes through the loop, not one. The monitor’s line-ending selector (the menu to the left of the baud rate, set to New Line) adds an invisible character behind what you type. Since Serial.read() reads only one byte, it takes the a first, then on the next pass that line-ending character, which prints as an empty line. With Both NL & CR, two characters are added: three passes.
Warning
Serial.read() returns a character, not a number. If you type 42, you will receive '4' then '2' in turn, not the integer 42. To read a number, Serial.parseInt() gathers the digits; to read a whole line, Serial.readStringUntil('\n').
Example — Driving an LED with text commands
A concrete case: the board reads a command sent from the computer (ON, OFF) and drives an LED, while periodically printing an analog measurement. Both directions of the link are used together.
Wiring: LED on GPIO16 and sensor on GPIO34 (see the diagrams in configuring the GPIO).
const int LED = 16;const int CAPTEUR = 34; // ADC1unsigned long dernierEnvoi = 0;void setup() { Serial.begin(115200); pinMode(LED, OUTPUT); Serial.println("Commands: ON / OFF");}void loop() { // Computer -> board: read a command line by line if (Serial.available() > 0) { String cmd = Serial.readStringUntil('\n'); cmd.trim(); // strips spaces and carriage return if (cmd == "ON") { digitalWrite(LED, HIGH); Serial.println("LED on"); } else if (cmd == "OFF") { digitalWrite(LED, LOW); Serial.println("LED off"); } else if (cmd.length() > 0) { Serial.print("Unknown command: "); Serial.println(cmd); } } // Board -> computer: print the measurement every 500 ms if (millis() - dernierEnvoi >= 500) { dernierEnvoi = millis(); Serial.print("sensor = "); Serial.println(analogRead(CAPTEUR)); }}
In the monitor you watch the measurement scroll past every half second. Typing ON or OFF switches the LED on or off and sends back a confirmation. Note that it is non-blocking: delay() is not used to pace the sending, a comparison on millis() is: reading commands stays responsive at all times.
Typing ON then OFF while the values scroll:
Commands: ON / OFF
sensor = 1832
sensor = 1847
sensor = 1795
LED on
sensor = 1811
sensor = 1826
LED off
sensor = 1804
The answer to the command slots into the stream without interrupting it: that is the non-blocking pattern at work.
Pitfalls
Mismatched baud rate. Pitfall number one: text in broken symbols, right from the boot messages. The cause is always Serial.begin(X) different from the monitor’s value. Line both up on 115200.
A native USB chip without “USB CDC On Boot”. On C3/S3/C6, monitor open at the right baud rate but no output at all: the USB CDC On Boot setting is on Disabled. Enable it and upload again.
Forgetting Serial.begin(). Without that line, the Serial.print() calls send nothing — monitor open, baud correct, but silent output.
An unwired analog input gives a floor, not noise. An analog input pin left in the air does not show values jumping all over the place, but a floor: zeros, sometimes ones. The reflex is to blame the monitor, the baud rate or the code, when all three are fine. To check the chain before wiring a sensor, briefly connect the pin to 3V3: the value must jump close to 4095, then drop back to 0 on GND. If it follows, the measurement path works and only the sensor is missing.
print everywhere, println nowhere. All the output on one unreadable line. The reflex: println at the end of every logical line, print in the middle.
Flooding the port. Printing every millisecond saturates the link and makes the output unreadable. Keep it to about 10-50 Hz for human observation (pace it on millis(), do not freeze the loop with delay).
A monitor open elsewhere locks the port. If PlatformIO or an external terminal is holding the port, the IDE can neither open its monitor nor upload. Close the other application.
Serial.read() reads only one byte. A single call reads only one character even if the computer sent a whole word. For a line, readStringUntil('\n'); for a number, parseInt().
The line-ending selector counts as part of what is received. To the left of the baud rate, a drop-down menu chooses what the monitor appends behind what you type — nothing, \n, \r, or both. Those characters land in the queue just like your text. Two consequences: Serial.read() makes one extra pass through the loop per added character (see step 4), and readStringUntil('\n') only finds its \n if the selector sends one, failing which it waits for its timeout to expire, one second by default, and the loop freezes for that long. It is the same mechanism as the parseInt() pitfall below, triggered this time by an interface setting rather than by the code. It is also what the cmd.trim() of the example cleans up.
parseInt() waits one second, then returns 0.Serial.parseInt() blocks the loop until it receives a complete integer, or until its timeout expires, one second by default, in which case it returns 0. Two consequences in lab work: the loop freezes briefly on every command, and a badly terminated entry silently applies the value 0 (LED off, with no message). Serial.setTimeout(50) shortens the wait. Reading the line with readStringUntil() then converting explicitly avoids the pitfall.
Exercises
Exercise 1 — A numeric setpoint
Have the board read a number typed in the monitor (180 for instance) and use it as the PWM duty cycle (0-255, clamped) of an LED on GPIO16. How do you read an integer cleanly?
Answer to exercise 1
You read the line, convert it to an integer, clamp it, then apply it as PWM.
const int LED = 16;void setup() { Serial.begin(115200); ledcAttach(LED, 5000, 8); // 8 bits: duty 0..255 Serial.println("Type a brightness 0-255:");}void loop() { if (Serial.available() > 0) { int duty = Serial.parseInt(); // gathers the digits duty = constrain(duty, 0, 255); // clamps within 0..255 ledcWrite(LED, duty); Serial.print("Brightness = "); Serial.println(duty); }}
parseInt() reads the integer, constrain() guarantees you stay inside the valid range even if the user types 999 or -5.
Exercise 2 — A log for a spreadsheet
Print, every 100 ms, three tab-separated columns: the elapsed time in ms, the raw value of a sensor on GPIO34, and that value converted to volts. Goal: paste the output straight into a spreadsheet.
The three tabbed columns paste as they are into a spreadsheet. The heading line names the columns (and doubles as a legend for the serial plotter).
Special case — Several serial ports, and the plotter
The ESP32 has several hardware UARTs. Serial (UART0) is reserved for the monitor and the boot log. To talk to a second device (GPS module, another board) without disturbing the monitor, you use another port, whose pins you can choose (the full subject of UART on the ESP32):
The serial plotter (Outils → Traceur série, Tools → Serial Plotter) is a miniature software oscilloscope: it plots any numeric value that gets printed (one per line, or several separated by tabs for curves on the same axes). Ideal for setting thresholds, watching the noise of a sensor, comparing setpoint and measurement. Limitation: no adjustable time scale, short window — for deeper analysis, export to a spreadsheet.
Where it fits in the project
Throughout the proof of concept phase — the serial monitor is the default debugging tool. Before the oscilloscope, before profiling, you print.
Step 1 of the integration and testing phase — to qualify a function over a set of known measurements, plot expected value and obtained value side by side.
Every calibration step — quick readings, range checks, watching a transient.
Learning from day one to print cleanly (headings, consistent separators, a reasonable rate, non-blocking pacing) saves rebuilding your instrumentation with every new sensor. It is the cheapest instrument in the project, and one of the most rewarding.
Non-blocking programming — pacing the sending without freezing the loop (the millis() pattern of the example). Covered on the Arduino side, it transposes as it stands to the ESP32.
To process the output downstream: a Python script with pyserial reads the stream (plotting, file logging, triggering actions).