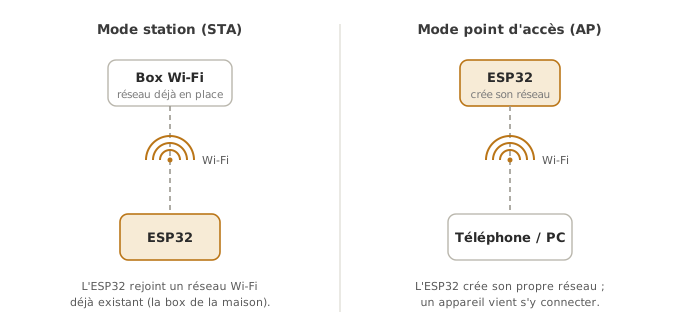
Wi-Fi is the decisive argument for the ESP32: a connected object with no external radio module. In a few lines, the board joins a network (station mode) or creates its own (access point mode), then exchanges data — query an API, expose a control web page, publish measurements. It is a capability the classic Arduino does not have, and the heart of what the ESP32 family brings. Wireless links in general are covered in wireless technologies and Wi-Fi. This page gives the ESP32 incarnation of it.
What is it for?
The Wi-Fi of the ESP32 opens three typical uses in a project:
Linking the system to the Internet — fetch the time, a weather forecast, a setpoint from an API; send measurements to a server or a dashboard. The board is a client.
Offering an interface with no display — the ESP32 hosts a small web page. You drive the system and read its state from a browser, phone or PC. The board is a server.
Doing without infrastructure — in access-point mode, the ESP32 creates its own network, which you join directly, with no router or box (field configuration, demonstration).
Warning
Wi-Fi on = ADC2 unavailable. As soon as the Wi-Fi runs, the pins of the ADC2 converter read nothing at all. Every analog sensor of a connected project must sit on ADC1 (GPIO32-39, see configuring the GPIO).
Two modes: station and access point
Everything starts from the WiFi.h library, included in the ESP32 core.
Station (STA) — the ESP32 connects to an existing network (your router). This is the usual mode for reaching the Internet.
Access point (AP) — the ESP32 creates a network that other devices connect to. Handy for a local configuration.
#include <WiFi.h>const char* ssid = "MonReseau";const char* motDePasse = "********";void setup() { Serial.begin(115200); WiFi.begin(ssid, motDePasse); // station mode Serial.print("Connecting"); int tentatives = 0; while (WiFi.status() != WL_CONNECTED && tentatives < 20) { // 20 x 500 ms = 10 s max delay(500); Serial.print("."); tentatives++; } Serial.println(); if (WiFi.status() != WL_CONNECTED) { // failure: say so, do not freeze Serial.println("Connection failed - check the SSID and the password"); return; } Serial.print("Connected, IP = "); Serial.println(WiFi.localIP()); // address handed out by the router}void loop() {}
The wait is bounded: after a dozen seconds the board gives up and says so, instead of staying frozen on a mistyped SSID. The examples that follow keep the short form so as not to drown their subject. In a project, take this bounded pattern back.
For access-point mode, two lines are enough: the board creates the network instead of joining it.
#include <WiFi.h>void setup() { Serial.begin(115200); WiFi.softAP("ESP32-Demo", "motdepasse"); // network created by the board Serial.print("Access point up, IP = "); Serial.println(WiFi.softAPIP()); // 192.168.4.1 by default}void loop() {}
You join the ESP32-Demo network from a phone, then open 192.168.4.1 (handy for a demonstration on a bench, with no router or box). The password must be at least 8 characters long: below that, softAP() fails and the network does not show up.
Warning
The ESP32 (apart from the C5) is 2.4 GHz only. It does not connect to a network broadcast on 5 GHz alone. On a dual-band router, check that the 2.4 GHz band is on and that the SSID you target really is the 2.4 GHz network.
Example — Driving a LED from a browser
The most telling use: the ESP32 joins the network, hosts a minimal web page, and drives a LED according to the link clicked. A phone on the same network opens the IP address and commands the board.
#include <WiFi.h>#include <WebServer.h>const char* ssid = "MonReseau";const char* motDePasse = "********";const int LED = 16;WebServer serveur(80); // HTTP server on port 80void pageAccueil() { String html = "<h1>ESP32</h1>" "<p><a href=\"/on\">Allumer</a> | " "<a href=\"/off\">Eteindre</a></p>"; serveur.send(200, "text/html", html);}void allumer() { digitalWrite(LED, HIGH); serveur.send(200, "text/html", "LED allumee. <a href=\"/\">Retour</a>");}void eteindre() { digitalWrite(LED, LOW); serveur.send(200, "text/html", "LED eteinte. <a href=\"/\">Retour</a>");}void setup() { Serial.begin(115200); pinMode(LED, OUTPUT); WiFi.begin(ssid, motDePasse); while (WiFi.status() != WL_CONNECTED) { delay(500); Serial.print("."); } Serial.print("\nOpen http://"); Serial.println(WiFi.localIP()); // the URL to type in the browser serveur.on("/", pageAccueil); // map paths -> functions serveur.on("/on", allumer); serveur.on("/off", eteindre); serveur.begin();}void loop() { serveur.handleClient(); // handle requests continuously}
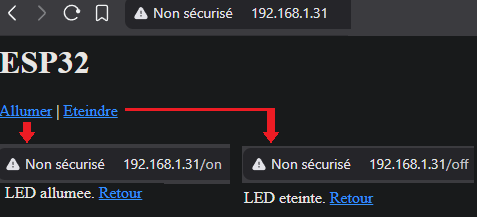
Upload, open the serial monitor (115200) to read the IP address printed, then type http://<that IP> in a browser on the same network. The page offers two links that switch the LED on and off. You get a control interface with no display and no application in about fifty lines.
The browser shows Non sécurisé (not secure) next to the address, on all three pages. That is expected: the page is served over plain HTTP, with no encryption: the ESP32 has no certificate, and the traffic never leaves your local network. Nothing is broken, nothing needs fixing. The warning becomes a real subject the day the board is reachable from outside, or carries anything other than the state of a LED.
Pitfalls
An analog sensor gone mute over Wi-Fi. An analogRead measurement that drops to zero as soon as the connection comes up: the pin is on ADC2. Move the sensor onto ADC1 (GPIO32-39).
A 5 GHz network. The ESP32 (apart from the C5) does not see an SSID broadcast on 5 GHz alone. Turn on, or target, the 2.4 GHz band.
An endless connection loop. The while (WiFi.status() != WL_CONNECTED) blocks for ever if the SSID or the password is wrong. In a project, bound the wait (a counter plus a failure message) rather than freezing the board.
Credentials in clear in the code. An SSID and a password written in the sketch end up in the binary and in Git. For a deliverable, take them out of the code (a configuration file kept out of version control, or a configuration portal).
Brown-out on transmission. Wi-Fi transmission draws current spikes. On a weak USB supply, the voltage sags and the board reboots (Brownout detector was triggered). A clean supply and a clean cable.
A web page that stops answering. Forgetting serveur.handleClient() in loop(), or blocking the loop with a long delay, freezes the server. The loop has to run freely.
Exercises
Exercise 1 — Scanning the networks
On startup, list in the serial monitor every Wi-Fi network detected, with its signal strength (RSSI). Which function of WiFi.h?
Answer to exercise 1
WiFi.scanNetworks() returns the number of networks found. You then read each entry by index.
#include <WiFi.h>void setup() { Serial.begin(115200); WiFi.mode(WIFI_STA); // station mode, to scan int n = WiFi.scanNetworks(); Serial.print(n); Serial.println(" networks:"); for (int i = 0; i < n; i++) { Serial.print(WiFi.SSID(i)); Serial.print(" "); Serial.print(WiFi.RSSI(i)); // dBm, closer to 0 = stronger Serial.println(" dBm"); }}void loop() {}
The RSSI (in dBm, negative) tells you about the range: around -50 dBm is excellent, around -80 dBm is weak.
Exercise 2 — A status page for a sensor
Change the example so that the web page shows the value of an analog sensor (on GPIO34, ADC1) instead of driving a LED. The value must be up to date on every reload of the page.
Answer to exercise 2
The value is read inside the page handler, so it is read again on every request.
#include <WiFi.h>#include <WebServer.h>const char* ssid = "MonReseau";const char* motDePasse = "********";const int CAPTEUR = 34; // ADC1WebServer serveur(80);void pageAccueil() { int valeur = analogRead(CAPTEUR); // read again on every request String html = "<h1>Sensor</h1><p>Value: "; html += valeur; html += " / 4095</p>"; serveur.send(200, "text/html", html);}void setup() { Serial.begin(115200); WiFi.begin(ssid, motDePasse); while (WiFi.status() != WL_CONNECTED) { delay(500); } Serial.println(WiFi.localIP()); serveur.on("/", pageAccueil); serveur.begin();}void loop() { serveur.handleClient();}
Reloading the page in the browser shows the current measurement. For an automatic update with no reload, you would add an HTML refresh (<meta http-equiv="refresh">) or some JavaScript.
Special case — The board as a client (querying an API)
The other direction: the ESP32 goes and fetches a piece of data on the Internet. The HTTPClient library makes a request in a few lines.
#include <WiFi.h>#include <HTTPClient.h>void requete() { if (WiFi.status() == WL_CONNECTED) { HTTPClient http; http.begin("http://exemple.com/api/mesure"); // plain http URL int code = http.GET(); // > 0 = an answer came back if (code > 0) { Serial.println(http.getString()); // body of the answer } http.end(); }}
For an HTTPS URL (most public APIs today), you need a secure client (WiFiClientSecure) and, strictly speaking, the certificate of the server (a more advanced subject, to be looked up in the Espressif documentation). Internally (sensor to local server), plain HTTP is often enough.
Where it fits in the project
Step 4 of the proof-of-concept phase — if the project is a connected object, validating the Wi-Fi connection and a first exchange early (a status page, publishing a measurement) lifts the main uncertainty of the PoC. It is the building block that often justifies choosing the ESP32 over an Arduino.
An operating interface — a web page hosted by the board serves as a fallback HMI, or as a field configuration tool, with no dedicated application to develop.
Taking the credentials out of the code and bounding the connection attempts from the prototype onwards keeps a demo from turning into a fragile deliverable (a versioned password, a board frozen if the network changes).