The ESP8266 is a 32-bit microcontroller (single Xtensa core) with built-in Wi-Fi, designed by Espressif and programmed inside the Arduino framework through the ESP8266 Arduino core. It is the pioneer of Wi-Fi on a microcontroller and the predecessor of the ESP32: think of it as the ESP32 with less — Wi-Fi only (no Bluetooth), fewer pins, a single analog-to-digital converter. Superseded by the ESP32 on new projects, it is still very much around: in drawers, in earlier projects, and inside a great many off-the-shelf Wi-Fi modules. Knowing how to program it usually means starting from hardware you already have rather than picking something new. This page is the hub that gathers the tutorials related to the ESP8266. The general overview of the families and the selection guide stay with microcontroller.
Why ESP8266?
The ESP8266 fills a precise niche: Wi-Fi and nothing else, with the comfort of Arduino.
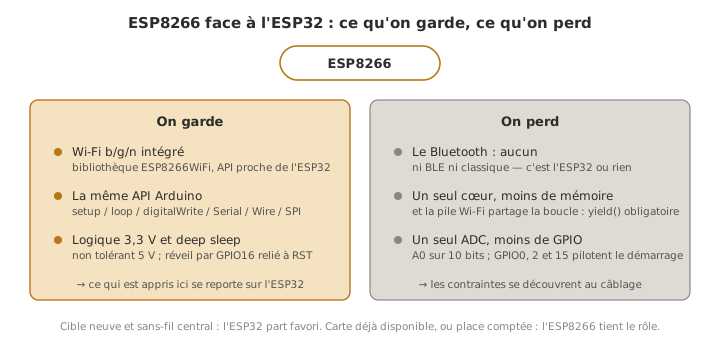
- a single door — everything is programmed with the Arduino API (
setup(),loop(),digitalWrite,Serial…) through the ESP8266 Arduino core, with nothing new to learn on the tooling side; - built-in Wi-Fi — the Wi-Fi b/g/n radio is on the chip (the
ESP8266WiFilibrary), as on the ESP32; - hardware already at hand — this is the board of drawers and earlier projects: reprogramming it means starting from what exists rather than adding something new (see eco-design);
- consumer products that already carry one — a great many smart plugs, relay boards and consumer Wi-Fi modules run an ESP8266: you do not choose it, you inherit it, and knowing how to reflash it opens the object up;
- very little room needed — the ESP-01, with two usable GPIO, grafts onto another microcontroller as a Wi-Fi module.
In exchange, this chip asks for less and gives less than the ESP32: no Bluetooth, fewer GPIO (several of them constrained at boot), a single ADC, less memory, and 3.3 V logic that does not tolerate 5 V. The honest reflex on a project: for a new target, the ESP32 starts as the favourite (Wi-Fi + BLE, more pins, more resources). The ESP8266 wins when the board is already available, or when the need comes down to a bit of Wi-Fi in the smallest possible space. The decision is settled with the selection guide on the microcontroller hub.
Board overview
All these boards carry the same ESP8266 chip (Tensilica L106 at 80/160 MHz, Wi-Fi b/g/n). They differ by the module, the USB and the number of pins brought out.
Info
This table is a teaching landmark, to be confirmed against the Espressif or board-maker documentation before a choice is frozen.
| Board | Module | Notable features |
|---|---|---|
| NodeMCU (ESP-12E/F) | ESP-12E | built-in USB, many pins brought out — the simplest one to start with |
| Wemos / LOLIN D1 mini | ESP-12F | compact form factor, ecosystem of plug-in shields |
| ESP-01 / ESP-01S | ESP-01 | tiny, very few pins (2 usable GPIO), no USB (serial adapter required) — often added as a “Wi-Fi module” to another MCU |
To start, the NodeMCU (ESP-12E) or the D1 mini are the handiest: built-in USB, power and programming over a single cable. The ESP-01 is best kept for a use where space comes first, or as the Wi-Fi graft of another microcontroller.
Ecosystem
- ESP8266 Arduino core — support for ESP8266 boards in the Arduino IDE (and PlatformIO). This is the single door, detailed in programming with the Arduino core.
- Uploading — on the NodeMCU and the D1 mini, the on-board USB-to-serial and the auto-reset (DTR/RTS) handle flashing with no manual step. The ESP-01 needs programming mode to be forced (GPIO0 to ground at reset).
- Wi-Fi — the
ESP8266WiFilibrary, whose API is very close to the ESP32 one (see Wi-Fi on the ESP32 for the concepts). - Alternatives — NodeMCU (Lua) firmware and MicroPython both exist, but this wiki sticks to the Arduino core.
How the code is structured (loop, states, tasks) belongs to firmware, whichever board is used.
Watch the voltage
Warning
The ESP8266 runs 3.3 V logic and is NOT 5 V tolerant. Applying 5 V to a pin can destroy the input (same case as the ESP32 and the Teensy 4.x). Coming from an Arduino (5 V), shift the level (divider, level shifter). See logic levels.
Watch the boot pins
Warning
Some pins decide how the chip starts up. GPIO0, GPIO2 and GPIO15 are boot pins: their state at reset selects the mode (normal execution or flashing). Wiring them as outputs in a way that forces a wrong state at start-up stops the board from booting. On top of that, the single ADC (pin A0) reads 0–1 V on the chip itself (usually brought back to 0–3.3 V by a divider on the NodeMCU and D1 mini boards). These constraints are detailed in programming with the Arduino core.
Tutorials
The tutorials of the ESP8266 module, by increasing difficulty. The entries marked (cross-cutting) are shared pages of the skeleton (valid for every family), the rest is specific to the ESP8266. Since the ESP8266 is the “little brother” of the ESP32, some deeper topics (Wi-Fi, deep sleep) point to the ESP32 pages rather than duplicating them.
Getting started
- Getting started with the ESP8266 — install the ESP8266 core, flash a first blink on a NodeMCU;
- Reading a datasheet (cross-cutting).
Learning the basics
- The C++ language (cross-cutting);
- Logic levels (cross-cutting) — 3.3 V, not 5 V tolerant;
- GPIO (cross-cutting) — the idea of an input and an output (put to work on the ESP8266 through the Arduino core);
- Programming with the Arduino core — the single door: pin constraints, the single ADC, and a first Wi-Fi.
Advanced topics
- Wi-Fi — the
ESP8266WiFiAPI (first steps inesp8266-arduino-core). For the concepts (station and access-point modes, and so on), see Wi-Fi on the ESP32, which is very close; - Communication: SPI (cross-cutting);
- Debugging (cross-cutting); Interrupts (cross-cutting) · Timers (cross-cutting).
Engineer level
- Firmware (cross-cutting) — structuring the code, from super-loop to RTOS;
- Saving power — the ESP8266 has a deep sleep (
ESP.deepSleep, which needs GPIO16 wired to RST). The principle is close to the deep sleep of the ESP32.
See also
- Microcontroller — parent hub: overview of the families and selection guide
- ESP32 — the big brother (Wi-Fi + BLE, more resources), to be preferred when wireless is central
- Wi-Fi on the ESP32 — Wi-Fi concepts, with an API almost identical to the ESP8266 one
- Arduino · Teensy · STM32 — other families
- Firmware — how embedded code is structured (cross-cutting)
- Logic levels — 3.3 V logic, not 5 V tolerant