The Teensy boards are a family of very capable 32-bit microcontrollers designed by PJRC, built on ARM Cortex-M cores (up to the M7 at 600 MHz on the Teensy 4.x) and programmed inside the Arduino framework through the Teensyduino add-on. What sets them apart is not new tooling, but what they do inside the Arduino framework: raw performance (FPU, DSP), fast I/O, and above all two signatures — real-time audio processing (the Teensy Audio Library and its graphical design tool) and USB versatility (a Teensy enumerates as a keyboard, a mouse, a game controller, a MIDI device or a sound card, as you choose). In one phrase: the Arduino, but fast, and a Swiss Army knife for USB and audio. This page is the hub that gathers the tutorials related to the Teensy. The general overview of the families and the selection guide stay with microcontroller.
Why Teensy?
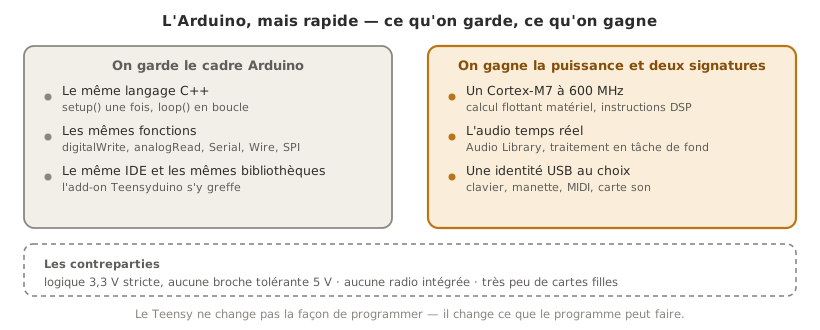
Where the Arduino aims at accessibility, the ESP32 at connectivity and the STM32 at industrial maturity, the Teensy aims at performance within the comfort of Arduino, plus two strong niches:
- a single door, but a muscular one — everything is programmed with the Arduino API (
setup(),loop(),digitalWrite,Serial…) through Teensyduino, with no separate native tooling to learn, but with a core hand-optimised by PJRC that works the hardware hard; - real-time audio — the Teensy Audio Library and its Audio System Design Tool make the Teensy a reference platform for sound and DSP (synthesis, filtering, effects, FFT), see Working with audio on the Teensy;
- USB versatility — the Teensy can become any USB device you like (keyboard, mouse, game controller, MIDI, audio…), chosen at compile time (see The Teensy as a USB device);
- fast I/O —
digitalWriteFast, PWM with adjustable frequency and resolution, several serial ports and hardware buses.
In exchange, the Teensy comes with three limits worth weighing before choosing it. Its current generation (4.x) is strictly 3.3 V, without a single 5 V tolerant pin, where an Arduino Uno does not care about the level and where the STM32 offers its FT pins. It carries no radio at all: as soon as an object has to communicate, the ESP32 or the ESP8266 take over outright. And its hardware ecosystem is deliberately thin. PJRC says so itself, it does not have the means to maintain a range of daughter boards, where Arduino shields run into the dozens. It is the choice that makes sense when the project calls for sound, DSP, a bespoke USB interface or performance inside a familiar Arduino framework. The decision is settled with the selection guide on the microcontroller hub.
Board overview
The family is small and easy to read, and the Cortex-M core gives the performance class.
Info
The table below is a teaching landmark, to be confirmed on the PJRC site (
pjrc.com) before a choice is frozen: exact part numbers and availability keep changing.
| Board | Core | Clock | Signatures |
|---|---|---|---|
| Teensy 4.1 | Cortex-M7 (NXP i.MX RT1062) | 600 MHz | Ethernet, microSD slot, many I/O, PSRAM/Flash footprints |
| Teensy 4.0 | Cortex-M7 (NXP i.MX RT1062) | 600 MHz | compact form factor, same performance as the 4.1 |
The earlier generations — Teensy LC, 3.2, 3.5 and 3.6 — have been discontinued since 2023, PJRC no longer being able to source chips from the older series. You may still come across one in an existing project, but they are no longer specified. Worth noting in passing: the 3.2 tolerated 5 V on its digital pins. No current board does.
The current generation is the 4.x (Cortex-M7 at 600 MHz): the Teensy 4.1 is the most capable one (Ethernet, microSD, plenty of I/O), and the 4.0 is its compact version. For most projects, either will do. The natural audio companion is the Audio Shield (SGTL5000 codec), which brings a clean analog input and output over the I2S bus.
Ecosystem
The Teensy has only one programming door, but a rich software ecosystem around it.
- Teensyduino — an add-on to the Arduino IDE (and to PlatformIO), not a separate IDE: it adds the PJRC core and the Teensy libraries. This is the single door, detailed in programming with the Arduino core.
- Teensy Loader — the application that flashes the board. It starts automatically on upload (a physical button on the board lets you force programming mode when needed).
- Audio Library + Audio System Design Tool — the audio signature: you wire processing objects graphically, and the tool generates the code (see Working with audio on the Teensy).
- USB Type — the menu that turns the Teensy into a keyboard, a game controller, a MIDI instrument… (see The Teensy as a USB device).
Unlike the STM32 (which has native vendor tooling, CubeMX/HAL), the Teensy core is laid directly on the NXP registers by PJRC, with no HAL in between: you stay “in Arduino”, and you can go down to the registers or to the fast functions (digitalWriteFast) when performance demands it. How the code is structured (loop, tasks, states) belongs to firmware, whichever board is used.
Watch the voltage
Warning
The Teensy runs 3.3 V logic, and how careful you need to be depends on the generation. The Teensy 4.x are NOT 5 V tolerant: applying 5 V to a pin can destroy the input, like the ESP32 (and unlike the STM32 with its FT pins). The older Teensy 3.2 tolerated 5 V on its digital pins, but that is no longer the case on the current generation. Coming from an Arduino (5 V everywhere), shift the level (divider, level shifter). See logic levels.
Tutorials
The tutorials of the Teensy module, sorted by increasing difficulty. As with the other families, the entries marked (cross-cutting) are shared pages of the skeleton (valid for every family), the rest is specific to the Teensy.
Getting started
- Getting started with the Teensy — install Teensyduino on the Arduino IDE, flash a first blink through the Teensy Loader;
- Reading a datasheet (cross-cutting) — pinout, levels, maximum current.
Learning the basics
- The C++ language (cross-cutting) — the basics of the language;
- Logic levels (cross-cutting) — 3.3 V, not 5 V tolerant on the 4.x;
- GPIO (cross-cutting) — the idea of an input and an output (put to work on the Teensy through the Arduino core);
- Programming with the Arduino core — the single door: Arduino with muscle on a Teensy (pins, performance,
digitalWriteFast).
Advanced topics
- The Teensy as a USB device — keyboard, mouse, game controller, MIDI, audio (Tools → USB Type);
- Communication: SPI (cross-cutting) — the Teensy 4.x offers several hardware instances of each;
- Debugging (cross-cutting); Interrupts (cross-cutting) · Timers (cross-cutting).
Engineer level
The Teensy signature — sound and real-time DSP, where it truly stands apart.
- Working with audio on the Teensy — the Teensy Audio Library and the Audio System Design Tool, real-time audio processing (synthesis, filtering, effects);
- Firmware (cross-cutting) — structuring the code, from super-loop to RTOS.
Performance (600 MHz, FPU, DSP) is not a tutorial of its own: it is lived through the Arduino core (fast functions) and it carries the audio.
See also
- Microcontroller — parent hub: overview of the families and selection guide
- Arduino — the framework that Teensyduino is a muscular superset of
- ESP32 · STM32 — neighbouring families (the ESP32 shares the non-tolerant 3.3 V, the STM32 offers the other high-performance route)
- Firmware — how embedded code is structured (cross-cutting)
- Logic levels — 3.3 V logic and the difference between generations
- Debugging — making use of an embedded debug probe