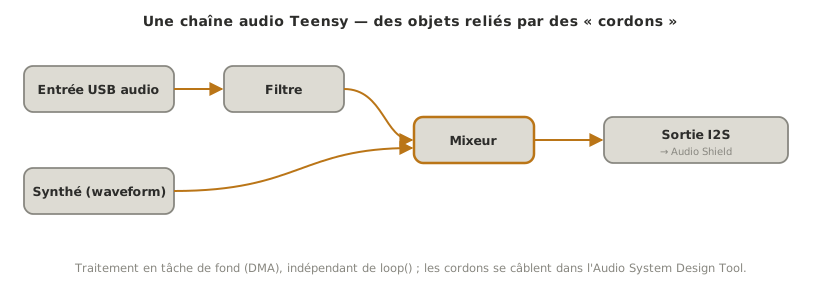
The Teensy Audio Library turns the Teensy into a real-time audio processing platform: synthesis, filtering, mixing, effects, FFT. You build a chain of objects (oscillators, filters, mixers, inputs and outputs) linked by patch cords, wired up graphically in the Audio System Design Tool before the tool generates the matching code. This is the Teensy’s signature feature, and the one that most often justifies choosing it. This page teaches how to assemble and drive an audio chain, not how to design a filter: signal processing theory belongs to a course of its own.
What is it for?
Doing audio “by hand” on a microcontroller (sampling, filtering, getting sound out without glitches, all while keeping up with the sample rate) is hard. The library solves this with an object-based abstraction:
Compose instead of coding DSP. You pick objects (an oscillator, a filter, a mixer and so on) and link them. Each object encapsulates its own processing, optimised for the Teensy.
Real time is handled for you. Sound is processed in the background, in blocks of samples, driven by DMA: the loop() function stays free.
Design by clicking. The Audio System Design Tool (a web interface from PJRC) lets you place objects and draw cords, then generates the matching code.
Objects and patch cords
Three building blocks structure every audio chain:
objects — processing blocks: inputs (AudioInputI2S, AudioInputUSB and others), generators (AudioSynthWaveform and others), processors (AudioFilterStateVariable, AudioMixer4, AudioEffectReverb and others), outputs (AudioOutputI2S, AudioOutputUSB and others);
patch cords (AudioConnection) — which link the output of one object to the input of another, like patch cables;
memory.AudioMemory(n) reserves n blocks of samples shared across the chain. Call it in setup(), or nothing will sound.
The Audio System Design Tool
Rather than writing the object and cord declarations by hand, you draw them: the Audio System Design Tool (on pjrc.com) offers every object in a library. You drag them onto the workspace, draw the cords, and one click on Exportgenerates the block of code (declarations plus AudioConnection lines) to paste into the sketch. The same graph as the SVG above yields a handful of ready-to-use lines. It is the reference tool for designing a Teensy audio chain.
Screenshot to take of the Audio System Design Tool open in the browser, with a few objects placed — a generator, a filter, an I2S output — linked by patch cords.
Processing runs in the background
The key point: once the chain is declared, sound is processed automatically, through interrupts and DMA, independently of loop(). You never push the samples yourself. The role of loop() narrows down to driving the parameters: changing a frequency, a gain, triggering a note. It is the same idea as the asynchronous modes of a peripheral: the work happens in the background, and the main program only steers it.
Example — An oscillator into the Audio Shield
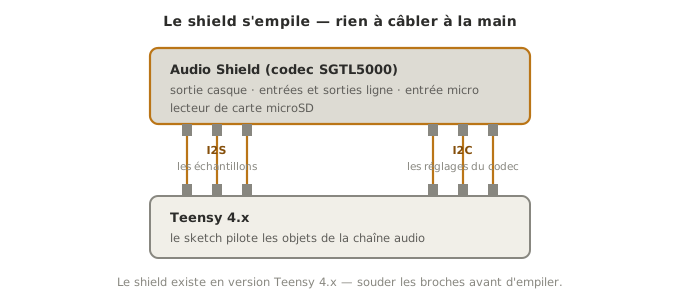
This minimal chain plays an A at 440 Hz. It assumes the Audio Shield (SGTL5000 codec) plugged onto the Teensy, connected over the I2S bus (data) and I2C (control).
#include <Audio.h>AudioSynthWaveform forme; // un oscillateurAudioOutputI2S sortie; // sortie I2S vers l'Audio ShieldAudioControlSGTL5000 codec; // contrôle du codec de l'Audio ShieldAudioConnection cordonG(forme, 0, sortie, 0); // forme -> canal gaucheAudioConnection cordonD(forme, 0, sortie, 1); // forme -> canal droitvoid setup() { AudioMemory(8); // réserver 8 blocs audio (sinon : pas de son) codec.enable(); codec.volume(0.5); forme.begin(WAVEFORM_SINE); forme.frequency(440); // la 440 Hz forme.amplitude(0.3);}void loop() { // le son joue en tâche de fond ; loop() ne fait que piloter les paramètres}
The object declarations and the two AudioConnection lines are exactly what the Audio Design Tool generates. Without an Audio Shield, you stay self-contained by replacing AudioOutputI2S with AudioOutputUSB and setting USB Type to Audio (see the Teensy as a USB device): the Teensy becomes a sound card and plays the signal into the computer.
Pitfalls
Forgetting AudioMemory(). Without a block reservation in setup(), the chain has no working memory at all: no sound. This is oversight number one.
Expecting analog sound on a pin (Teensy 4.x). Teensy 4.x boards have no built-in DAC: analog output goes through the Audio Shield (I2S), through USB audio, or through the MQS output (moderate quality, on 2 pins). The older Teensy 3.x boards had a DAC pin. That is no longer the case.
Under-sizing the memory. Too few AudioMemory() blocks causes dropouts. Watch AudioMemoryUsageMax() (and AudioProcessorUsageMax() for CPU load) and adjust.
Trying to process audio inside loop(). Processing happens in the background. loop() only sets the parameters. Handling samples there by hand breaks the sample rate.
Wiring the Audio Shield. The I2S pins are fixed and the codec is controlled over I2C: forgetting codec.enable() leaves the shield silent.
Exercises
Exercise 1 — A siren
Starting from the example, make the frequency vary over time (a sweep from 300 to 1000 Hz and back, for instance) to hear a siren. Where is that code written, and why is it possible without interrupting the sound?
Solution
The sweep is written in loop(), which drives the parameters while the sound plays in the background:
void loop() { for (int f = 300; f <= 1000; f += 5) { forme.frequency(f); delay(5); } for (int f = 1000; f >= 300; f -= 5) { forme.frequency(f); delay(5); }}
It works because forme.frequency() only changes a setting on the object. Signal generation carries on in the background, without a gap. The samples are never touched.
Exercise 2 — Inserting a filter
You want to soften the sound by placing a low-pass filter between the oscillator and the output. Which objects and which cords are needed, and which tool saves you from writing it all by hand?
Solution
Insert an AudioFilterStateVariable object (which offers a low-pass output) between the waveform and the output, re-patching the cords: forme → filtre, then filtre (low-pass output) → sortie.
The Audio System Design Tool saves you from writing all of that by hand: drag the filter in, remove and redraw the cords, export the code again. That is precisely what the tool is for. (Filter design — type, slope, cut-off frequency — belongs to a signal processing course. Here it is assembled and tuned.)
Special case — Audio Shield, USB audio, outputs without a codec
Audio Shield (SGTL5000) — the reference companion: line in and out, headphones, microphone, all over I2S plus I2C control. The clean analog path.
USB audio. With no extra hardware at all, USB Type → Audio turns the Teensy into a sound card (the AudioInputUSB and AudioOutputUSB objects). Ideal for experimenting (see USB).
MQS / external I2S. On a Teensy 4.x without a shield, the MQS output (2 pins, moderate quality) or an external I2S codec provides analog output. There is no built-in DAC.
Where it fits in the project
Step 4 of the proof of concept phase. For a project with a sound dimension (an instrument, audio feedback, sound analysis), the audio chain is prototyped early: checking that a signal comes out cleanly, without glitches, conditions everything else.
Load kept under control. Watching AudioProcessorUsageMax() from the proof of concept onwards gives a realistic compute margin before effects are stacked up.
Understanding that Teensy audio is composed (objects plus cords) and runs in the background shifts the effort from “how do I process the signal” to “which chain do I assemble”: that is what makes DSP accessible to a school project.