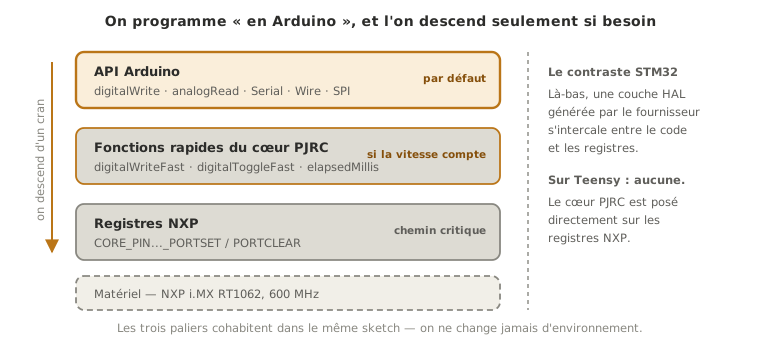
The Arduino core for Teensy (brought in by Teensyduino) is the software layer that carries the Arduino API (setup(), loop(), digitalWrite, Serial and the rest) onto Teensy boards. It is the Teensy’s single door: there is no separate native toolchain to learn, you stay “in Arduino”, but with the power of a 600 MHz Cortex-M7 and a core hand-optimised by PJRC. Under the hood, that core sits directly on the NXP registers (i.MX RT on Teensy 4.x boards), with no vendor HAL in between, which contrasts sharply with the STM32 HAL. How to structure a firmware is covered in firmware.
What is it for?
The Teensy Arduino core acts as a bridge towards the high end:
Reusing what you already know. The whole Arduino vocabulary (pinMode, analogRead, Serial, Wire, SPI and so on) works as is. A circuit validated on an Arduino often carries over immediately.
Gaining performance without changing paradigm. The same sketch runs far faster. Fast functions (digitalWriteFast) and rich peripherals (several serial ports, adjustable PWM) are exposed in the Arduino style.
Reaching the Teensy signature features.Real-time audio and versatile USB are libraries of the core, usable like any other Arduino library.
It is the right (and only) entry point. You do not “move on” to another environment the way you do on STM32. You simply drop down to the fast functions or to the NXP registers when performance demands it.
The same code as Arduino, only faster
A Teensy sketch has the shape of an Arduino sketch:
const int LED = LED_BUILTIN; // broche 13bool allumee = false; // on mémorise l'état, on ne le relit jamais sur la brochevoid setup() { Serial.begin(115200); pinMode(LED, OUTPUT);}void loop() { allumee = !allumee; // on bascule la variable digitalWrite(LED, allumee ? HIGH : LOW); // puis on applique l'état à la broche delay(500);}
setup() once, loop() forever: the model is identical. The differences are platform details, and gains:
pins are named by their number (0, 1, 2 and so on), as on Arduino, and the Teensy offers plenty of them, with several hardware buses;
logic is 3.3 V (4.x boards are not 5 V tolerant, see voltage levels);
the ADC is a 12-bit converter that Teensyduino reads on 10 bits by default (0-1023) to stay compatible with sketches written for an Uno: analogReadResolution(12) unlocks the full scale (0-4095), but PJRC only guarantees about 10 useful bits: beyond that, you digitise noise (see measurement accuracy). The input range is fixed at 0-3.3 V and analogReference() has no effect on 4.x boards;
PWM has an adjustable frequency and resolution (analogWriteFrequency, analogWriteResolution);
Serial is a USB port (CDC) always available (as long as the USB Type includes Serial), with no adapter;
several hardware serial ports (Serial1, Serial2 and up to Serial7 on the 4.0, Serial8 on the 4.1).
What changes under the hood
The Teensy Arduino core is not a minimal port: it is a core written and hand-optimised by PJRC on the NXP hardware. In practice:
No vendor HAL. Where the STM32 has a generated HAL layer, the Teensy core talks directly to the i.MX RT registers. The code is fast, at the price of being Teensy-specific.
Fast functions.digitalWriteFast(pin, val) and digitalReadFast(pin) compile down to a few instructions (near a register access) when the pin is known at compile time, which makes them useful for generating a fast signal. digitalToggleFast(pin) flips an output in hardware, by writing the port’s toggle register, without ever reading the pin back.
Timing helpers. The elapsedMillis and elapsedMicros types measure an elapsed duration without handling the millis() subtraction yourself.
Register access stays open. You can read and write the NXP registers (or use the CORE_PIN..._PORTSET and PORTCLEAR macros) on critical paths, following the same logic as dropping down to registers on STM32, but without leaving the sketch.
Tip
Not every Arduino library supports the Teensy. Some of them poke at AVR registers (<avr/io.h>), which do not exist on ARM NXP. Before depending on a library, check that it advertises Teensy support (most of the major ones do, and PJRC ships optimised versions of the most common).
Example — A sketch that plays to the Teensy’s strengths
To make the “Arduino comfort plus performance” idea tangible, this sketch uses the Arduino API and helpers specific to the Teensy: a pin toggled with digitalWriteFast, the core frequency, and an elapsedMillis that replaces a blocking delay.
elapsedMillis depuisClignotement; // compteur de temps Teensyvoid setup() { Serial.begin(115200); pinMode(LED_BUILTIN, OUTPUT); delay(200); Serial.print("Coeur : "); Serial.print(F_CPU / 1000000); // 600 sur un Teensy 4.x Serial.println(" MHz");}void loop() { if (depuisClignotement >= 500) { // toutes les 500 ms, sans bloquer depuisClignotement = 0; digitalToggleFast(LED_BUILTIN); // bascule matérielle : on écrit le registre, on ne relit rien } // la boucle reste libre pour d'autres tâches entre deux clignotements}
On the serial monitor you read Coeur : 600 MHz, and the LED blinks without delay, thanks to elapsedMillis, while the loop stays available. This is the bridge made concrete: you program “in Arduino”, but with the tools and the speed of the Teensy.
On the monitor, a single line, printed inside setup(), so once and for all:
Coeur : 600 MHz
The figure is not measured: F_CPU is a compile-time constant, fixed by the core speed chosen before upload. Lowering that speed to save current therefore changes this line without a single edit to the code.
Pitfalls
Reading an output pin back to know its state. The construct digitalWrite(pin, !digitalRead(pin)) is all over web tutorials, and it is wrong in principle: not every microcontroller allows an output-configured pin to be read back, the result depends on the output mode (push-pull or open drain), and on a loaded output the level read can differ from the level driven. Keep the state in a variable, or use the hardware toggledigitalToggleFast(pin), which acts on the output register.
Assuming AVR reflexes. AVR registers, cycle-exact AVR timing, <avr/...>: none of it works on ARM NXP. Go through the Arduino API, the fast functions or the NXP registers.
Believing delay is free. As on any MCU, a delay blocks the loop. On a fast Teensy, there is every reason to structure the code non-blockingly (elapsedMillis, state machines) to exploit the available power (see firmware).
A library incompatible with the Teensy. Check for Teensy support before depending on a library (some are AVR-only).
Applying 5 V. The Teensy 4.x is not 5 V tolerant: shift the level of incoming signals.
Confusing the pin layouts. The pinout differs between the 4.0, the 4.1 and the earlier generations. Refer to the layout of the exact board.
Exercises
Exercise 1 — What frequency?
Print the core frequency at start-up. What is F_CPU on a Teensy 4.x? Compare it with an Arduino Uno (16 MHz).
F_CPU is 600 000 000 on a Teensy 4.x, that is 600 MHz, roughly 37 times the frequency of an Uno (16 MHz). This performance gap is what justifies the Teensy for computation, DSP or audio.
Exercise 2 — Blinking without blocking
Rewrite the Blink withoutdelay, using an elapsedMillis, so that the loop stays free to read a sensor in parallel, for instance.
Solution
elapsedMillis t;void setup() { pinMode(LED_BUILTIN, OUTPUT);}void loop() { if (t >= 500) { t = 0; digitalToggleFast(LED_BUILTIN); } // ... autre travail ici, exécuté à chaque tour sans attendre ...}
elapsedMillis increments on its own. You test it for overrun and reset it. The loop never stalls on a delay, which leaves the processor available: this is the starting point of a responsive firmware (see firmware).
Special case — PlatformIO and register access
PlatformIO handles the Teensy with convenient versioning and multi-file support, useful as soon as the project grows.
Dropping down to registers. For an ultra-critical path, you can write the NXP registers directly from the sketch (or through the CORE_PIN..._PORTSET macros), without changing environment. Same approach as on STM32, while staying “in Arduino”.
Where it fits in the project
Step 4 of the proof of concept phase. The Teensy Arduino core is the environment for the software proof of concept: you move fast, while keeping performance and the signature libraries (audio, USB) within reach. Holding it in reserve means only dropping to the fast functions or the registers where a precise need calls for it.
Reusing an Arduino prototype. A circuit validated on an Arduino often carries over as is onto a Teensy through the core, gaining speed and peripherals.
Understanding that the Teensy core is an optimised kernel laid on the NXP registers (and not a HAL) explains why the Teensy has only one door: no other environment is needed, the performance is already there, reachable in tiers (Arduino API, then fast functions, then registers).