Getting started with the Teensy means installing the Teensyduino add-on in the Arduino IDE, having the board recognised, and uploading a first program through the Teensy Loader. Since the Teensy is programmed inside the Arduino framework, most of the steps are already familiar to anyone who has touched an Arduino. One step is added: installing Teensyduino (support for the Teensy boards). The target program is still Blink (making the built-in LED flash), the embedded equivalent of “Hello World”.
What is it for?
Getting started validates the whole chain in one go: editor, compiler, Teensy support, Teensy Loader, USB link. If one link is broken, Blink does not flash, and you find out straight away, on trivial code, rather than buried inside a complex project.
Beyond the first program, the step has two roles:
Discovering the Teensy Loader. Uploading to a Teensy goes through a small dedicated application that launches automatically. Understanding how it works (and the physical button on the board) saves you from getting stuck later.
Anchoring the gestures. Selecting the board, the port and the USB Type, the Upload button, the serial monitor: these are the gestures repeated in every following tutorial. Anchoring them once on something trivial frees up attention later.
Step by step
Five steps: install the Arduino IDE, add Teensyduino, plug in and select the board, load Blink, upload.
1. Install the Arduino IDE
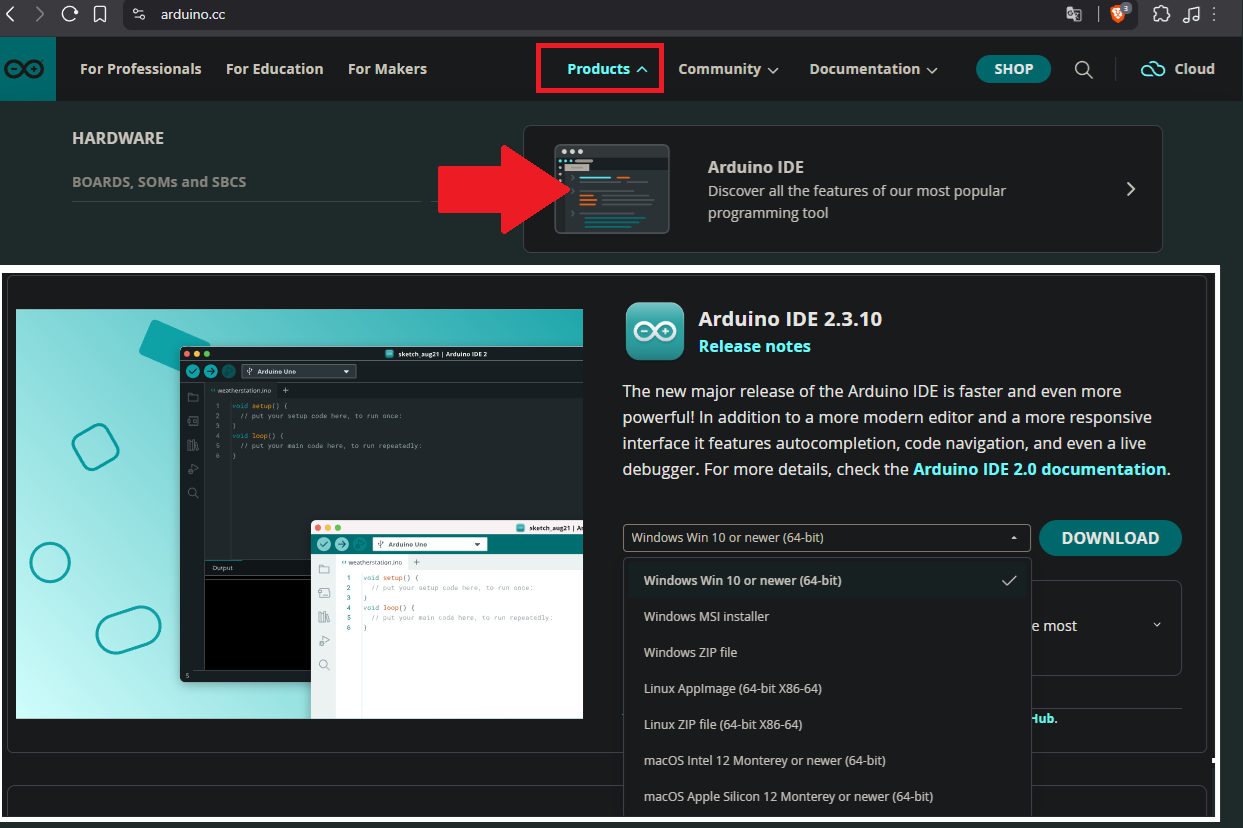
Download the Arduino IDE 2.x from arduino.cc, under Software. It is the recommended IDE. Teensyduino installs into it through the boards manager (step 2). PJRC requires version 2.0.4 as a minimum, and recommends 2.3.10 or later (noticeably faster recompilation).
On recent Windows versions, no particular driver is needed: the Teensy is programmed over USB (HID) and exposes a serial port with no third-party driver.
2. Add Teensy support (Teensyduino)
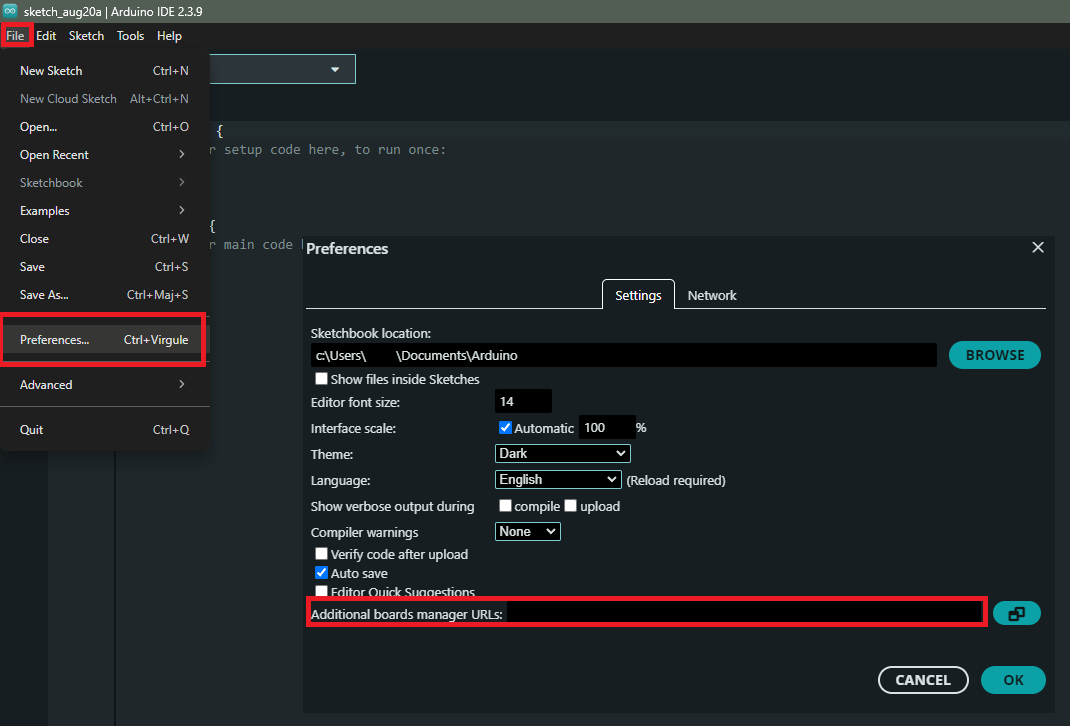
This is the step specific to the Teensy. Open File → Preferences, and in Additional boards manager URLs, add:
Open the boards manager, search for teensy, and install the “Teensy (for Arduino IDE 2.0.4 or later)” package by Paul Stoffregen. It brings the PJRC core, the Teensy libraries (including Audio) and the Teensy Loader.
3. Plug the board in and select board plus port
Plug the Teensy in with a USB data cable (a charge-only cable exposes no port). In the IDE, go to Tools → Board → Teensy and choose your model (Teensy 4.1 or Teensy 4.0). Then Tools → Port.
Leave Tools → USB Type on Serial for this first program (the setting that turns the Teensy into a keyboard, a joystick and so on is covered in the Teensy as a USB device).
Screenshot to take of the Tools menu of the Arduino IDE unfolded, showing “Teensy 4.1” as the board type, the active port, and the USB Type line set to Serial.
4. Load Blink
Type in (or paste) this sketch, which flashes the built-in LED of the Teensy (pin 13):
void setup() { pinMode(LED_BUILTIN, OUTPUT); // LED intégrée sur la broche 13}void loop() { digitalWrite(LED_BUILTIN, HIGH); delay(1000); digitalWrite(LED_BUILTIN, LOW); delay(1000);}
The model is identical to an Arduino: setup() once, loop() forever. Click Verify (the tick icon) to compile: the console shows the binary size, with no red line.
Screenshot to take of the Arduino IDE console after a successful compilation for the Teensy, showing the binary size with no red line.
5. Upload and observe
Click Upload (the arrow icon). The IDE compiles, then the Teensy Loader launches and programs the board.
Tip
If nothing happens on upload. The Teensy Loader sometimes waits for the board to enter programming mode: press the button on the Teensy once. After a first successful upload, the following ones restart the board automatically, with no button. This is the Teensy equivalent of programming mode, simpler than the BOOT manoeuvre on the ESP32.
The LED flashes on a one-second rhythm. The program is running: getting started is validated.
Screenshot to take of the Teensy Loader window during programming, with the Teensy plugged in and the pin 13 LED lit.
Example — Blink, modified
To check that you really control what happens, change the timings:
Upload again: the LED now gives a short flash (100 ms) once a second. This small step — change, upload, observe the expected difference — is the basic gesture of every tutorial that follows.
Pitfalls
Teensy support not installed. Without step 2, no Teensy board appears under Tools → Board. This is the most frequent oversight when coming from a classic Arduino.
Upload stuck for want of programming mode. If the Teensy Loader does not write, press the button on the board once (see the tip above).
A charge-only cable. The board is powered (the power LED is on) but no port appears: swap it for a data cable.
Wiring 5 V out of Arduino reflex. The Teensy 4.x runs at 3.3 V and is not 5 V tolerant: never apply 5 V to a pin (see voltage levels).
The wrong model selected. Choosing “Teensy 4.0” for a 4.1 (or the reverse) can throw off the pinout of some examples. Select the exact model.
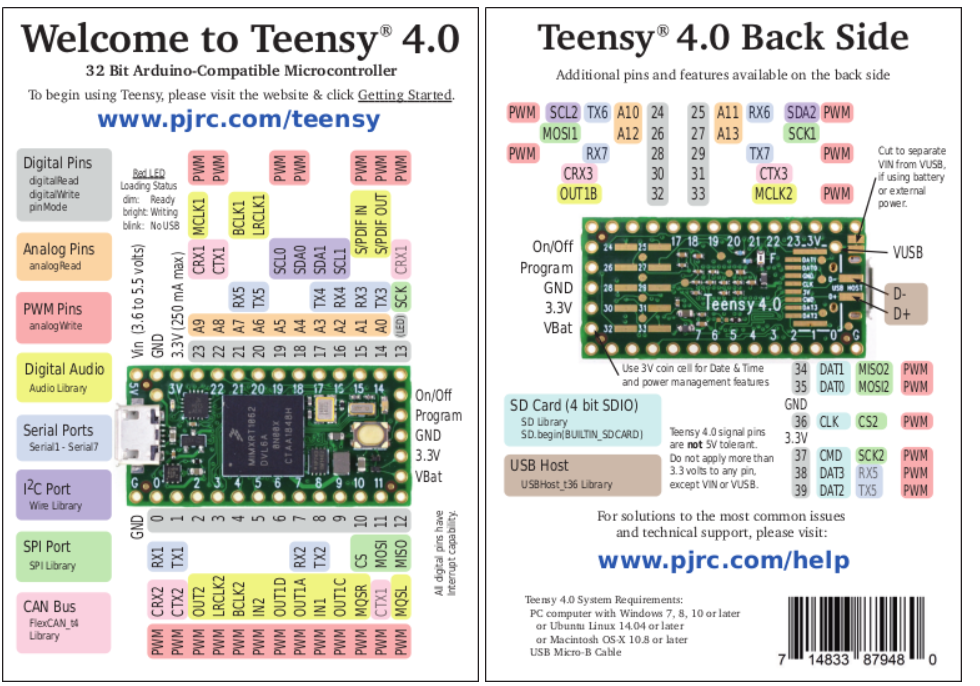
To wire anything beyond the built-in LED (pin 13), for instance on pin 14 in the next exercise, the board pinout is the reference to keep in front of you.
Source: PJRC (Paul Stoffregen).
Exercises
Exercise 1 — Two rhythms
Modify Blink so that the LED stays on for 2 seconds, then flashes quickly three times (100 ms on / 100 ms off), before starting over.
Solution
void setup() { pinMode(LED_BUILTIN, OUTPUT);}void loop() { digitalWrite(LED_BUILTIN, HIGH); delay(2000); digitalWrite(LED_BUILTIN, LOW); delay(300); for (int i = 0; i < 3; i++) { digitalWrite(LED_BUILTIN, HIGH); delay(100); digitalWrite(LED_BUILTIN, LOW); delay(100); }}
The for loop factors out the three flashes. The need for rhythms without a blocking delay comes back when structuring the firmware.
Exercise 2 — An external LED
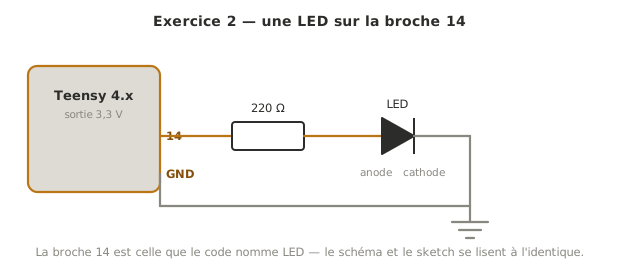
Wire an external LED (with its series resistor of about 220 Ω) to pin 14 and make it flash, without touching the built-in LED. Which line changes?
Solution
Only one thing changes: the driven pin, declared as a const int (a typed constant) rather than a #define.
const int LED = 14;void setup() { pinMode(LED, OUTPUT);}void loop() { digitalWrite(LED, HIGH); delay(500); digitalWrite(LED, LOW); delay(500);}
The LED anode goes to pin 14 through the resistor, the cathode to GND. Careful: the output is 3.3 V, which the resistor value has to account for.
Special case — PlatformIO and the legacy installer
Two variants go beyond the Arduino IDE 2.x:
PlatformIO (a VS Code extension) handles the Teensy with convenient Git versioning and multi-file support, which helps as soon as the project grows.
The legacy Teensyduino installer. For the older Arduino IDE 1.8.x, PJRC provides a separate add-on installer (instead of the boards manager). Keep it for cases where you have stayed on the 1.8.x IDE, and only on Windows or 64-bit Linux: since Teensyduino 1.60, PJRC has dropped support for the 1.8.x IDE on macOS. On a Mac, the 2.x IDE is the only way.
Where it fits in the project
Step 4 of the proof of concept phase. The first compilation and the first upload onto the target board are the founding act of the software proof of concept. Until Blink flashes, no downstream measurement or control loop is credible.
Every downstream Teensy tutorial. Without having actually got started, reading the other tutorials with no way to test amounts to reading code without running it. Do Blink at least once, on the target hardware, as early as possible.
Investing half an hour to validate the complete chain at the start of the proof of concept saves hours of hybrid bugs later, when a tooling problem can no longer be told apart from an algorithm problem.