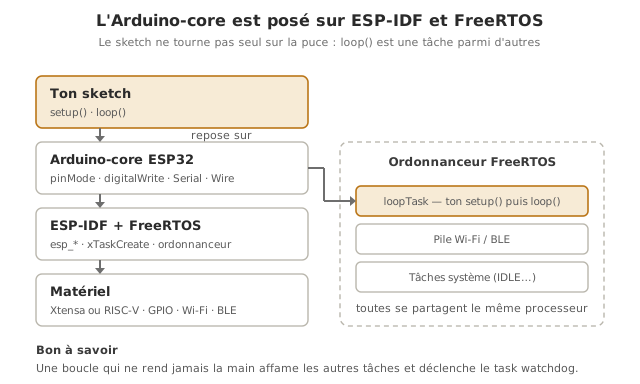
The Arduino core for ESP32 is the software layer that brings the Arduino API (setup(), loop(), digitalWrite…) to ESP32 chips. It is the recommended way in: you reuse the same reflexes as on an Arduino, but with the processing power, the memory and the radios of the ESP32. Under the bonnet, that layer sits on ESP-IDF (Espressif’s native environment) and its FreeRTOS real-time system, which quietly changes a few of the rules. How to structure a firmware, whichever route you take, is covered in firmware.
What is it for?
The Arduino core acts as a bridge:
Reuse what you already know. All the Arduino vocabulary (pinMode, analogRead, Serial, the Wire/SPI libraries…) works as is. Migrating an Arduino project to the ESP32 is often immediate.
Reach the ESP32 capabilities simply. Wi-Fi, BLE, deep sleep, PWM through LEDC: all exposed through simple APIs, with no need to dive into the native environment.
Keep a door open to the native side. From an Arduino sketch you can call ESP-IDF functions (esp_*) directly when you need finer control, without rewriting everything.
This is the right entry point. Moving to the full native environment (ESP-IDF) is only justified by specific needs.
Almost the same code as Arduino
An ESP32 sketch has the shape of an Arduino sketch:
const int LED = 16;void setup() { Serial.begin(115200); pinMode(LED, OUTPUT);}void loop() { digitalWrite(LED, !digitalRead(LED)); delay(500);}
Wiring: the LED on GPIO16 with its 220 Ω resistor (see the circuit in getting started).
setup() once, loop() forever: the model is identical. The differences are platform details, not structural ones: a usual serial rate of 115200 (the one used by the chip’s boot log, where the AVR examples run at 9600), analogRead over 12 bits, PWM through ledcAttach instead of analogWrite, pins at 3.3 V (all covered in configuring the GPIO and the serial monitor).
What changes under the bonnet
The ESP32 Arduino core is not “bare metal” the way the AVR Arduino is: it runs on top of FreeRTOS. In practice:
loop() is a FreeRTOS task. The core creates a task (loopTask) that calls setup() then repeats loop(). Your code therefore shares the processor with the system tasks (Wi-Fi/BLE stack, and so on).
Two cores. The original ESP32 has two cores, and loop() runs by default on one of them. You can create your own tasks and spread them out (see FreeRTOS). Watch out for the variants: the C3, C6 and H2 are single-core (RISC-V), and xPortGetCoreID() always answers 0 there.
Far more memory. Hundreds of kilobytes of RAM (against a few on an Uno): String objects, buffers and heavy libraries fit much more easily.
The native API is within reach.esp_* and the FreeRTOS functions (xTaskCreate, vTaskDelay) can be used directly inside a sketch.
Tip
loop() must hand back control. Since loop() is a task sharing the CPU, a loop that never “breathes” (heavy computation with no delay or vTaskDelay) can starve the system tasks and trigger the task watchdog. A delay() (which, on the ESP32, yields the processor) or a non-blocking architecture avoids the trouble.
Example — A sketch that mixes Arduino and ESP-IDF
To make it tangible that the Arduino core sits on the native environment, this sketch uses the Arduino API and two native functions: the core loop() runs on, and the free memory.
void setup() { Serial.begin(115200); delay(200);}void loop() { // Native ESP-IDF / FreeRTOS API, called from an Arduino sketch Serial.print("loop() runs on core "); Serial.println(xPortGetCoreID()); // 0 or 1 (always 0 on single-core chips) Serial.print("Free memory: "); Serial.print(esp_get_free_heap_size()); // bytes Serial.println(" bytes"); Serial.print("... the same value, seen through the Arduino facade: "); Serial.print(ESP.getFreeHeap()); // Arduino equivalent Serial.println(" bytes"); delay(2000);}
On the serial monitor you read the core number and the free memory, two pieces of information that do not exist on an AVR Arduino, obtained without leaving the comfort of the sketch. The two memory lines print the same value by two routes: esp_get_free_heap_size() is the native function, ESP.getFreeHeap() the Arduino facade laid on top of it. That is the bridge made concrete: you program “in Arduino” while keeping ESP-IDF at hand.
On the monitor, a block of three lines every 2 seconds:
loop() runs on core 1
Free memory: XXXXXX bytes
... the same value, seen through the Arduino facade: XXXXXX bytes
The two memory figures are identical. That is the point of the demonstration. Their value, on the other hand, depends on the board and on the libraries loaded: read it on your own setup.
Pitfalls
Assuming AVR reflexes. Poking AVR registers, relying on cycle-accurate timing, or using <avr/...> does not work: the architecture is different (Xtensa or RISC-V). Go through the core APIs.
A loop that never hands back control. A loop() (or a task) computing permanently with no delay/vTaskDelay triggers the task watchdog (Task watchdog got triggered). Yield the processor regularly.
An Arduino library that does not support the ESP32. Not every Arduino library supports the ESP32 (some of them poke AVR registers). Check ESP32 compatibility before depending on a library.
Believing in “bare metal”. The ESP32 Arduino core shares the CPU with system tasks (Wi-Fi/BLE). Fine timing determinism is not guaranteed the way it is on a bare AVR. For strict deadlines, structure the code into tasks (FreeRTOS) or move to the native side.
Exercises
Exercise 1 — On which core?
Print, once at start-up, the number of the core setup() runs on. Is it the same one as loop()?
setup() and loop() run inside the same task (loopTask), and therefore on the same core (core 1 by default on the original ESP32). To put the other core to work you have to create a task and pin it there (see FreeRTOS).
Exercise 2 — Memory before and after
Print the free memory, then allocate a large String (5000 characters, say) and print it again. What do you observe?
Answer to exercise 2
void setup() { Serial.begin(115200); delay(200); Serial.print("Before: "); Serial.println(esp_get_free_heap_size()); String big = ""; for (int i = 0; i < 5000; i++) big += 'x'; Serial.print("After: "); Serial.println(esp_get_free_heap_size()); Serial.print("Length: "); Serial.println(big.length());}void loop() {}
The free memory drops by roughly the size allocated (a little more, with the management overhead). On the ESP32 those few thousand bytes go through without trouble. On an Uno (2 kB of RAM), the same allocation would crash. This is one of the concrete gains of the platform.
Special case — PlatformIO and Arduino inside ESP-IDF
Two set-ups go beyond the Arduino IDE:
PlatformIO (a VS Code extension) handles the Arduino core and ESP-IDF within a single project, with fine-grained library and version management, handy as soon as the project grows.
Arduino as an ESP-IDF component: you can use the Arduino libraries inside a native ESP-IDF project. You keep the Arduino comfort for some parts while benefiting from the native environment — a bridge in the other direction.
Where it fits in the project
Step 4 of the proof-of-concept phase. Choosing the Arduino core as the environment of the software PoC is the sensible default: you move fast, and you keep the native door open. Holding it in reserve means you only switch to ESP-IDF if a specific blocker demands it.
Reusing an Arduino prototype. A setup validated on Arduino often carries over as is to the ESP32 through the core, gaining connectivity and memory.
Understanding that the Arduino core sits on FreeRTOS (and therefore that loop() is not alone in the world) avoids the watchdog pitfalls and prepares the move to multitasking when the project calls for it.
Going further
FreeRTOS — creating and coordinating several tasks, and using both cores.