ESP-IDF (Espressif IoT Development Framework) is the native development environment of the ESP32: C/C++ built directly on FreeRTOS, organised into components, finely configured. It is the alternative to the Arduino core, for anyone who needs full control of the chip. This page is a survey (when the IDF is justified, what it brings, how to take a first step into it) rather than a full course: getting properly started goes through the Espressif documentation.
What is it for?
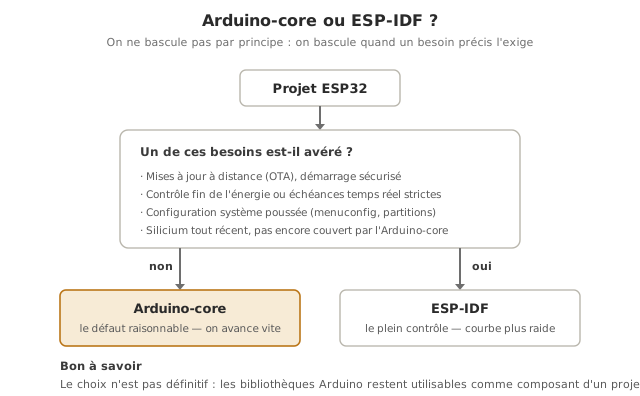
The Arduino core is enough for the vast majority of teaching projects. ESP-IDF comes into its own when you run into one of these needs:
- Fine control of power and real time — precise handling of sleep modes, task scheduling under control, strict deadlines.
- Production features — over-the-air updates (OTA), secure boot, Flash encryption, custom partitions.
- System configuration — enabling and tuning components in detail (network stack, BLE, drivers) through a dedicated configuration menu.
- The newest silicon, straight away. A new Espressif chip is supported by the IDF as soon as it ships, sometimes before the Arduino core.
Tip
Do not switch too early. The IDF has a steeper learning curve. The right reflex is to stay on the Arduino core as long as no specific blocker forces the move, and to migrate only the part concerned once the need is established.
What the IDF brings (and what it changes from Arduino habits)
app_main()instead ofsetup()/loop(). The entry point is anapp_main()function. There is no loop imposed on you: you explicitly create your own FreeRTOS tasks (see FreeRTOS).- The
idf.pycommand-line tool. Creating, configuring, building, flashing and monitoring are all driven by commands (idf.py build,idf.py flash monitor), scriptable and reproducible. - Configuration through
menuconfig. An interface (idf.py menuconfig) sets hundreds of options (CPU frequency, stack sizes, network options…), stored in ansdkconfigfile. - Component architecture. The code is split into reusable components, each with its own
CMakeLists.txt— close to the module-splitting logic of firmware.
First steps (orientation)
Without going into detail, the way in looks like this:
- Install the IDF — through the official installer (Windows) or the ESP-IDF extension for VS Code, which downloads the toolchain.
- Create a project —
idf.py create-project my_project, or start from thehello_worldexample that ships with it. - Configure —
idf.py set-target esp32(or the variant you are targeting), thenidf.py menuconfigif needed. - Build, flash, observe —
idf.py build,idf.py -p PORT flash,idf.py -p PORT monitor.
The minimal structure of an IDF program fits in one function:
#include <stdio.h>
#include "freertos/FreeRTOS.h"
#include "freertos/task.h"

void app_main(void) {
    while (1) {
        printf("Hello from ESP-IDF\n");
        vTaskDelay(pdMS_TO_TICKS(1000));   // FreeRTOS: yield for 1 s
    }
}
No setup()/loop(): app_main() is called once, and it is up to you to build the loop or the tasks inside it. FreeRTOS shows up immediately (vTaskDelay).
The bridge with Arduino
The two worlds are not sealed off from each other:
- Arduino as an ESP-IDF component. You can use the Arduino libraries inside an IDF project, to keep the Arduino comfort on some parts.
- PlatformIO handles both environments in a single project.
In other words, choosing the IDF does not mean giving up everything learned with Arduino: you combine them.
Pitfalls
Switching prematurely. Moving to the IDF “to do things properly” without a real need costs time for no gain. Stay on the Arduino core as long as no specific blocker forces the migration.
Drowning in menuconfig. Hundreds of options: only touch what an identified need requires, and leave the rest at its default.
Forgetting that everything is FreeRTOS. In the IDF there is no hidden loop: with no task and no loop inside app_main(), nothing you wrote runs: the function returns, its task is deleted, and only the system tasks are left. Multitasking is explicit from the start.
Exercises
Exercise 1 — Arduino core or ESP-IDF?
For each of these projects, which would you choose, and why? (a) A connected thermometer that publishes one measurement per minute. (b) A commercial product that needs secure over-the-air updates. (c) A robot prototype for a course.
Answer to exercise 1
- (a) Arduino core. Simple need, standard connectivity: you move fast, and the IDF would bring nothing useful here.
- (b) ESP-IDF. Secure OTA and secure boot are production features that the IDF exposes fully: precisely one of its use cases.
- (c) Arduino core. Teaching prototype: the priority is iteration speed and reuse of what has already been learned with Arduino.
The rule: Arduino core by default, IDF when a specific need (production, fine control) justifies it.
Exercise 2 — A first
hello_worldWithout writing any new code: describe the sequence of
idf.pycommands to build, flash and observe thehello_worldexample on a board plugged into portCOM5.
Answer to exercise 2
idf.py set-target esp32      # target (or esp32c3, esp32s3...)
idf.py build                 # build
idf.py -p COM5 flash         # upload
idf.py -p COM5 monitor       # serial monitor (Ctrl+] to quit)
You can chain flash and monitor:
idf.py -p COM5 flash monitor. The logic (set the target, build, flash, observe) is the same as in the Arduino IDE, but in reproducible commands, which is where the value lies in continuous integration.
Where it fits in the project
- Step 4 of the proof-of-concept phase. The PoC is almost always carried out on the Arduino core. Identifying whether and where the IDF will become necessary (OTA, power, strict real time) is a decision worth raising early, without necessarily implementing it in the PoC.
- Moving towards a deliverable. If the project aims at a product rather than a prototype, the production features of the IDF (OTA, security) belong in the technical design file.
Knowing that the IDF exists and when to reach for it avoids two symmetrical mistakes: staying stuck on the Arduino core in the face of a need it does not cover, or making life difficult in the IDF with no necessity.
Going further
- Programming with the Arduino core — the starting environment, on top of which the IDF is a step up in demands.
- FreeRTOS — the real-time core, everywhere and explicit in the IDF.
- Firmware — splitting into components and modules (cross-cutting).
- Espressif ESP-IDF getting started guide — installation and first project, step by step.
See also
- ESP32 — hub for the ESP32 tutorials
- Programming with the Arduino core — the recommended alternative to start with
- FreeRTOS — the native real-time system
- Firmware — structuring embedded code (cross-cutting)