MicroPython is a lightweight implementation of Python 3 that runs directly on a microcontroller. Instead of compiling and then uploading a binary (as in C++/Arduino), you install a MicroPython firmware on the board once, and it then runs a Python interpreter: you talk to the board live from the keyboard (the REPL) and drop .py files onto its memory. This is the scripted approach to embedded work — readable and immediate. This page is the hub that gathers every MicroPython tutorial, organised like the Arduino module, from the first LED up to engineer level. The reference board for this path is the Raspberry Pi Pico 2, but MicroPython programs plenty of other boards just as well (see below). The overview of the families and the help in choosing one stay with microcontroller.
Tutorials
The tutorials of the MicroPython module, in the recommended order. Items marked (cross-cutting) are shared pages of the skeleton, valid for every family. The rest is specific to MicroPython. The language replaces the C++ page here: MicroPython has a learning path of its own.
Where to start? With getting started: install Thonny, flash the firmware and run a first program on the board. The rest follows in order, or gets picked up as the project needs it.
Getting started
- Getting started with MicroPython — install Thonny, flash the firmware, write and run a first program;
- Simulating with Wokwi — test a Pico + MicroPython setup online, before touching hardware.
Learning the basics
- The MicroPython language — Python on a microcontroller: a learning hub (types, control flow, functions, modules);
- Logic levels (cross-cutting) — 3.3 V, the Pico 2 is not 5 V tolerant;
- Configuring the GPIO —
machine.Pin, input / output / pull modes; - Talking back:
print()and the REPL — the equivalent of the serial monitor (the interactive shell doubles as a console); - off input — button or switch, plus debouncing;
- off output — LED, relay;
- Reading a digital sensor;
- Reading an analog sensor — through the
ADC; - Driving a PWM output;
- Timing delays —
time.sleep()versustime.ticks_ms(); - Using a library —
import, modules, installing withmip; - Reading a datasheet (cross-cutting) — where to find Vin, logic levels and maximum current, at wiring time;
- Wiring a module · Using a shield;
- Powering the board — USB / VSYS, voltage range, maximum current.
Advanced topics
- Communication, by protocol: UART · I2C · SPI (cross-cutting concept pages: communication buses);
- Debugging a program;
- GPIO states at power-up — default levels, sensitive pins;
- Actuators: servo · DC motor (H-bridge) · stepper motor;
- OLED display;
- Non-blocking programming — getting out of the blocking
sleep(), a prerequisite for the state machine; - State machine (→ concept page State machine);
- Persistent storage — files on the flash, or an external EEPROM.
Engineer level
- Interrupts (→ concept page Interrupt);
- Hardware timers (→ concept page Timer) —
machine.Timer; - Bit manipulation (cross-cutting) — registers, masks, low-level access;
- Deep sleep (→ concept page Deep sleep) —
machine.lightsleep/deepsleep; - PID control — the control loop;
- Memory management (→ concept page Memory) — RAM, garbage collector (
gc); - Watchdog —
machine.WDT, firmware robustness.
More tutorials will fill in these levels as projects come along. How embedded code is structured overall stays with firmware.
Why MicroPython?
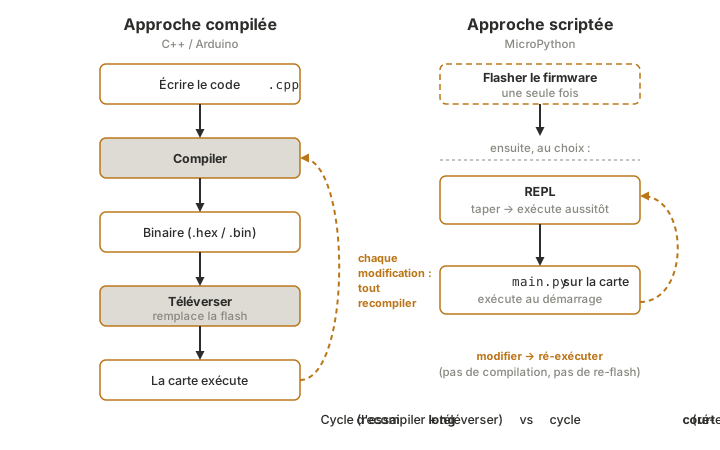
MicroPython occupies a niche of readability and fast iteration, not one of raw performance. What it brings:
- Python, readable and already familiar — many students arrive with some Python behind them, and put it straight to work on hardware;
- no compilation — edit a file, run it again, see the result, and the try-it cycle is close to instant;
- the REPL — an interactive shell runs on the board: you try one line (
Pin("LED", Pin.OUT).on()) and the result is immediate, ideal for exploring a sensor or a module; - short code — dynamic typing and no verbose declarations: a program fits in a handful of lines.
In exchange, MicroPython is slower and less deterministic than compiled C++ (the interpreter adds overhead and the garbage collector can introduce pauses), and it leaves less usable memory. It is the right choice for learning, prototyping, scripting — less so for tight real time or maximum performance, where you go back to Arduino/C++ or to the STM32. That decision is made with the help in choosing on the microcontroller hub.
Board overview
The reference board here is the Raspberry Pi Pico 2, but the table sums up the essentials of the range.
Info
This table is a teaching reference, to be confirmed on
raspberrypi.combefore locking in a choice (part numbers and availability change).
| Board | Chip | Core | Notable feature |
|---|---|---|---|
| Pico 2 | RP2350 | 2× Cortex-M33 (or 2× RISC-V), 150 MHz | the reference board of this module; more RAM than the Pico 1 |
| Pico 2 W | RP2350 | same | adds Wi-Fi / Bluetooth (CYW43 chip) |
| Pico / Pico W | RP2040 | 2× Cortex-M0+, 133 MHz | previous generation, still widespread and compatible |
All of them are programmed the same way in MicroPython. The choice comes down to Wi-Fi (the W variant) and to processing power (RP2350 versus RP2040). The board exposes a USB connector for power and programming, and a row of 3.3 V GPIO pins.
Ecosystem
- The MicroPython firmware — a
.uf2file to install once on the board (see getting started). After that, the board is a Python interpreter. - Thonny — the reference beginner IDE: it flashes the firmware, opens the REPL, and manages the
.pyfiles on the board (includingmain.py, which runs at start-up). - The REPL and the file system — you type commands live, and you save your programs as files on the board. This is the heart of the MicroPython model.
- The modules —
machine(hardware access:Pin,ADC,PWM,I2C…),time,network(on Wi-Fi boards)… plus library installation withmip(see libraries).
MicroPython is not tied to the Pico alone: the same language and the same approach program the ESP32, the Pyboard range, and several recent Arduino boards (Nano RP2040, Nano ESP32…). This module is anchored on the Pico 2 because that is the board used in class, but the path carries over. How to structure embedded code belongs to firmware, whatever the board.
See also
- Microcontroller — parent hub: overview of the families and help in choosing
- The MicroPython language — the learning path for the language itself
- Arduino — the compiled approach (C++); same curriculum, opposite paradigm
- ESP32 — another common MicroPython target (and Wi-Fi/BLE)
- Firmware — structuring embedded code (cross-cutting)
- Logic levels — 3.3 V logic (the Pico 2 is not 5 V tolerant)