Getting started with a Raspberry Pi means installing its operating system on a microSD card, booting it with no screen and no keyboard (in headless mode), and connecting to it remotely over SSH to run your first programs there. It is very different from getting started with a microcontroller: you do not flash a program, you install a computer, which you then drive like a remote Linux machine. Once that base is in place, writing code (in Python most of the time) and driving the hardware becomes immediate.
What is it for?
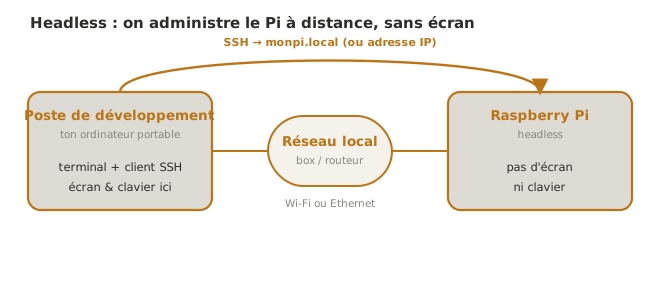
Before you can do anything useful with a Pi — read a sensor, do vision, serve a web page — you need a system that boots and a way to reach it. This step validates both. On a project, you almost never plug a screen into the Pi embedded in the mock-up: it lives headless, powered and connected to the network, and you administer it from your own laptop. Mastering that mode from the start builds the right reflex for the whole rest of the project.
1. Choosing and flashing the system
The official tool is Raspberry Pi Imager (downloadable from raspberrypi.com, available for Windows / macOS / Linux). It writes an operating system image onto a microSD card, which becomes the Pi’s “disk”.
Insert a microSD card (16 GB or more, of decent quality) into your computer, launch Imager, and make the three choices it offers: the Pi model, the system, and the storage (the SD card).
For the system, Raspberry Pi OS is the default choice, and it comes in two flavours that matter:
- Raspberry Pi OS Lite — no graphical interface. This is the right choice for an embedded Pi driven over SSH: lighter, faster to boot, less useless surface.
- Raspberry Pi OS (with desktop) — with a graphical desktop. Useful if you plug in a screen, heavier for headless use.
2. Preparing the headless boot — before flashing
This is the key step of screenless mode, and it is settled before the card is written. Imager offers an OS customisation (a window appears at the end, or through Edit settings / Ctrl+Shift+X). There you configure everything that would otherwise demand a screen at first boot:
- the hostname,
monpifor instance, which will serve to reach the card on the network; - a user name and a password: recent versions of Raspberry Pi OS no longer create a
piuser by default, so it has to be defined here; - the Wi-Fi credentials (SSID + password) if the Pi connects without a cable, otherwise an Ethernet cable is enough;
- enabling SSH (Services tab) — indispensable for the remote connection. Choose password authentication (simple) or key authentication (safer).
Take a screenshot of the “General” tab of the Raspberry Pi Imager OS customisation, with the hostname, user name and password fields, and the Wi-Fi settings.
Take a screenshot of the “Services” tab of the Raspberry Pi Imager OS customisation, with the “Enable SSH” box ticked.
Confirm, then start the write. Imager writes the image, applies your settings, then verifies the card (a few minutes).
Warning
Without this preparation, a headless Pi is unreachable. If you flash the image without enabling SSH or configuring the network, the card will boot fine but you will have no way in without plugging in a screen and a keyboard. It is the most frequent mistake of the first attempt.
3. First boot and SSH connection
Insert the card into the Pi, plug in its power supply (see the pitfall below), and be patient: the first boot takes longer (the system expands the partition and applies the configuration), reckon on one to two minutes.
From your computer, on the same network, open a terminal and connect:
ssh monutilisateur@monpi.localThe .local suffix works thanks to local name resolution (mDNS). If it fails on your network, use the Pi’s IP address directly (visible on your router’s dashboard, or through a network scan). On the first connection, SSH asks you to confirm the machine’s fingerprint (yes), then the password set in Imager.
Once the connection is accepted:
monutilisateur@monpi:~ $
The prompt changes: you are inside the Pi. Everything you type runs on the card, remotely.
4. Running a first Python program
Python 3 is preinstalled. Check it, then launch the interactive interpreter:
python3 --version
python3
>>> import platform
>>> platform.machine()
'aarch64'
>>> print("Bonjour depuis le Pi !")
Bonjour depuis le Pi !
>>> exit()For a real file, create bonjour.py with the command-line editor nano:
nano bonjour.pyimport platform
print("Bonjour depuis", platform.node(), "—", platform.machine())Save (Ctrl+O, Enter), quit (Ctrl+X), then run:
python3 bonjour.pyThe program runs on the Pi and prints its name and its architecture. The system is running, access is validated: getting started is done. The next step is to make that program talk to the physical world: driving the GPIO from Linux.
Pitfalls
Undersized power supply. This is the Pi’s number one pitfall. A weak phone charger causes voltage drops: spurious reboots, corrupted SD card, erratic behaviour. A Pi 5 calls for a high-current USB-C supply (~5 V / 5 A); a Pi 4, ~5 V / 3 A. A lightning bolt shown on screen (or reported in the logs) indicates an undervoltage, to be fixed as a priority.
SSH not enabled / network not configured. Seen above: without headless preparation, no access. Reflashing the card with SSH ticked is faster than trying to work around it.
Poor quality microSD card. Low-end cards are slow and fail. A corrupted card shows up as a system that no longer boots. Prefer a branded card of a fast class, and back the image up once the system is configured.
Cutting the power abruptly. Like any computer, the Pi writes to its “disk” (the SD card). Unplugging without a clean shutdown (sudo poweroff) risks corrupting the system. Always shut down properly before cutting power.
Wrong network. SSH only works if your computer and the Pi are on the same network. On a segmented school network, .local can be blocked — go through the IP address, or use a direct Ethernet cable.
Going further
Beyond this first boot, administering the system — updating packages (apt), installing libraries, starting services at boot, securing access — belongs to Linux administration, a field of its own. This wiki stops at the useful threshold: a Pi that boots, reachable over SSH, ready to run Python. For the rest, the official Raspberry Pi documentation and a Linux course are the right resources.
- Raspberry Pi OS and Imager — download and official guide.
- Raspberry Pi documentation — installation, configuration, troubleshooting.
See also
- Raspberry Pi — hub of the SBC module
- Driving the GPIO from Linux — the next step: talking to the hardware
- Operating system — what the OS layer brings (and costs)
- Microcontroller — parent hub, an overview of the families and help choosing