The risk matrix is the tool for anticipating the hazards of a project: identify the main risks, rate them by likelihood and severity, and decide on a response for each (prevention, mitigation, fallback plan). On a school project 5 to 10 major risks are enough. What counts is not how exhaustive the initial list is but how regularly it is updated, at every phase review.
What is it for?
The risk matrix takes the hazards of a project out of the implicit. Every project meets its share of setbacks: a component out of stock, a 3D printer down, a teammate ill, a technical building block that turns out harder than expected. With no formal matrix those hazards arrive as surprises and the team is left absorbing them. With one, they have been anticipated and a response is already in place.
Three roles:
- Naming what could go wrong. What is named can be prepared for. What is left unsaid comes as a surprise. The act of writing a risk down, however improbable, changes the stance of the team.
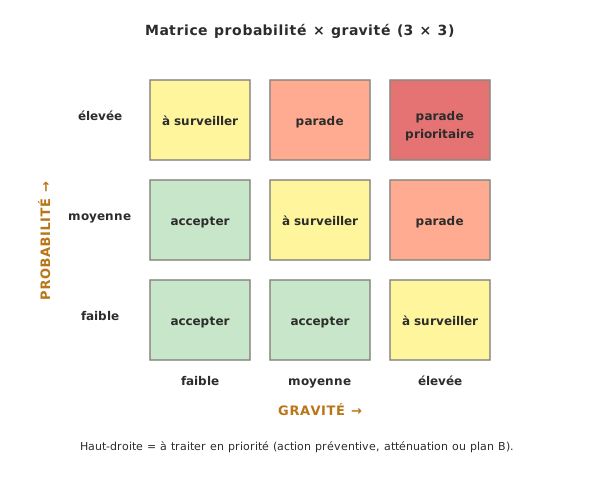
- Prioritising the prevention effort. Not all risks are equal. A risk that is both likely and severe deserves a preventive action, a risk that is unlikely and minor can be ignored. Rating on likelihood × severity makes that prioritisation explicit.
- Acting as a compass at phase reviews. At every review the matrix is reread: which risks have materialised (and what has been learned), which no longer apply (to be removed), which have appeared (to be added). It is a living tool, not an opening checklist.
How do you build one?
Three steps:
- Identify the risks by team brainstorm, working systematically through the families: technical (a building block not mastered, a borderline sizing), schedule-related (external dependencies, fablab windows), human (absences, people leaving on work placement), logistical (suppliers, deliveries), regulatory. Five to ten major risks are enough on a school project. Beyond that the list dilutes and loses its prioritising effect.
- Rate each risk by a likelihood × severity pair on a simple scale (low / medium / high on each, or a 1-3 rating on each axis). The aim is not statistical precision but the ranking of the risks against one another.
- Define a response for the risks in the top-right of the matrix (high likelihood × severity): a preventive action (which cancels the risk), mitigation (which reduces its impact), or a fallback plan (which sets out a response should the risk materialise). Each response names an owner and a deadline.
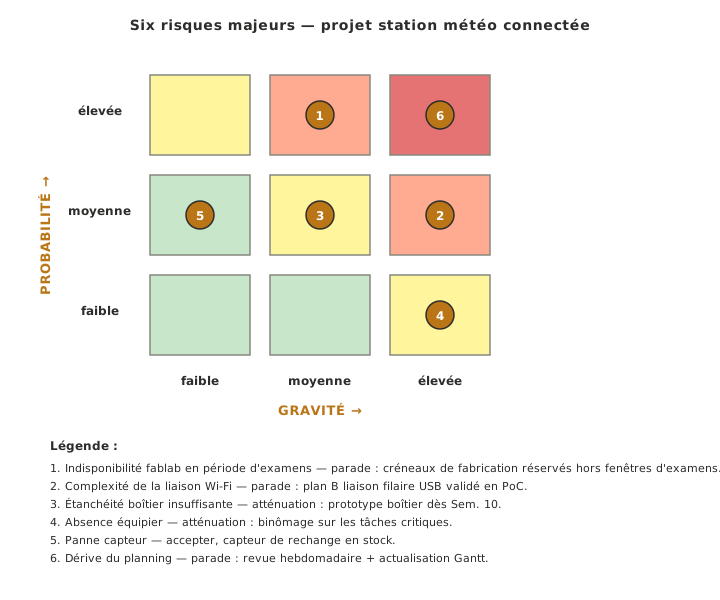
A worked case: six major risks placed on a connected weather station project, with their responses.
Pitfalls
A matrix produced once and forgotten. A risk matrix frozen at the start of the project is worth little: risks change, some materialise or disappear, new ones show up along the way. Its value lies in being updated regularly, at every phase review.
Confusing a risk with a known difficulty. “We have never made a PCB” is not a risk, it is a gap to be filled by training or by help. A real risk is an uncertain event that may or may not happen — a 3D printer breakdown, a component going unavailable, a teammate away.
A vague response. “Be careful”, “anticipate”, “stay alert” are not responses. They are intentions. A response names a concrete action, its owner and its trigger (“order the critical component at the start of the concept phase, owned by X, triggered when the concept is approved”).
See also
- Technical specification — step 5, where the initial risk matrix is built
- Project planning and tracking — the cross-cutting thread that keeps the matrix alive through the project
- Eco-design — environmental and regulatory risks built into the matrix
- Safety and quality — safety and compliance risks that cross over into it
- AMDEC — analysis of product failures, the counterpart to the project risk matrix
- Milestones — the appointments at which the matrix is updated